At this stage of the build internally there is only really the bedroom, snags and trims (windows, ceiling edges and doors) left to do. I am currently in Australia having a bit of RnR so this is a reflective post to show the build at its present state and go through the things I have learnt along the way. I could plan all I like but as I haven’t lived on a boat before there was always going to be a few wrong design decisions.
Table Of Contents
Logistics
It seems crazy how I thought I could do the boat in 6 weeks (am not exactly a glass half full type of person), in the end it took 5 months and I still didn’t complete everything. Circumstances came together in that I found a boat whilst working my notice period, ideally it would have been better to start this as a side project whilst still in fulltime employment. That said, if I didn’t do it in this manner I would still be doing it up now.
Living on the boat put added pressure on me to get the build complete, this obviously effected some of the decisions I made as I was rushing. Like most things in life, sometimes you have to step back and take a bit of time to re-evaluate things as you can get tunnel vision and don’t see the obvious alternative options.
- Time: I should have approached this as a weekend project for first few months before starting full time on it and ideally not moved onto it until it was nearer completion
- Location: I either needed a car, a location that had better public transport or even better rented a house backing onto the canal. The need to mail order everything or hire a van limited some of the materials and drove up the costs
- External storage: Would have been better to have a lockup to store things from the rip out as well as any new materials. There were many times I needed some of the wood I had thrown away or jobs were delayed waiting for goods to arrive
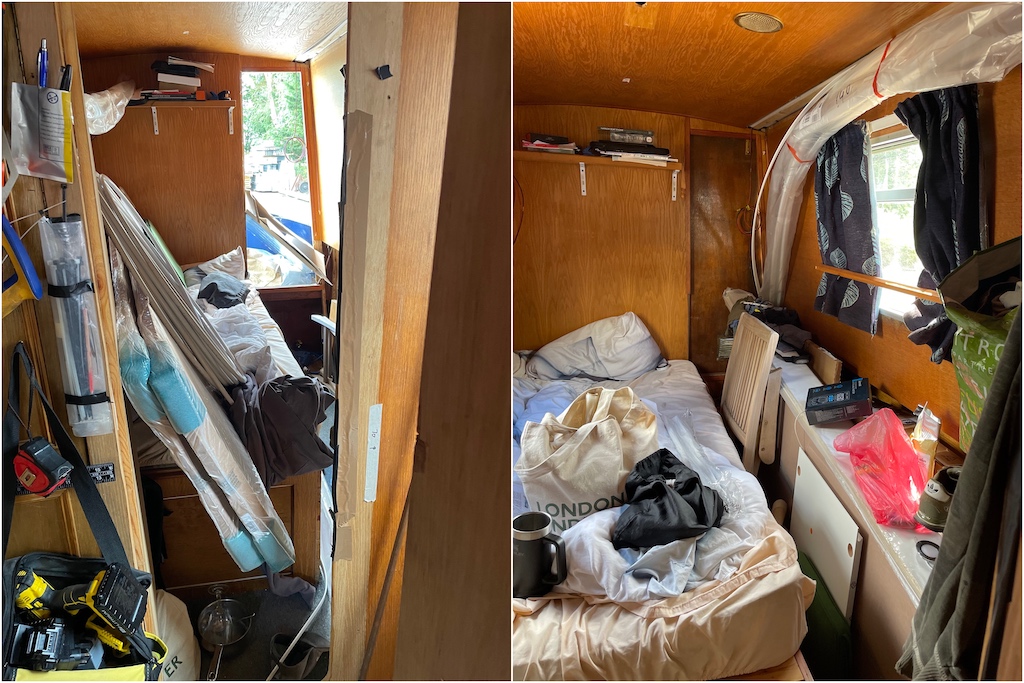
- Don’t live on it: Apart from the dust and mess, personnel artifacts fill up the space meaning you are constantly moving things whilst working and having to put them back in place at the end of each day
- Find a local timber merchant: Wood is the main thing involved with most internal elements of the boat. It would be a good idea before starting the build to find a local supplier you can get everything from and therefore negotiate trade rates
If you had a bigger boat you could possibly seal a living section off but if not you have to accept that you are going to be living in dust and mess for the majority of the build. For example, I was living and storing supplies in the bedroom so was constantly move things just to be able to sleep.
Bilge, Ballast and Weight Distribution
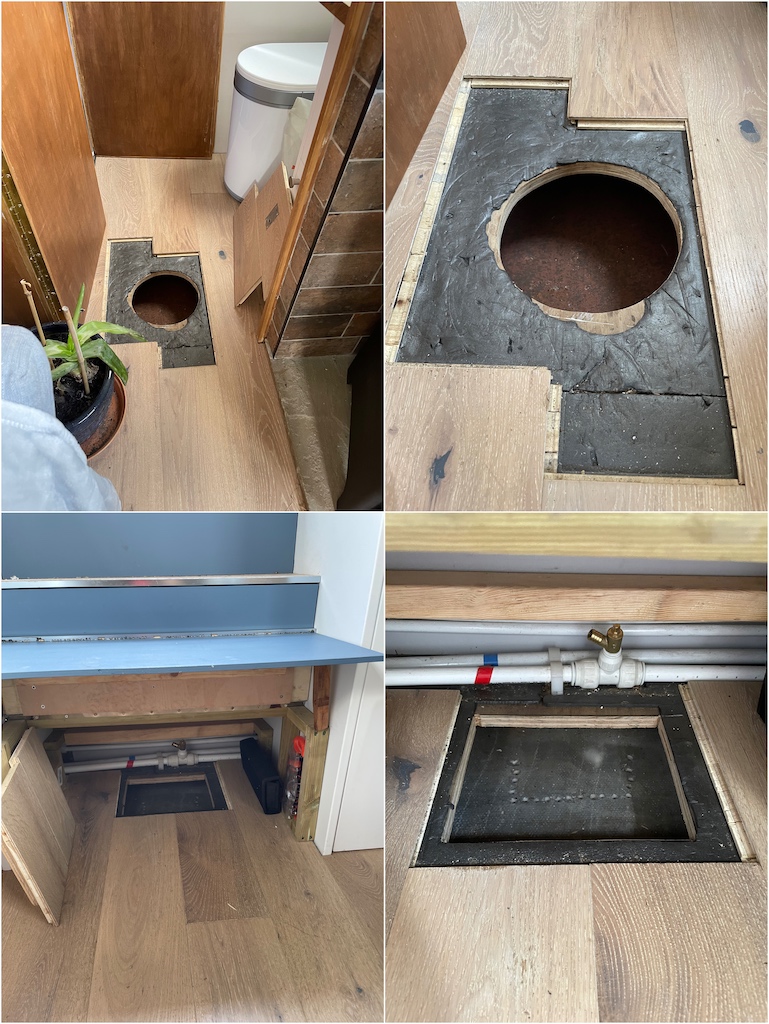
The area under the floor is called the bilge, the ballast in the bilge balances the boat ensuring that the stern is heavier than the bow. There needs to be access to the bilge to check that it is dry, be it from internal service leaks or defects in the hull. I cut access hatches along the centre of the boat in the bathroom and under the stairs at the stern. The stern bilge access hatch is not great as I assumed the ballast would be bricks rather than paving slabs which are too big to move to provide unrestricted access. I should have cut the hatches at an early stage in the build when I could have taken the floor up, it would have also been beneficial to put extra hatches under the kitchen cabinets as they wouldn’t need covers.
In terms of balancing weight, when I designed the layout I spread out the heavy things such as kitchen cabinets, log burner and calorifier across opposite sides. However there are a few things I overlooked which should have also been accounted for:
- AGM batteries weigh double compared to normal lead acid. I had to spread them out across sides in the engine bay to distribute the weight
- The shower tray weighed more than I thought as it was concrete rather than plastic
- The space under the sofa and bed is your major storage space, for this reason it is probably best to ensure these are on opposite sides of the boat to naturally distribute weight
Static things such as kitchen cabinets, oven, calorifier and stove cant be installed before the floor is put down so that weight always has to be judged beforehand. I should have installed the shower and batteries sooner in the build (I didn’t do so until post kitchen and stove) and then I could have possibly taken some ballast out before putting my sub-flooring down to counter weight them. If the ballast was bricks rather than slabs it would be a lot easier to remove ballast from the access hatches rather than needing to lift flooring.
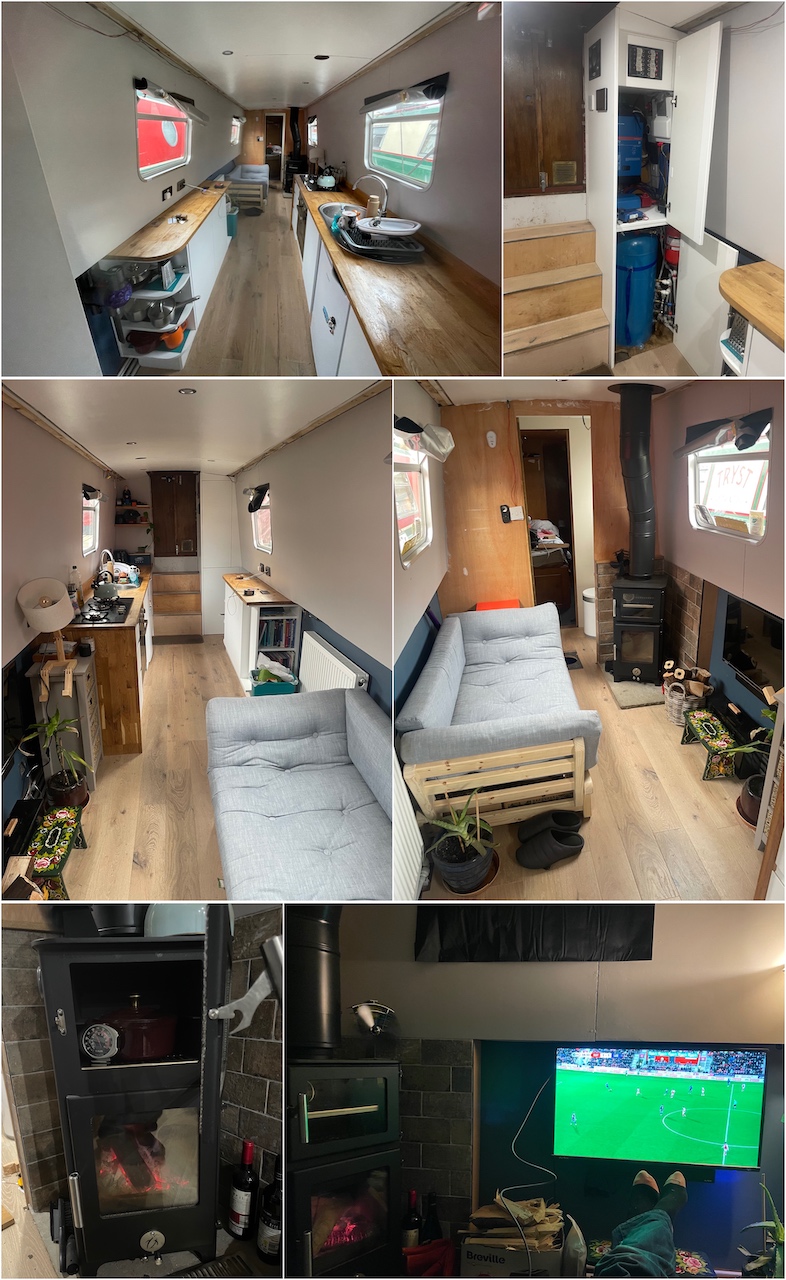
Galley and Saloon
When moving on to a boat you have no choice but to downsize, this is especially difficult for the galley if you enjoy cooking. Due to the boat only being 45ft long there was always going to be sacrifices and compromises made, the idea behind the original layout was to have the galley and saloon flow as if the one room rather than trying to split them between a dinette.

This design doesn’t really work as I thought it would do, below is a list of issues I have with this area:
- There isn’t really sufficient room on the port or starboard side to fit a table
- The shorter depth of the port side worktop is not really big enough to be of any real use
- The stern of the boat is lower than the bow, therefore the sink drainer should be on the left of the sink (bow side) so that it drains into the sink
- The radiator as well as piping takes up vital width space needed for the sofa, may have been better to have a wall radiator on the end wall (opposite side of shower wall)
- The sofa sticks out slightly too far into the middle of the boat. If I had made a custom sofa it could have been built around the pipes allowing it to go further under the gunnel
- Could do with an extra radiator in the gap next to electric cupboard as this is wasted space, it would also counteract the cold draft from doors
- The stern top step should open upwards as it holds mooring apparatus that you normally need to gain access to whilst leaning into the boat from the stern deck
If I was mad enough to do it again I would have the sink on the port side and make the starboard side with the hob into a L-shape to allow room for a fitted dinnete. This is not really an option due to hassle of welding up redrilling the sink waste so instead I plan to remove the bookcase and make the port side cupboard full depth which should give me enough room for a table and built in chair on the port side.
The galley is a lot more niche than a standard house kitchen due to the gunwale and limited space. Rather than buying flat pack kitchen cabinets it would probably be better to make the cabinets yourself and just buy the cupboard doors. Standard flat pack draws don’t really work as there is not enough friction on them, also the below cabinets plinth could be better utilised with draws or full length cabinets.
Despite the issues the majority of it has come out well, itis still missing a few finishing touches. The log burner may have been a bit excessive, but it and the fireplace are my favorite part and due to its builtin stove I don’t have a need to use the gas oven in winter.
Electrics
The electrical diagrams were a major success. Although they took a long time to do they were super useful and saved a ton of time when doing the actual fit out. The only reason they are done in Visio is because I started them whilst still in work (was a full on Microsoft shop), if it wasn’t for that I would have used Lucidchart as in my view is a lot more fluid and easier to use.
The 240v electrics was pretty straightforward as I already have experience in that, however the 12v side was always going to have unavoidable mistakes as it was a case of you only really learn once you use.
- I should have used the more expensive heat shrinks that contain adhesive to reinforce all the crimps from day1 as the non adhesive versions are not that great
- I went a bit over the top with the 12v sockets, if I had know how difficult they are to fit I wouldn’t have put half as may in. Ideally you need lots of USB and the odd cigarette lighter socket
- The lighting RF receivers cause a low pitched squeal when dimmed at certain levels. Is more of an annoyance rather than an issue, however really I should have tested one of these out before buying and fitting all of them. At the time I though it was overkill to have wifi receivers however in hindsight it could have been useful when coming back to boat late at night or for security when away
- In the past few months Drift Pro lithium batteries have been released which seem to address a lot of the issues I saw with lithium when looking at batteries. They have heat pads in the base so can go in the engine bay, are fully compatible with victron (plug and play Victron integration) and fairly reasonably priced
Insulation and Condensation
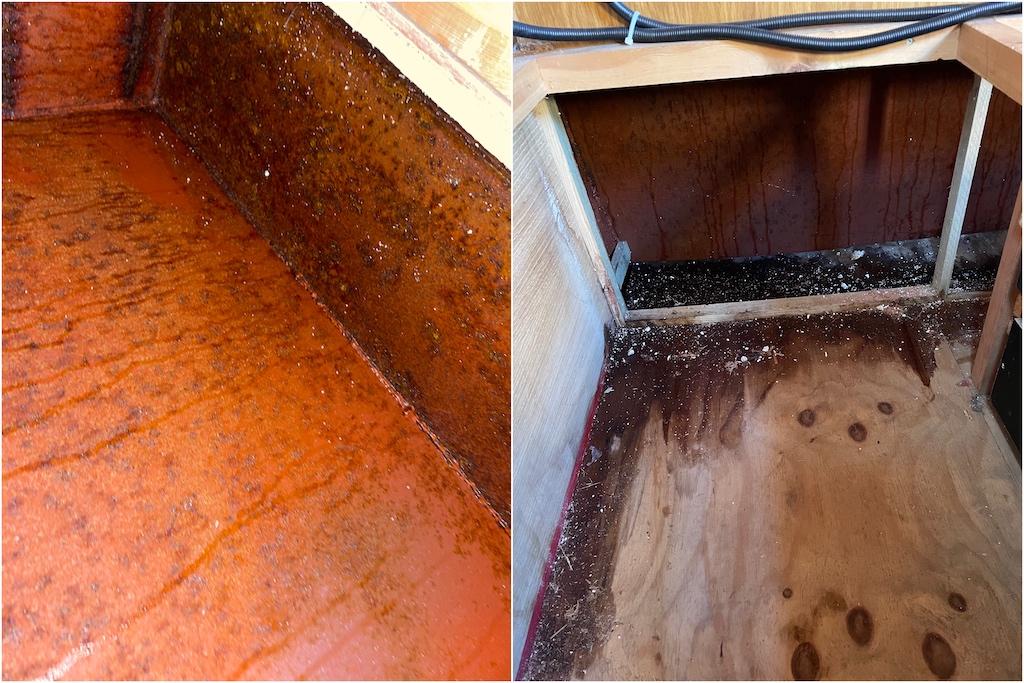
As with houses the insulation on older boats is never going to be as good as you get on newer boats unless you replace it all. Mine has polystyrene foam, these days people tend to use thermal insulation board or spray foam. I always thought it was only for heat retention, however after my first winter on the boat I now understand that it is equally as important for condensation. Condensation will form on any area of metal that isn’t insulated, it is normally worse in the bedrooms (unless you can sleep without breathing). For example there was no insulation under the front deck and water tank, you can see in the images how much damp this created.
I was never planning to remove wall panels so am going to live with the level of insulation I get from the polystyrene. However, I have used expanding insulation foam to cover any metal not insulated (like ceiling beams) or gaps between polystyrene sheets. If I was to fit out a new boat i would go for spray foam as at least that way you know you have completely covered every last bit of metal.
As condensation occurs when moisture-packed warm air comes into contact with a chilly surface the other main area for it on a boat is obviously the windows. You could put double glassing in but is expensive and will that just move condensation to other areas? A dehumidifier is not really an option if not on shorepower so my plan is to ensure I have as much ventilation as possible and invest in a window vacuum.
Bathroom
The original idea behind the bathroom layout was with the hope that the doors could open inwards in way that would conceal the bathroom by creating a passageway. Unfortunately this wasn’t viable in the end as either the shower tray would have been too small or I would have needed to somehow workout a way to cantilever the doors. I kept the idea of a center passageway through the bathroom as this makes best use of space on a boat of this size.
Overall I am happy with the bathroom, the shower turned out better than expected and for the limited space feel it works really well. Although there are no major issues with the bathroom the following improvements could have been made:
- I could have possibly got away with the bathroom being another 10 or 20cm wide
- Bathroom doors slide into walls, would improve feeling of space in bathroom and bedroom
- A curved shower curtain rail as it would give the feeling of more space in the shower
- A bigger bathroom radiator could have been put on back wall of shower rather than the smaller one behind the toilet
- Make the shower pump automatic so that it is controlled by flow sensor on water pipes rather than a manual switch
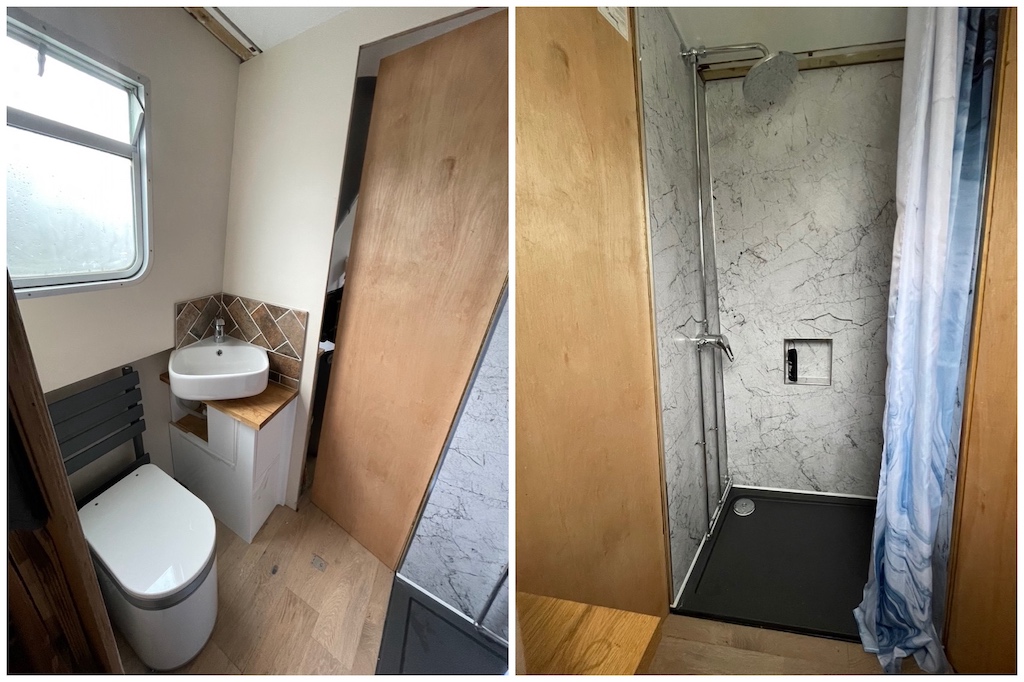
The composting toilet is a lot more pleasant to deal with (if dealing with our own s@#t can be classed as pleasant) compared with the horrible task of emptying a cassette toilet.
To sum up
Including what I paid for the boat I have probably spent about £45,000 on it in total. In hindsight I wonder whether I would have been better off spending nearer that amount initially on a boat that was in better condition and done incremental upgrades so as to have more time enjoying life on the canals rather than the hardships of a full renovation. However, the flipside is what would you get for that money and how much work you would still have to do to get it as you want? Like with a house it is very unlikely you will find a boat that is perfect for your needs, and as there are no real standards with boats the gotchas you may find could be a lot worse.
The good thing about doing it up yourself is that you learn how it all works, if I have an issue I know how to fix it as I fitted everything myself. All the additions I have done to the boat should add value to it so I would hope in the long run when I do decide to move back to land I won’t really be too much out of pocket. If I was to do a second boat I think I would either try to buy one as much as to my liking that only really needed small alterations, if that wasn’t possible then get a sailaway (just a shell with an engine) and then at least can start with a complete clean canvas. Whatever happens I would never live on it again if doing extensive work, am getting too old for this s@£t……
I would consider getting a slightly bigger boat to better accommodate a dinette and possibly a workspace, although I wouldn’t want to go much more than 60ft. If it was a new boat I would definatly get bow thrusters, seems daft to struggle without them. To give a bit more natural light into the boat it would be nice to have a hatch either by the dinette or in the galley. For a bit more privacy portholes could be a good option for the bedroom instead of windows. Finally, i always thought cruiser stern design would be best but I don’t use that space on the stern as much as I planned so wonder whether a trad stern makes better use of this space (especially when dealing with a smaller boat).