You can only live for so long on laughing cow, pot noodles, soup and beans on toast, the boat diet is good for losing weight but not for your wellbeing. I got lucky with the weather as winter was pretty mild up until late October but when it turned you certainly did feel the cold on the boat. You would have to be crazy to try and survive on a boat in winter without a stove or some form of heating.
Table Of Contents
Gas
Gas is one of the only things that you are not allowed to do yourself, to pass the BSS it must be installed by a registered gas safe engineer. The engineer I used was happy for me to run the pipe and put the fittings in place, he then came and made the fittings and tested for leaks.
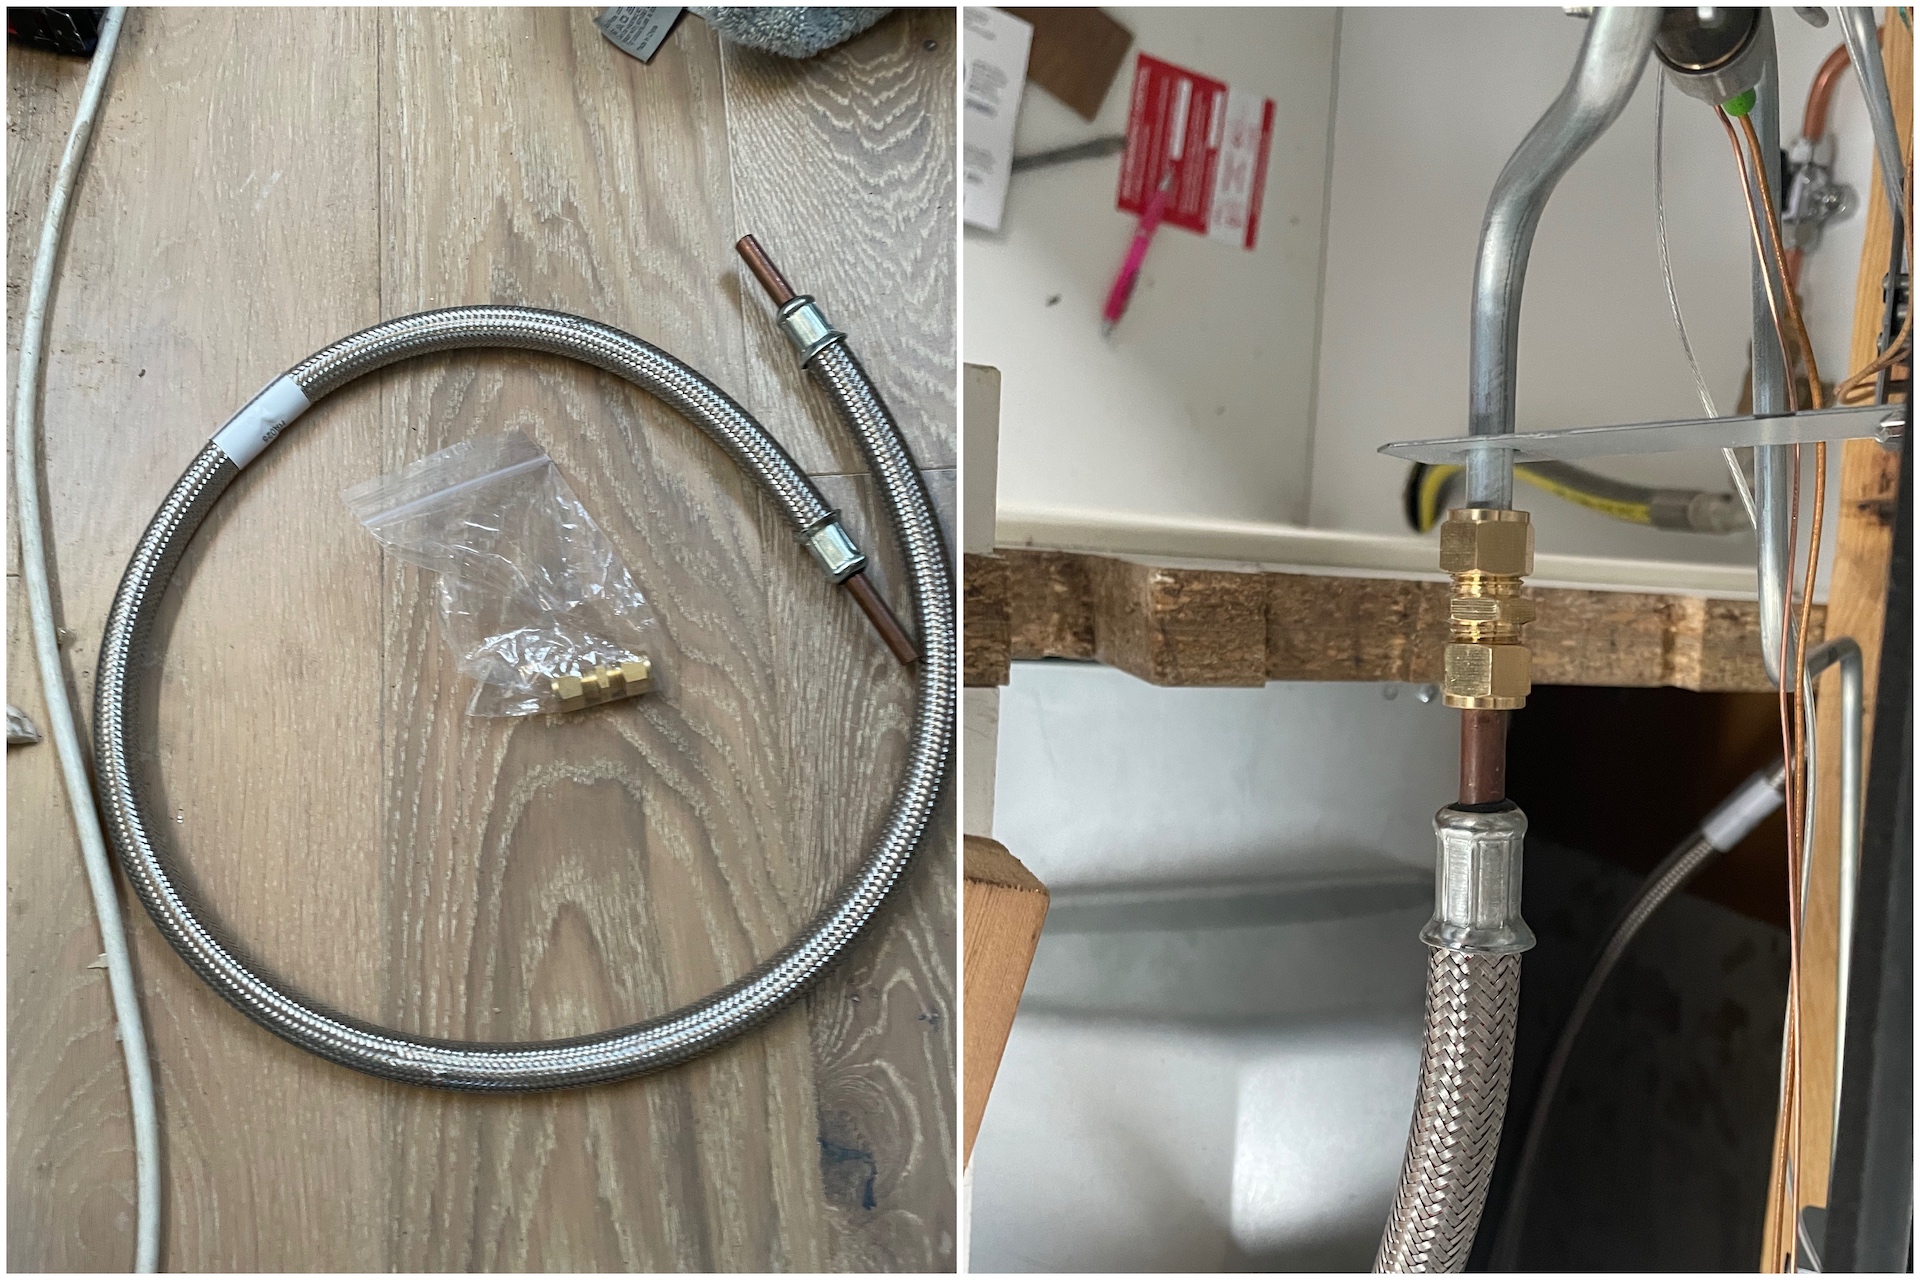
The run from the gas locker (at the bow) to the galley should preferably be 1 continuous run (BSS states as little joints as possible) of 10mm or 3/8" (about 9.5mm) copper pipe. Chandlers and marinas only sell 3/8" piping and fittings (at their usual over inflated prices), I went for 10mm as you can get a 10m roll at a more reasonable price on the high street and bubble testers only come in 8 or 10mm. Pipework run in the cabin must be as high up as possible, the reason being that LPG gas sinks so a leak may not be noticed if escaping from pipework situated at floor level.
A continuos piece of pipe was run under the gunwale from the bulkhead fitting at the gas locker to the compression T that the ball valves are connect to (cleated every 30cm). 10mm piping has a lot more dexterity than 15mm so for small radius bends you can get away with doing them without a pipe bender with no fear of kinking it.
There should be no holes in the gas locker sides except for the ones at the bottom of the port and starboard sides to allow for gas to exit if there was a leak (as LPG sinks). For this reason a bulkhead fitting is used to seal where the pipe comes in/leaves the gas locker, it is a compression fitting joining the cabin and gas locker piping. The manual changeover regulator allows for quick changeover between gas bottles when one runs out, all gas bottles must be securely strapped in. The bubble tester is a way can check for leaks although it isn’t actually a BSS requirement of yet.
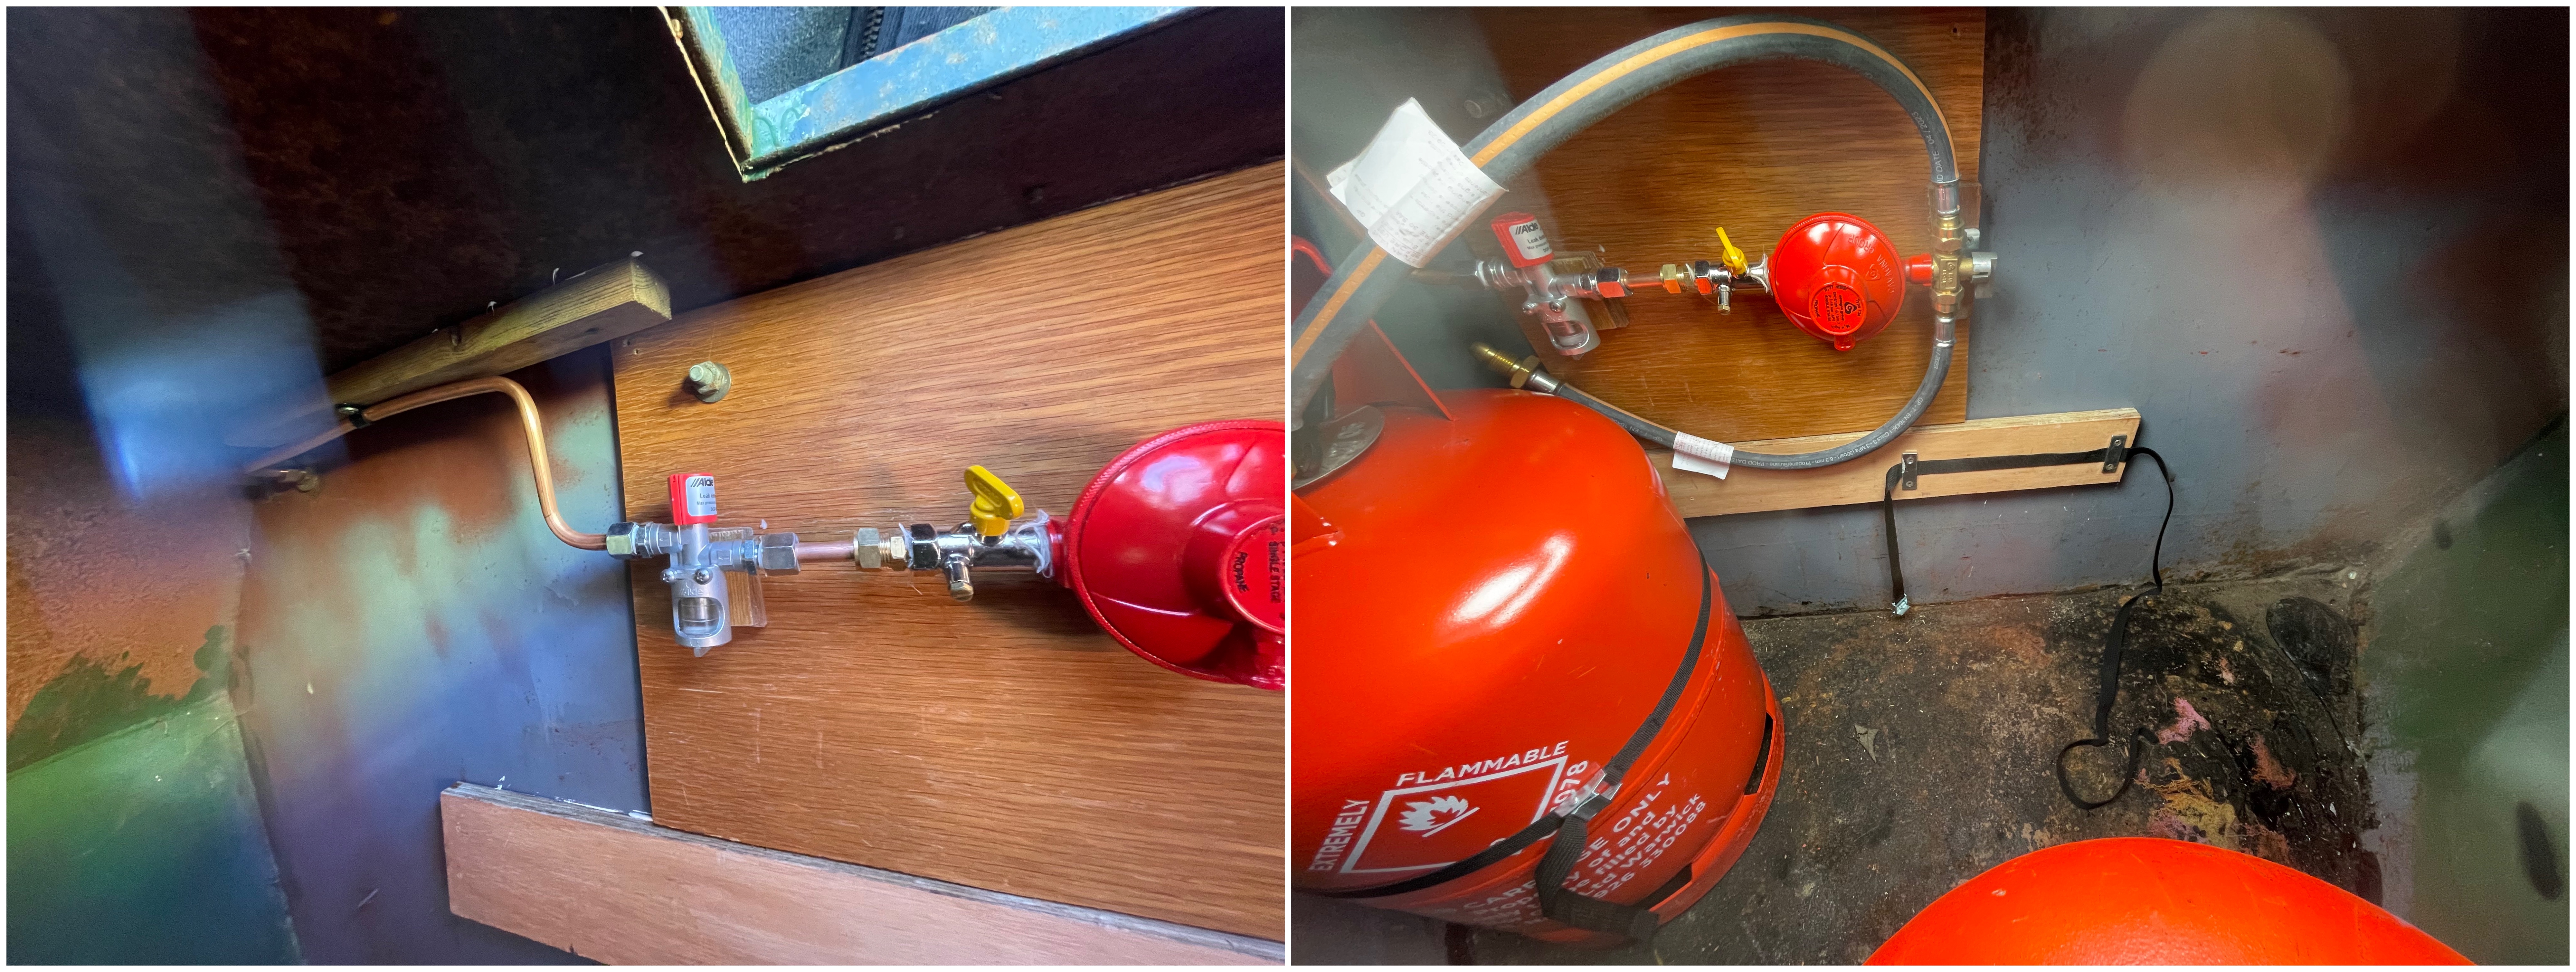
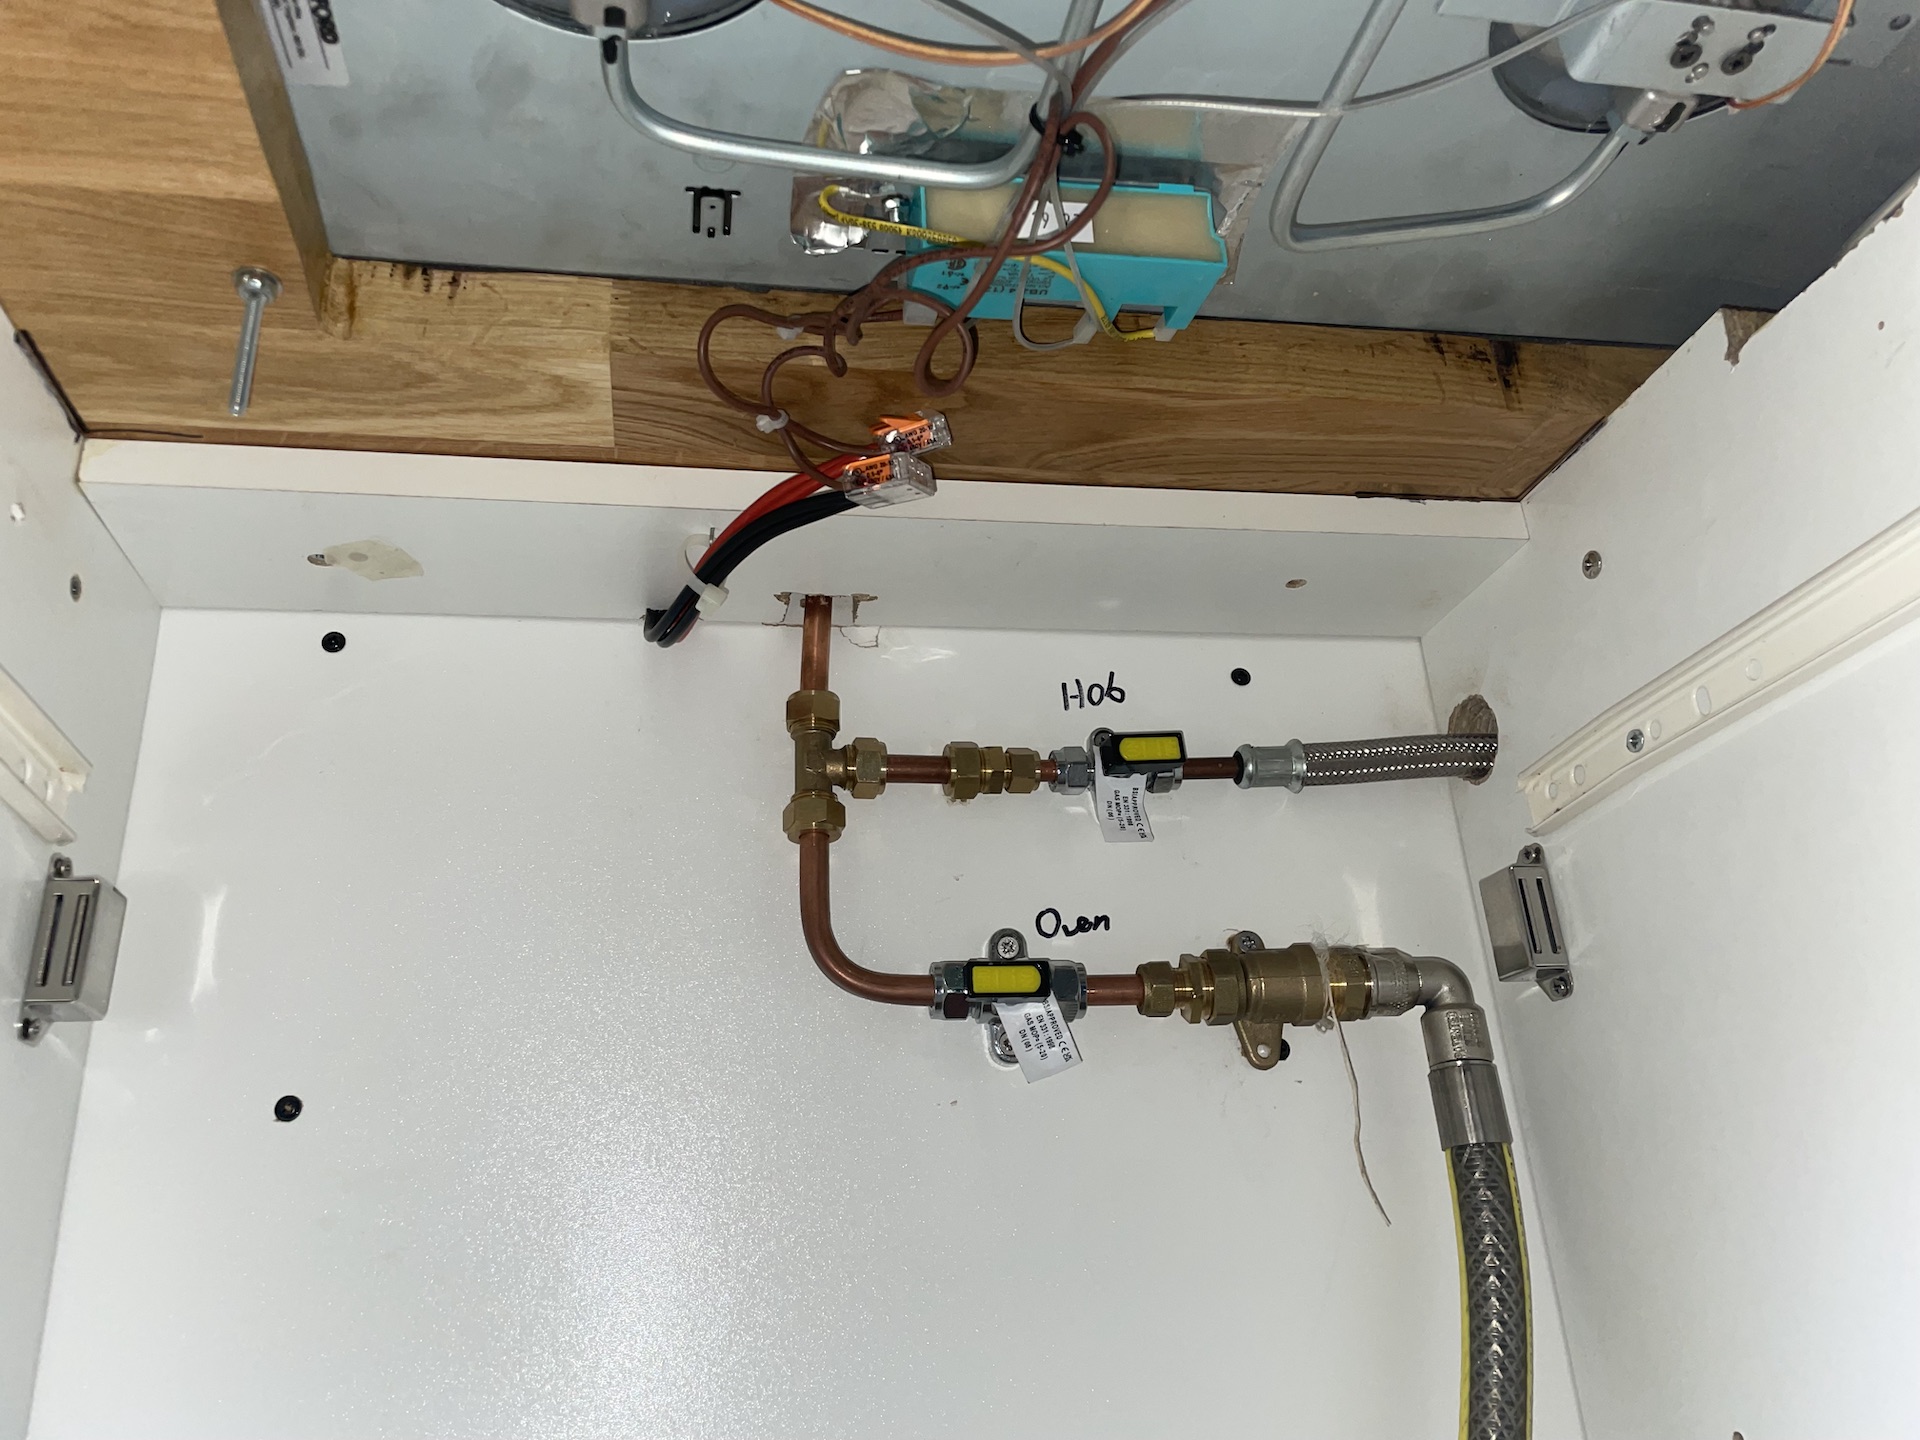
To comply with BSS all gas appliances should have a fully accessible fixed footplate shutoff ball valve. From these ball valves a flexible hose of no more than 1 meter in length goes to both the hob and cooker.
I picked up a second hand household CDA single oven off ebay, converting it to LPG was just a simple matter of changing the brass jets which provide the flame to those supplied in the LPG conversion kit (think the holes in the jets are bigger). The connecting hose and bayonet are a standardised connection that lock in place similar to a lightbulb.
Like with the sink a normal household hob would not fit because of the kitchen cabinet depth, the only thing I could find with more than 2 burners was a Thetford topline 931 hob. As it is designed for a motorhome it is long rather than wide to keep the burners away from the walls and the rings are fixed down to stop them rattling. Am surprised no one does a triangle shaped hob, would be a better use of space. A compression fitting has to be used to join the hob and the 3/8" flexible hose, as I was using 10mm copper pipe this was reduced to 3/8" before the shutoff ball valve.
Stove
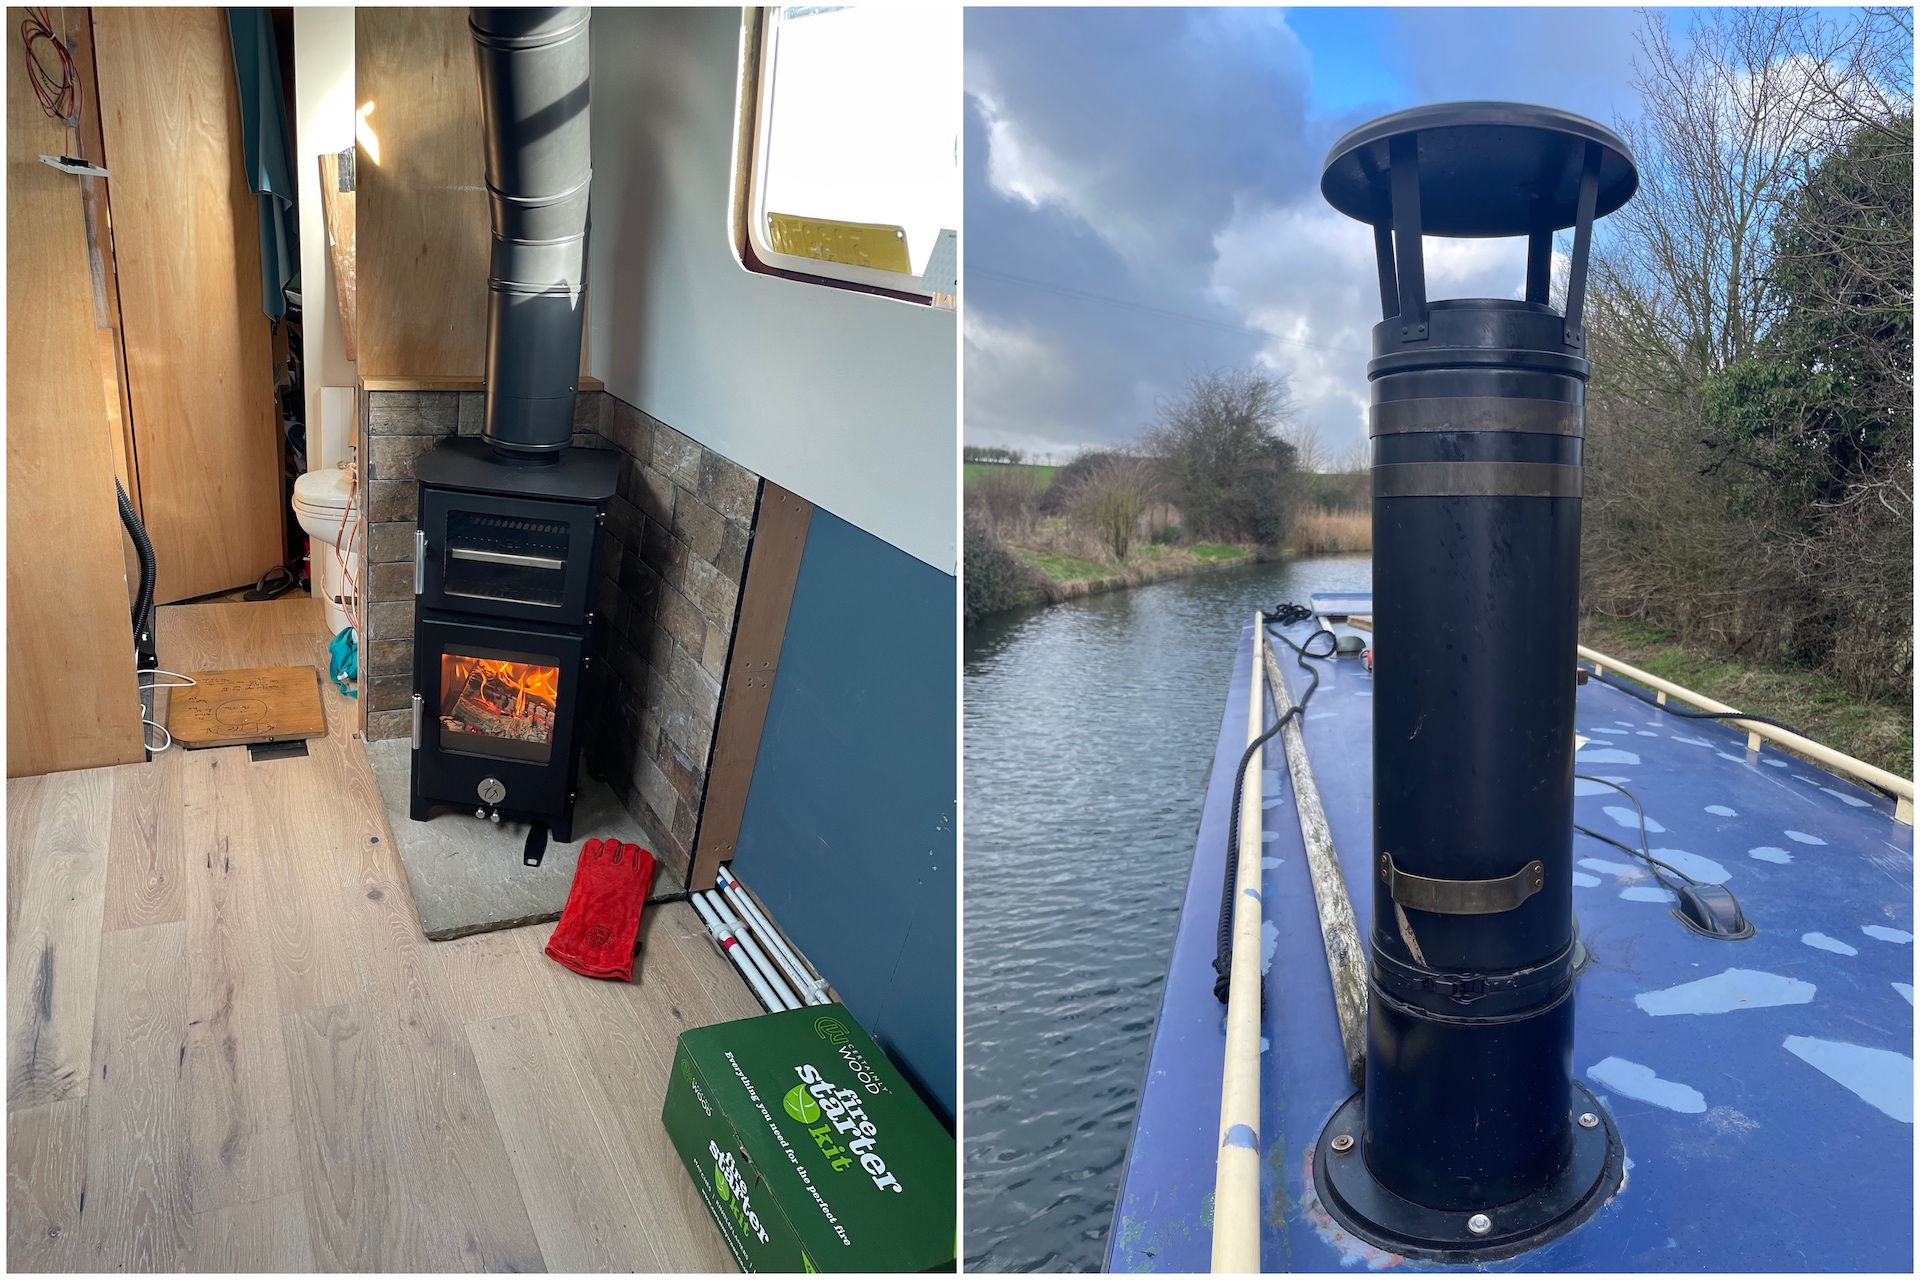
I went for a Chilli Penguin Hungry Penguin tall order stove as I liked the idea of having an oven built into the stove like you do with an AGA. Obviously this luxury cost me a lot more than a standard stove (£2395) but it will be well worth it when I am cooking a hearty stew in the middle of winter. You can only buy them from certified suppliers so I decided that I might as well get it fitted to save me time (winter had already arrived) and make sure it was done right. I used a Leicester based company called MDW fireplaces.
The BSS suggestions regarding stoves is to follow the SOLIFTEC guidelines or the manufacturer’s instructions. I am not sure how well enforced these are as my original stove and most others I have seen don’t meet these guidelines with the biggest problems being no air gaps, small hearths and the proximity of fixtures and furnishings to the stove (in some cases dangerously close).
A lot of hearths on boats are a piece of wood or paving stone covered in tiles, instead I went for a 25mm thick piece of sandstone. The 2 edges that will be hidden by walls were cut down with a circular saw (diamond blade) to make the overall size 75cm x 55cm, a messy job but really easy to cut. If the floor went round the hearth you would lose the stones jagged edge effect therefore I put a piece of 18mm ply down so the hearth effectively floats on top of the flooring. The hearth is unlikely to move because of its weight but it had to be bolted down to comply with BSS.
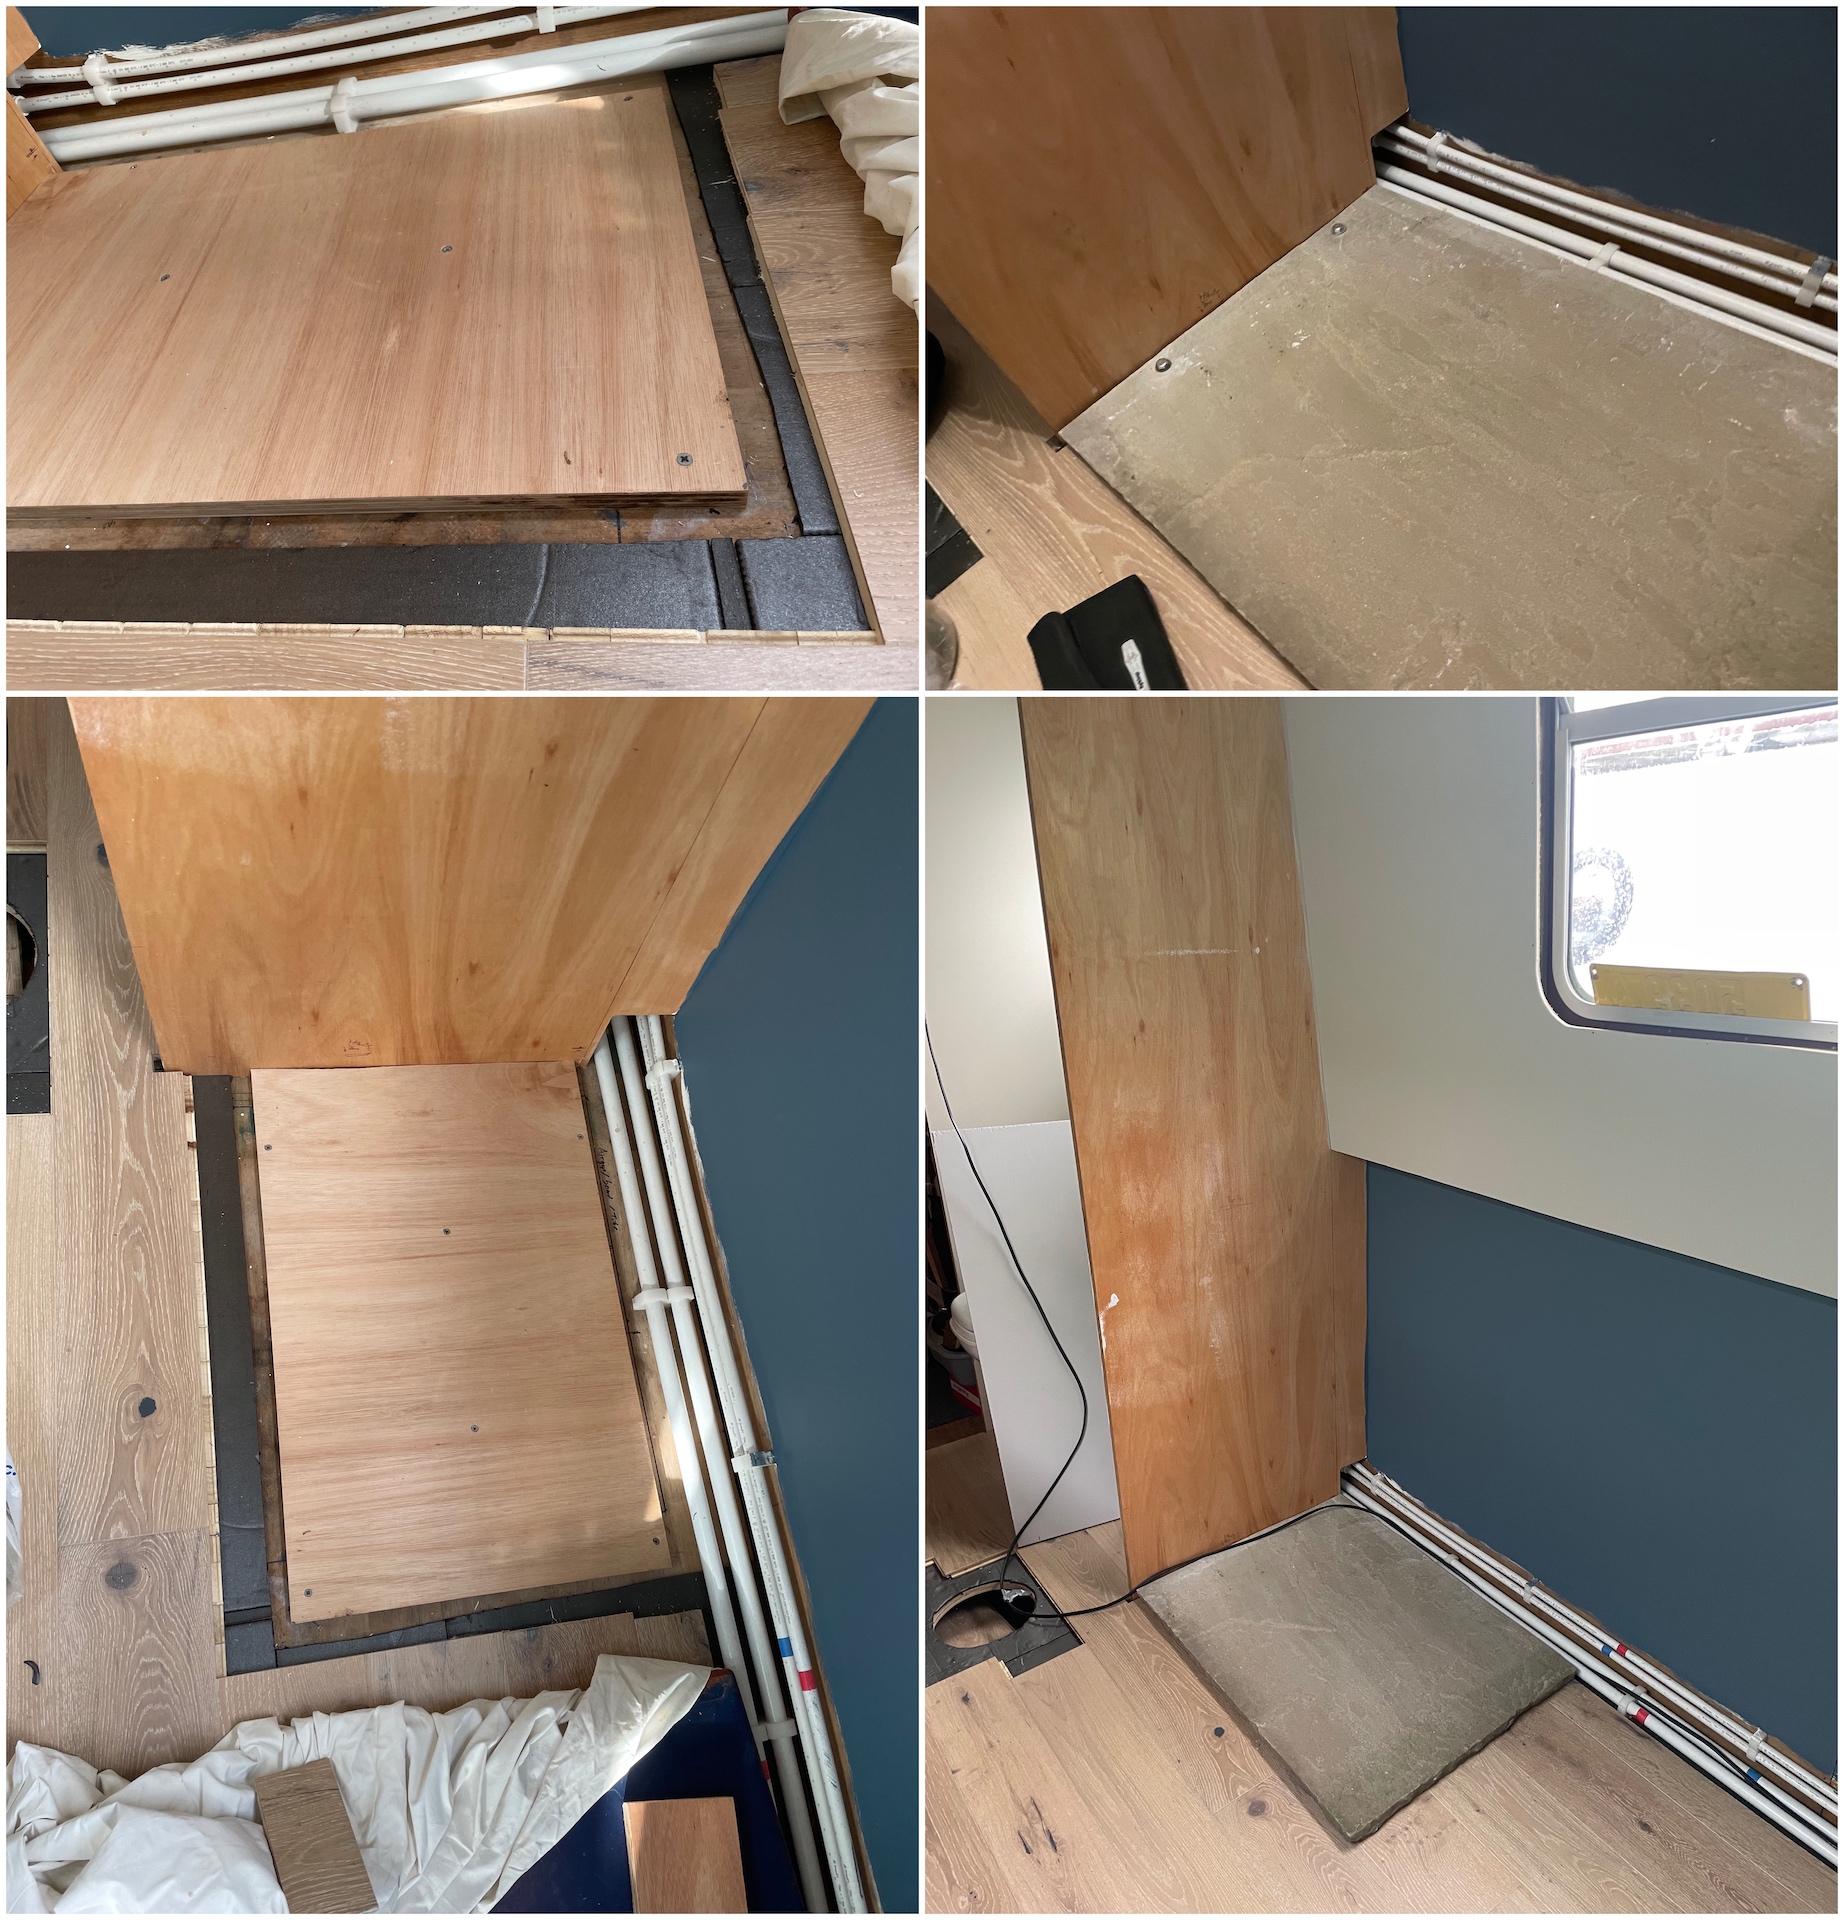
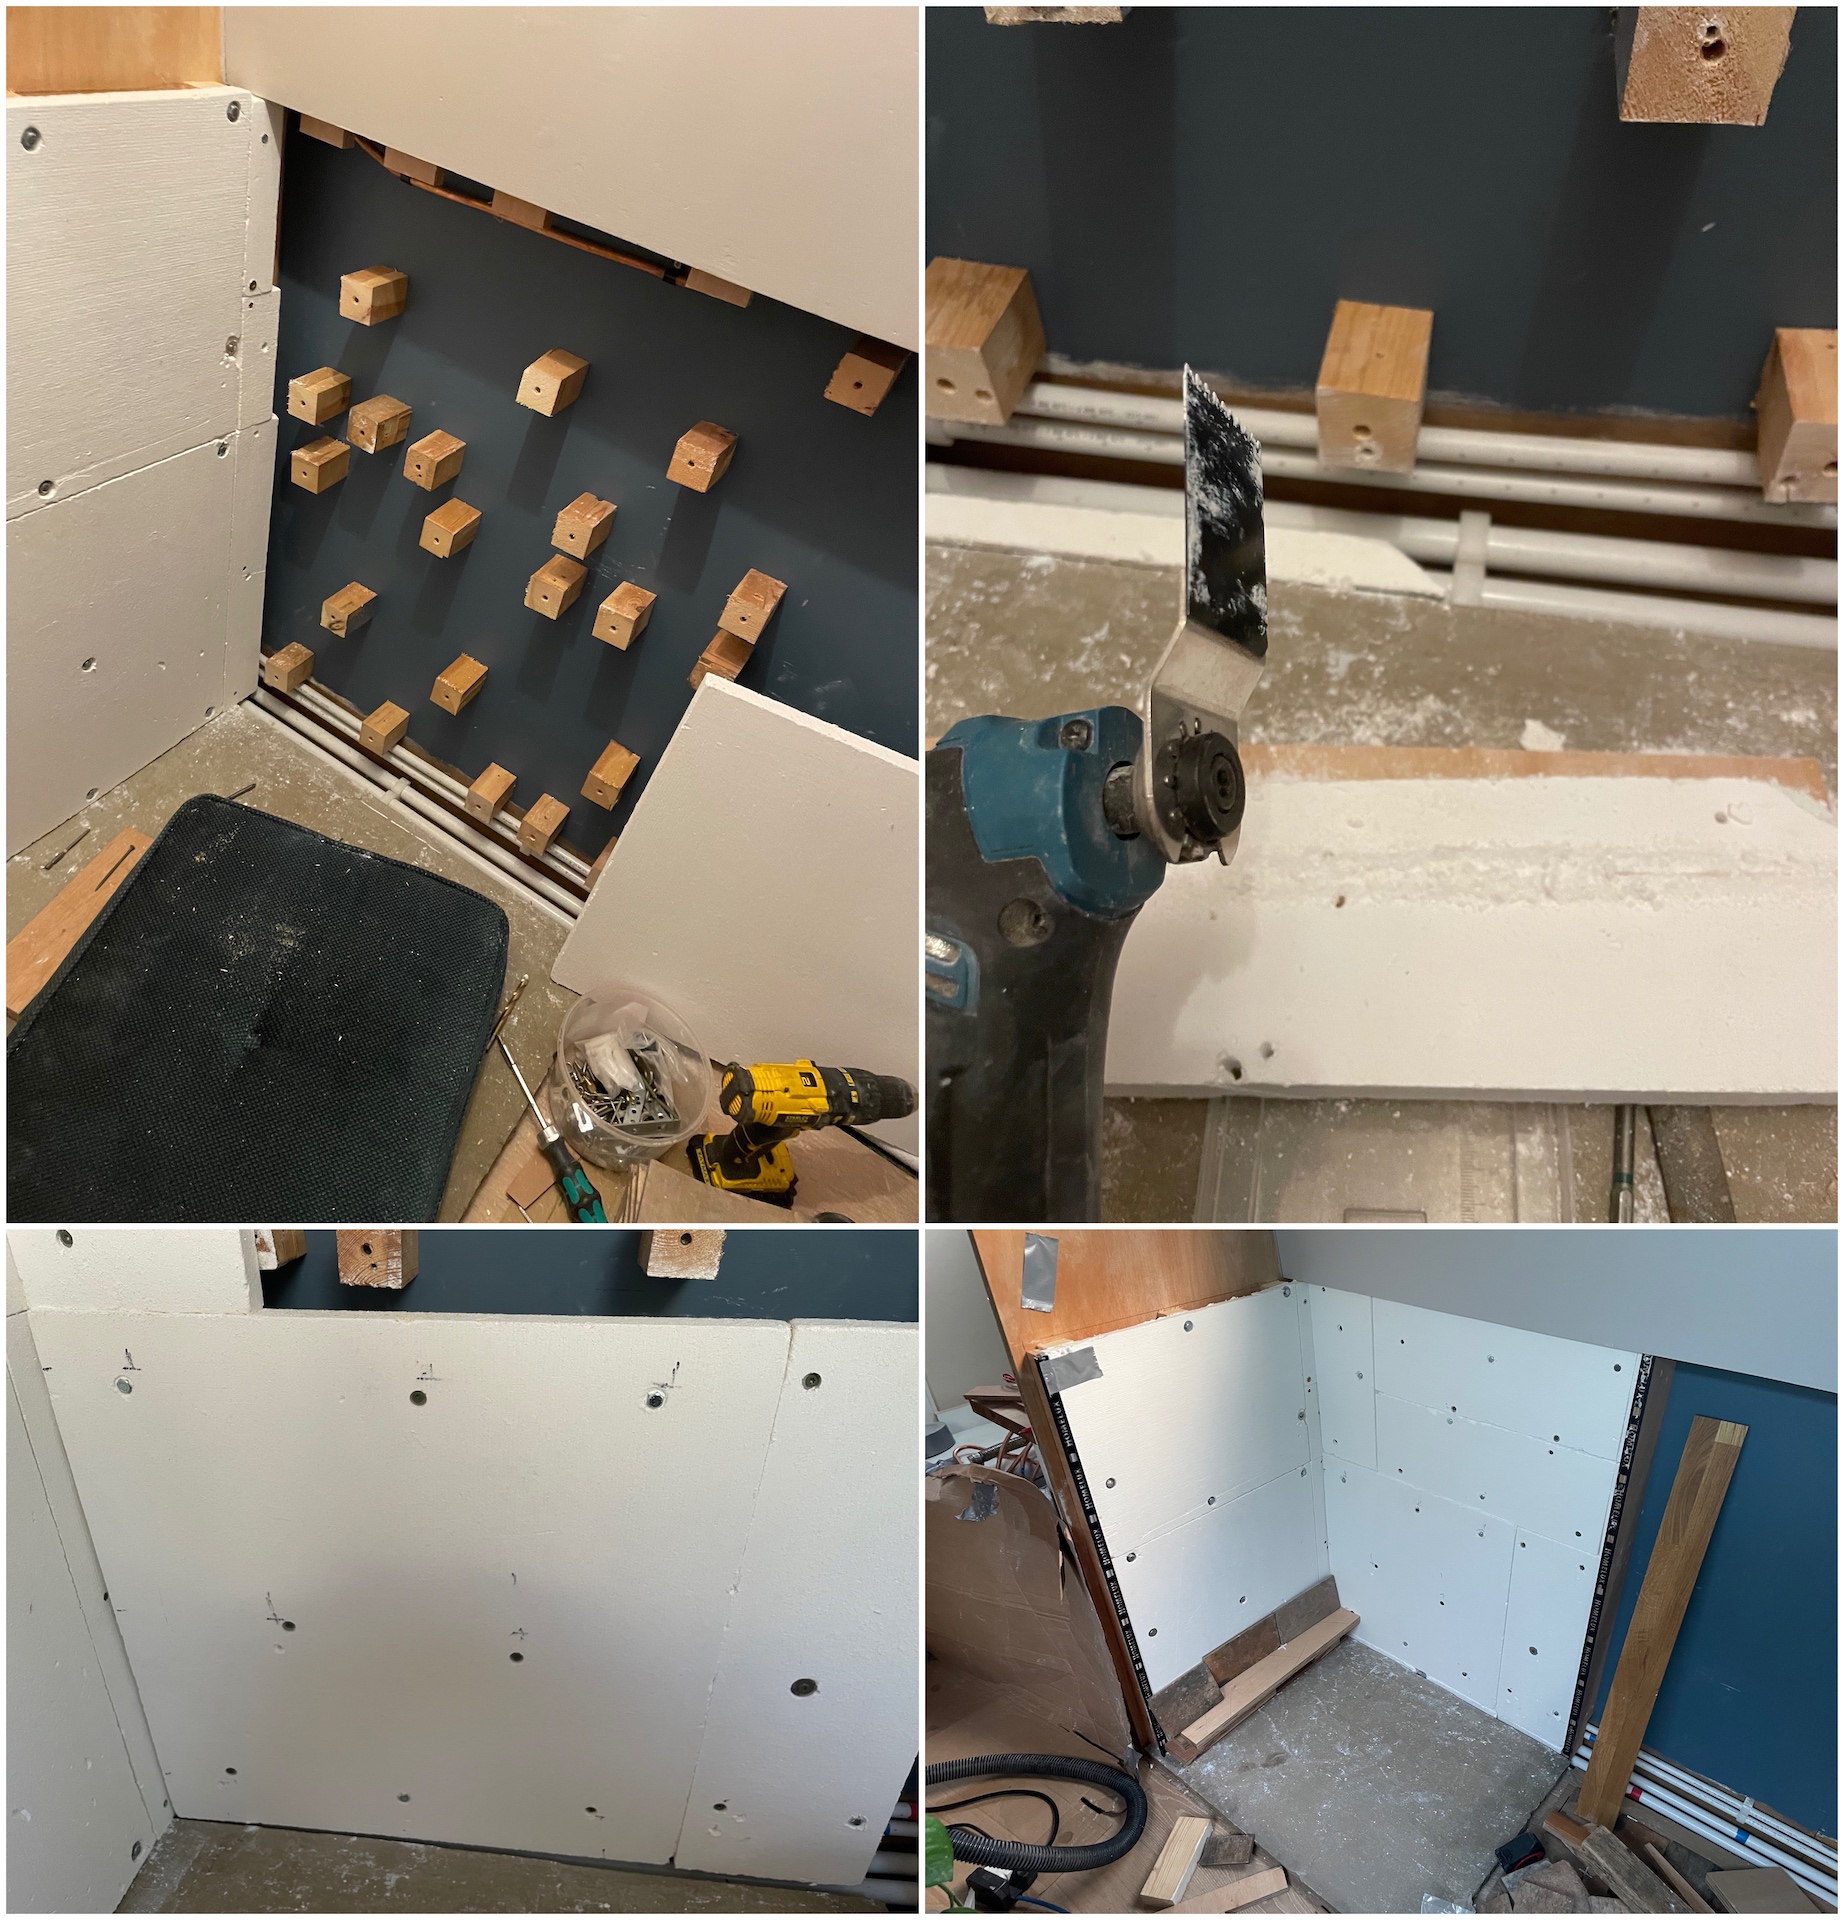
The air gap and 25mm calcium silicate board are to protect the walls from the heat of the stove, I went for a 25mm air gap rather than the 10mm suggested by SOLIFTEC at the recommendation of MDW and Chilli Penguin. I first started off cutting the CS board with a circular saw but that created a lot of dust (wasn’t sure if is harmful so wore a mask), a better method is to use the multi-tool as it doesn’t circulate the dust. Wooden blocks screwed to the wall create the air gap with the the CS board screwed onto as well as through them. I initially made mistake of using washers, I wouldn’t suggest this as the board is quite fragile so if the washers are too big they can easily cause it to crack.
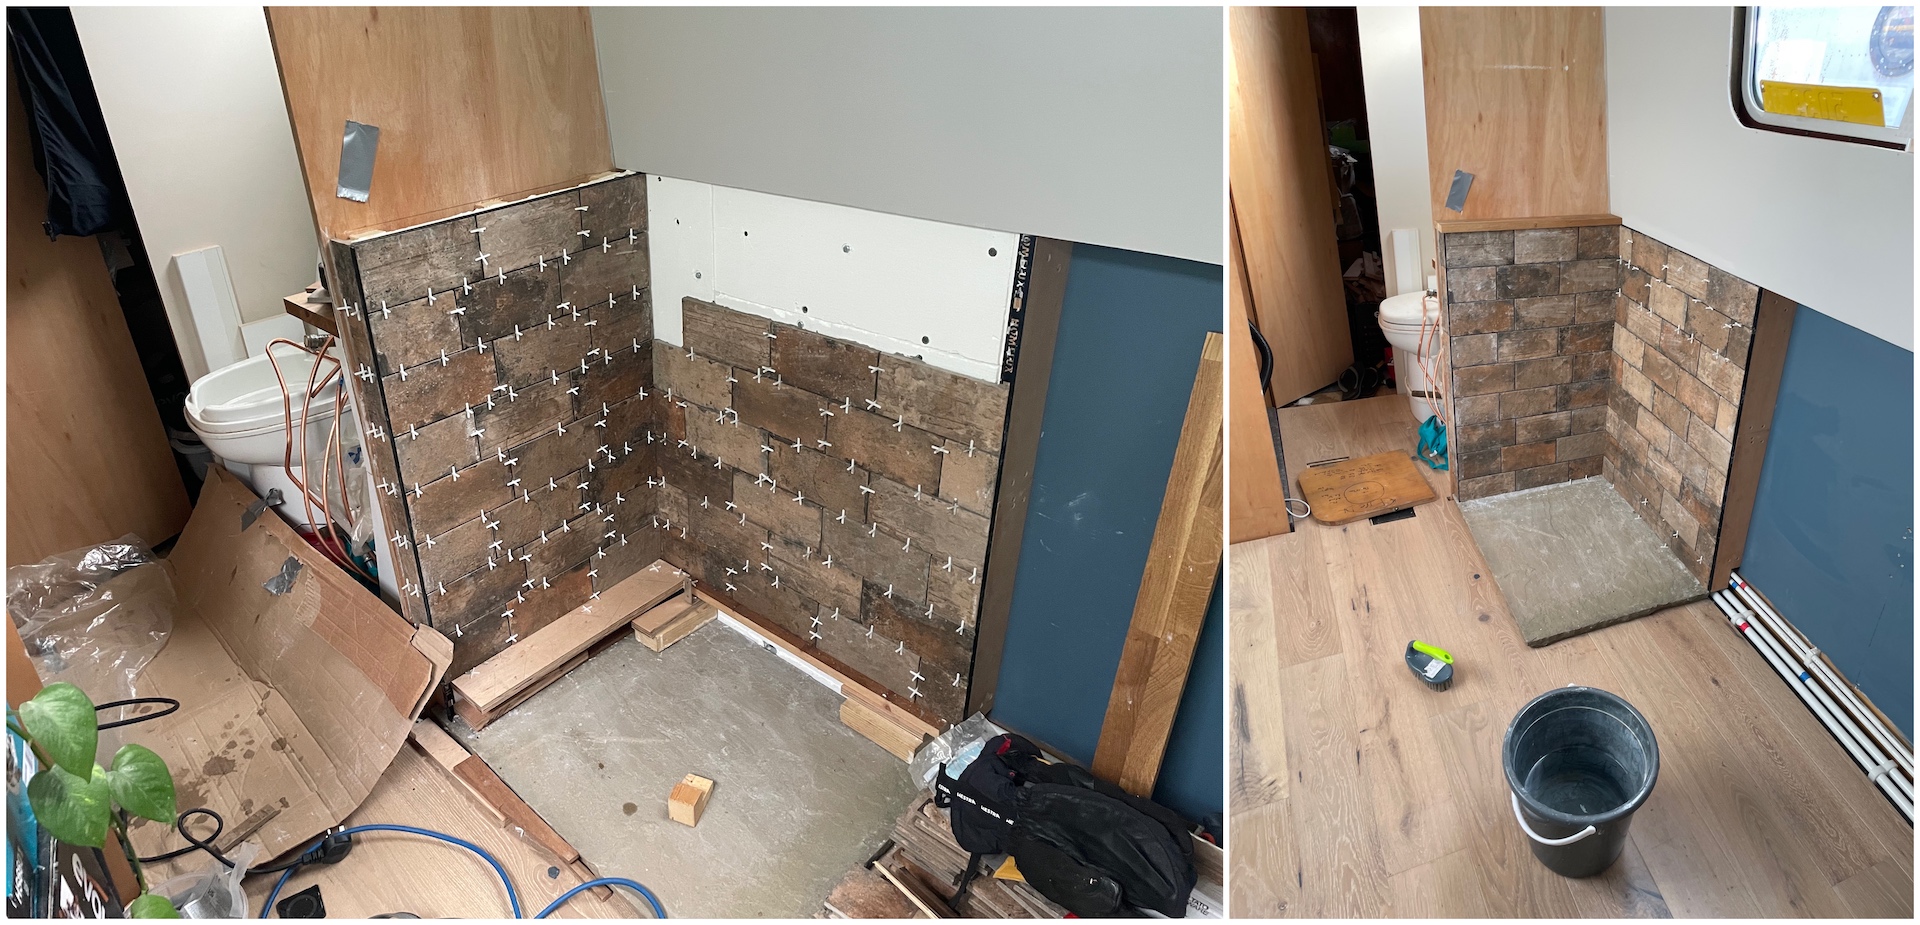
A sensible person would have used bigger tiles as that means less cutting and grouting, obviously I didn’t do that and went for the state street version of these Chicago tiles. As it was a fireplace I had to use heat resistant tile adhesive and grout.
It only took them MDW morning to fit the stove, the flue required a slight angle in it as I wanted to reuse an existing hole in the ceiling from where the old water heater flue was. The flue has clips at top and bottom so when cruising you can either take the whole flue off or shorten it to just the end cap if you have a fire going. From watching how it was done I think it is something I would consider doing myself if I was to do this again.
Ventilation
Un-flued (cookers/hobs), open flued (water heaters) and closed flued appliances (woodburner stoves) all use air from the surrounding space in which they are installed to burn safely and efficiently. Inefficient or poor combustion through the lack of oxygen produces carbon monoxide (CO) gas which means it is extremely important to have enough fixed ventilation thoughout the boat.
The formula for calculating the fixed ventilation requirement (in mm²) is (2200 x U) + (650 x P) + (440 x F)
- U = Input rating (kW) for all unflued appliances (cookers/hobs)
- F = Input rating (kW) for all open or closed flue appliances (stove/water heater)
- P = Number of people for which the craft is rated
Transposing this formula with the ratings for my hob (5kW), oven (2.7kW), stove (5kW) and people (don’t expect to have more than 6 people on the boat) gave me this.
(2200 x 7.7) + (650 x 6) + (440 x 5) = 16940 + 3900 + 2200 = 23040
BSS recommends the fixed ventilation is split as equally as practicable between high level and low level outlets, it allows a 10% divergence on the 50/50 split. Fixed ventilation is classed as vents that can not be closed without the use of tools, adjustable vents such as roof mushrooms are measured in their most closed down position.
When buying vents look at the allowed air flow in the specification, the value for my mushrooms and grills are 5800mm² and 6175mm², I rounded them down to 5000 as a precaution. The totals below show it is well above the 11520mm² of space required for the low and high level ventilation.
- High level ventilation: 4 mushroom vents = 4 x 5000 = 20000
- Low level ventilation: 3 louvre air vent grill (6" X 6") = 3 x 5000 = 15000
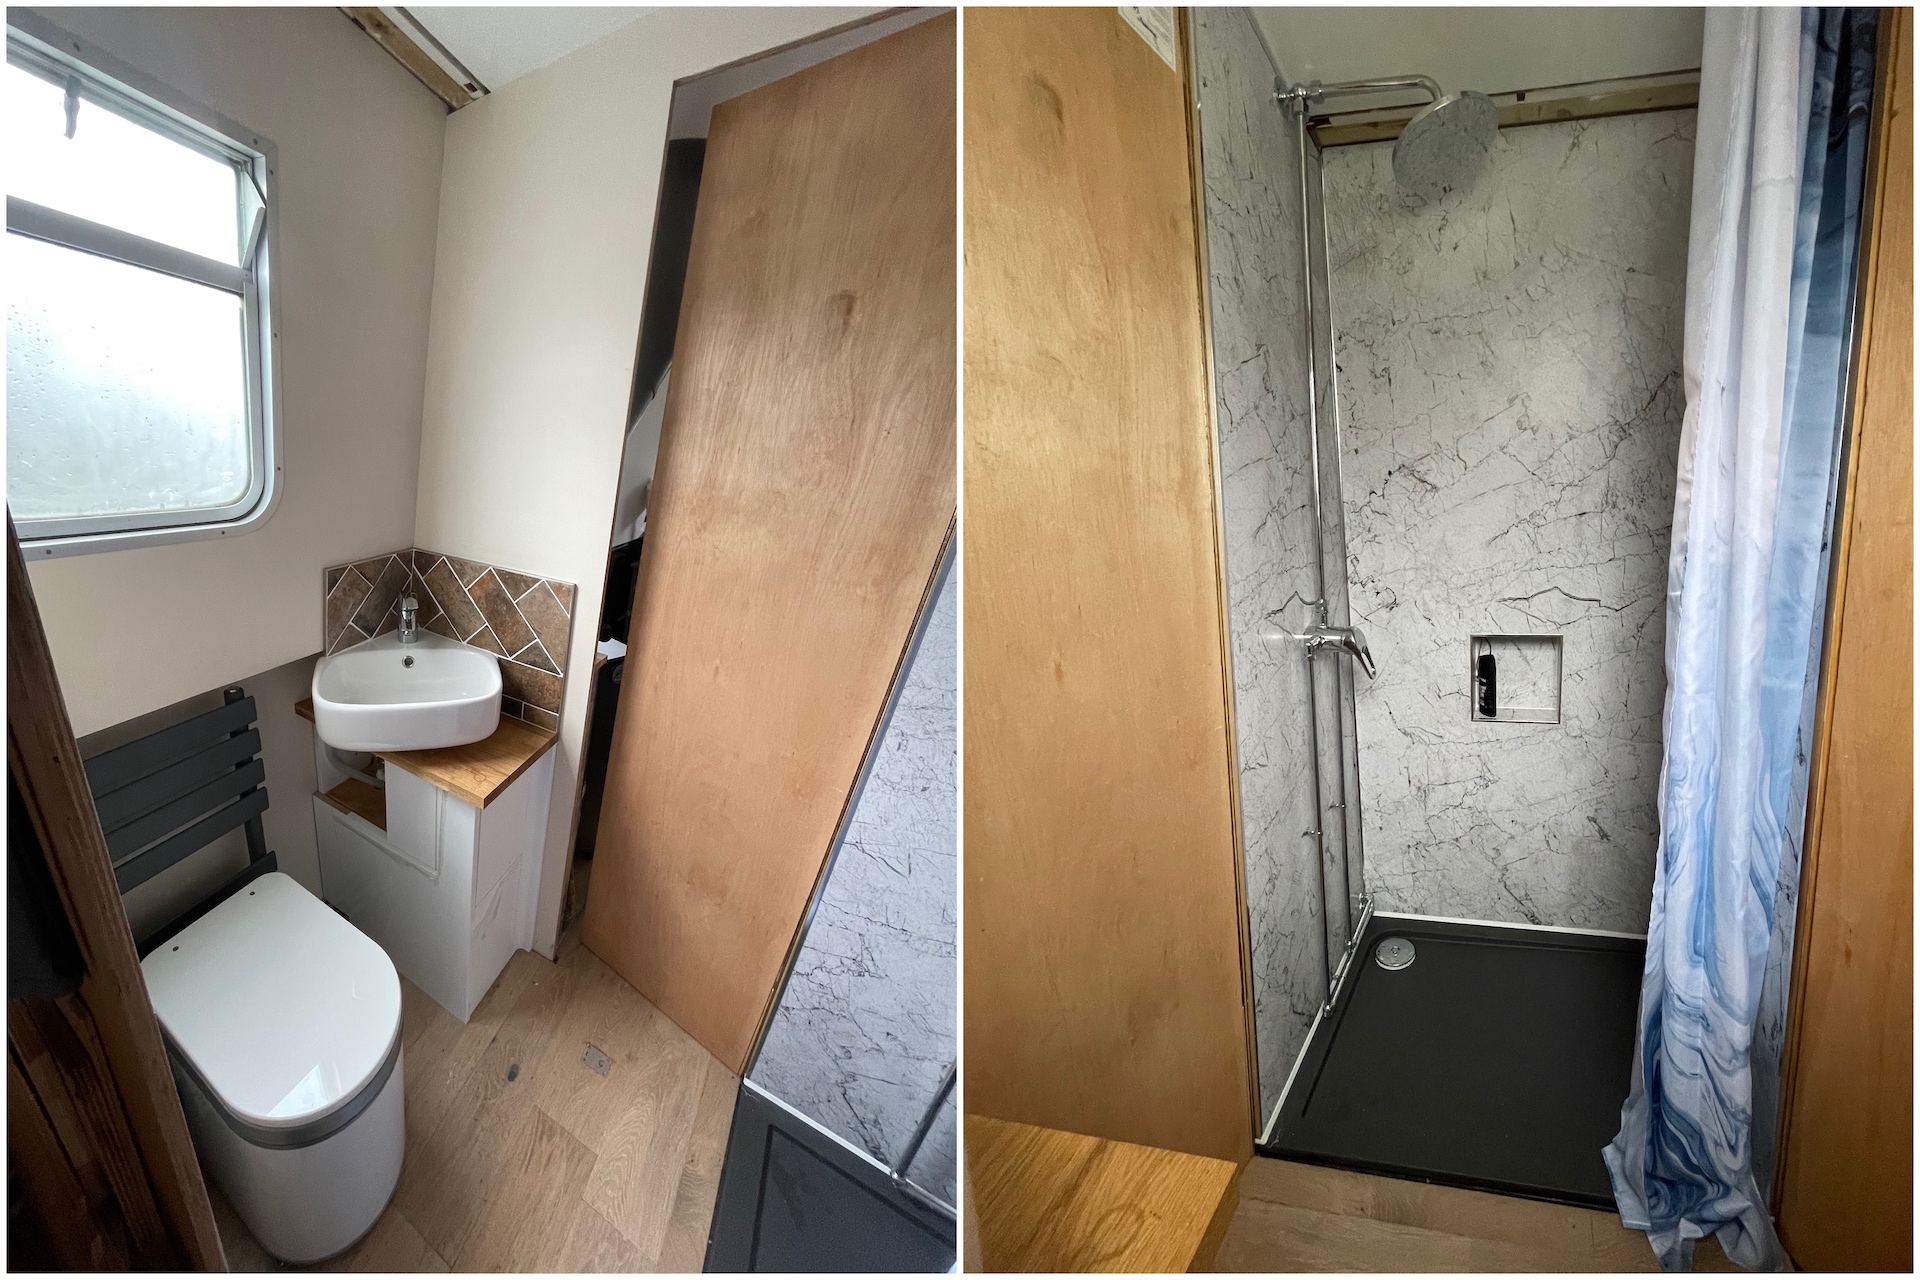
Bathroom
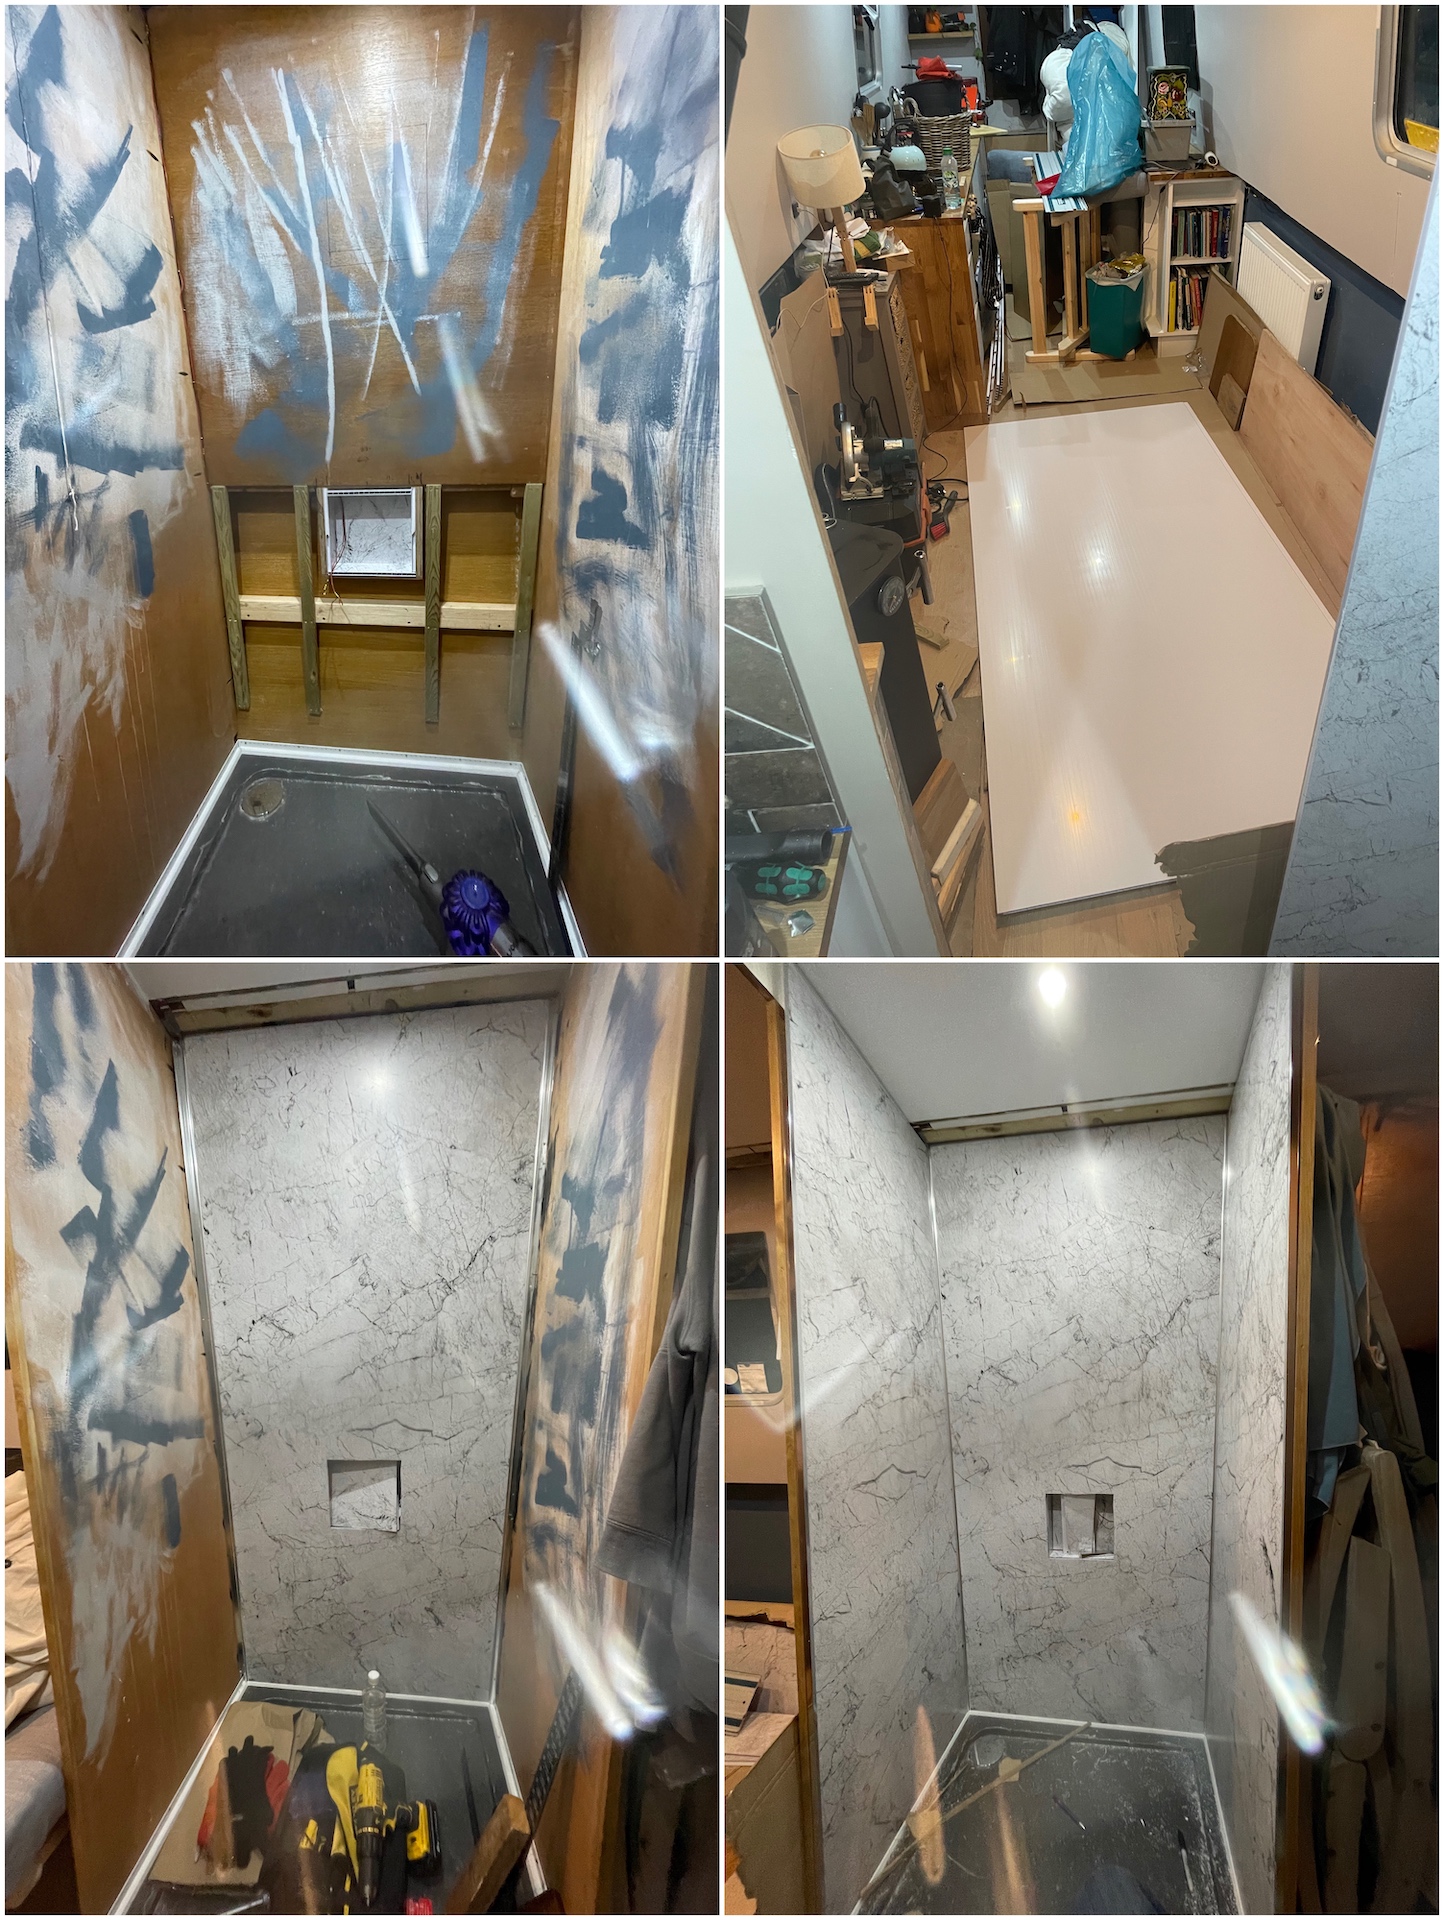
The bathroom size centres around the 90cm x 70cm shower tray, this dictated the width and depth so the tray was required early on in the build when fitting the bulkheads. The shower walls are lightweight PVC panels, I should have cut these when I did the bulkheads as I already had templates for the wall shape. Cutting them on a fully furnished boat (using the circular saw) was a real struggle as the 1m x 2.4m sheets give you very little room to manuever. The panels are a hollow construction reinforced with internal ribs so all edges require some sort of trim which allows a little leeway on the cuts, the edging is sealed with silicon and the panels stuck to the walls with sikaflex.
All of the exposed showers I found had a 15mm outlet designed for a shower hose, I wanted to fit a fixed shower rail that are only available in 18mm. It was a nightmare trying to go from 15mm to 18mm as there is no standard fitting out there for this, I eventually managed it with a coupler, 8 rubber washers and a 15mm to 18mm compression. The chrome shower pipes connect to the PVC feeds via tap connectors and shut off valves.

Showers use a diaphragm pump as they need to have the ability to run dry without damaging the pump. The Whale Gulper 220 can pump 13.4 litres per minute which is more than fast enough for my water rate and shower tray depth. I planned to put water flow sensors on the pipes so the pump came on automatically (using a relay on the Cerbo GX) but couldn’t do so in the end as the toilet fan was also off the same feed. A 19mm braided PVC hose connects the pump to a washing machine hose connector that fits to the McAlpine shallow shower trap. Everything is secured with 2 jubilee clips each just for good measure. A bilge access hatch was required to fit the shower waste and check for leaks, I would suggest fitting the waste and testing it before putting the shower tray down as it would have been a lot easier.
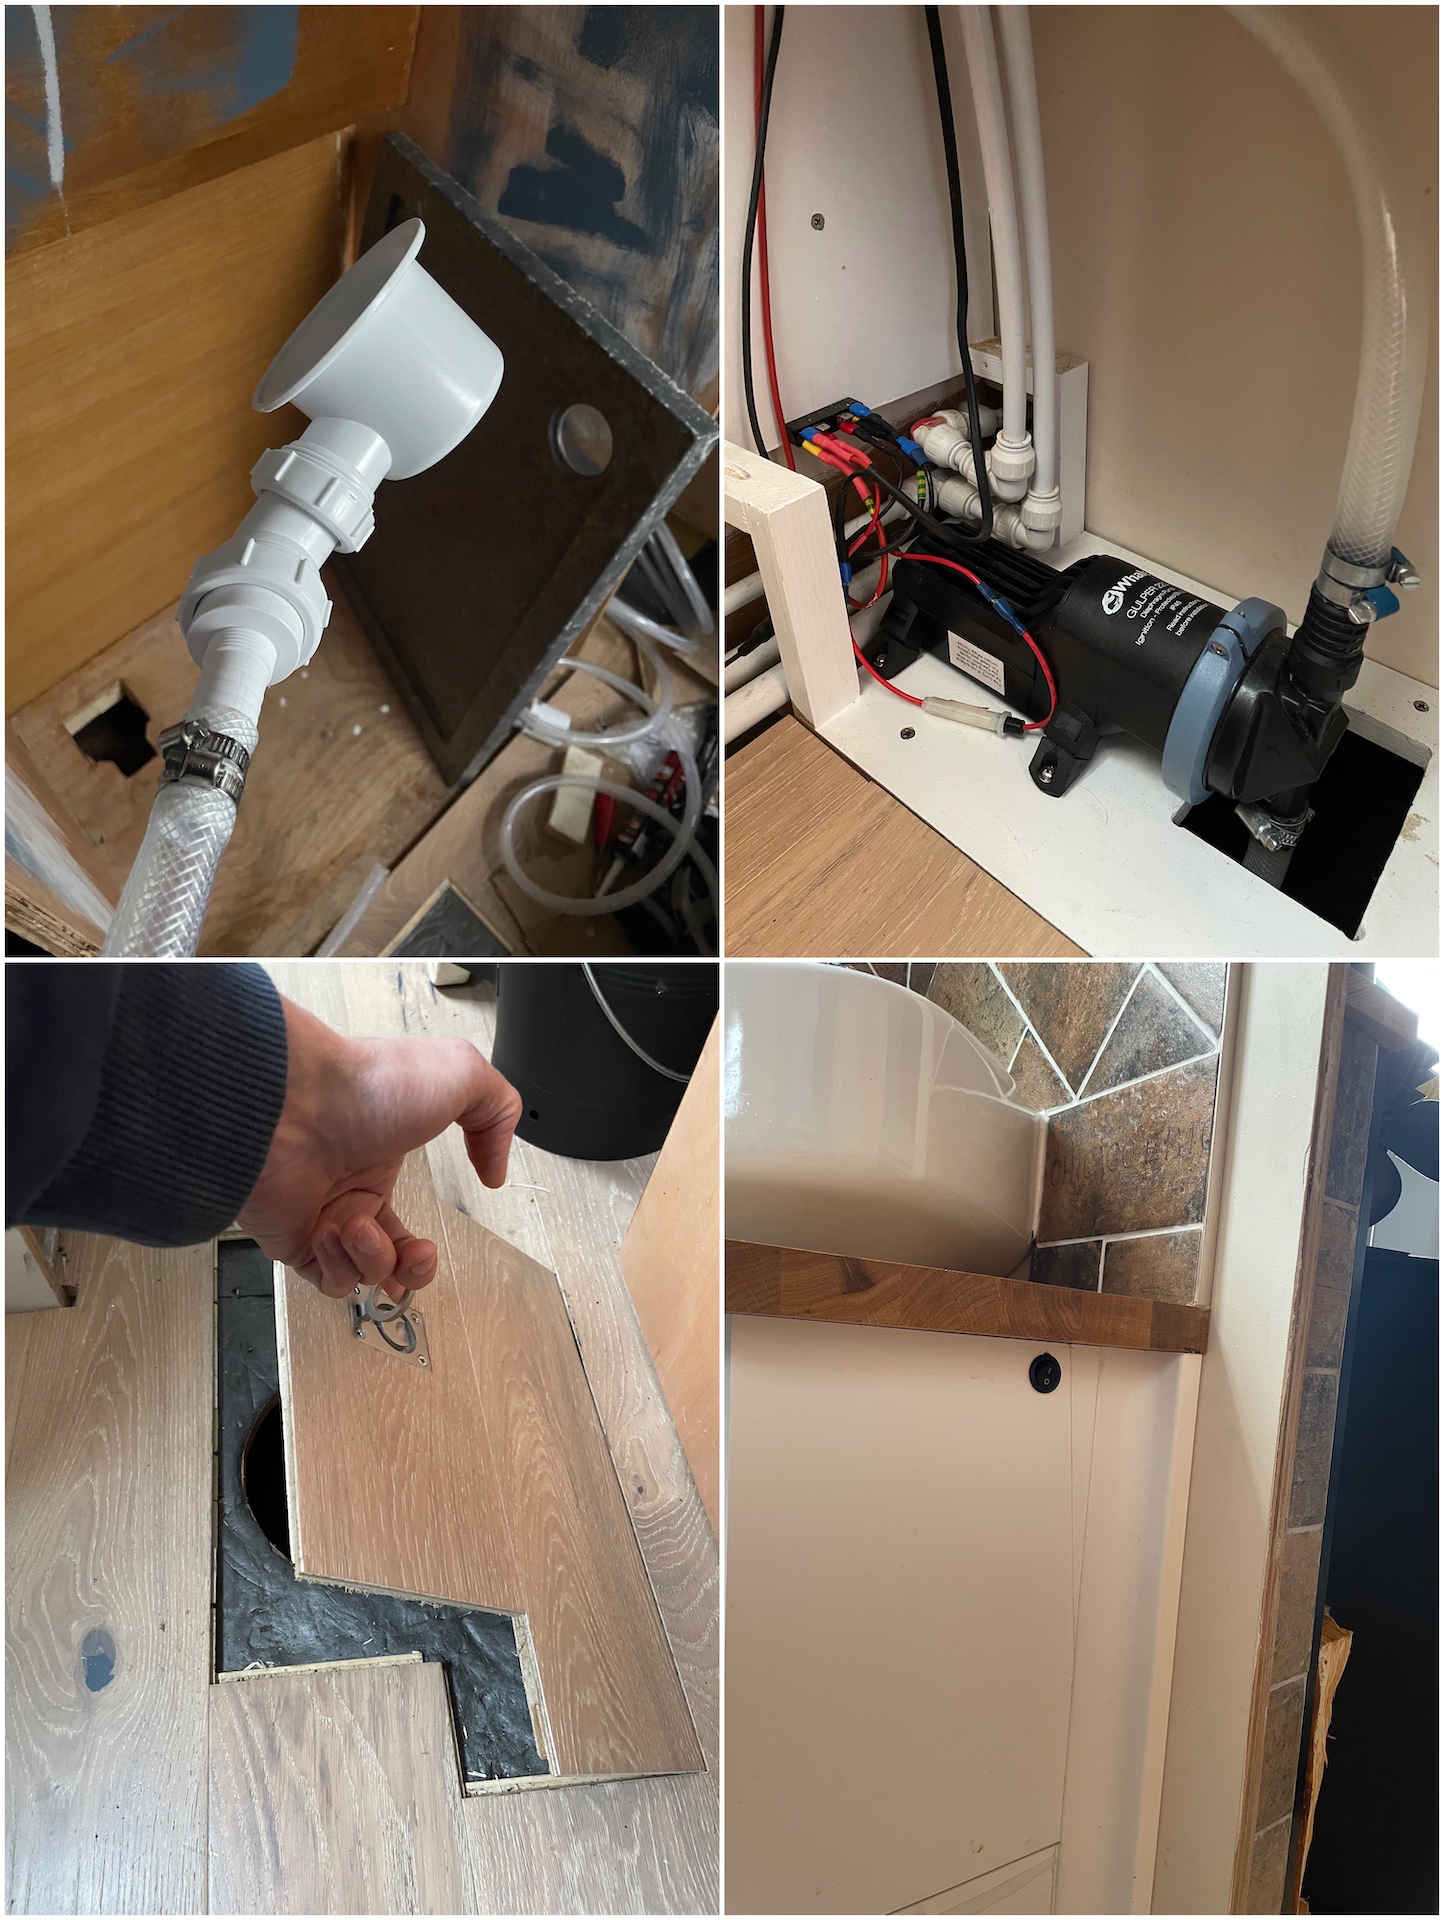
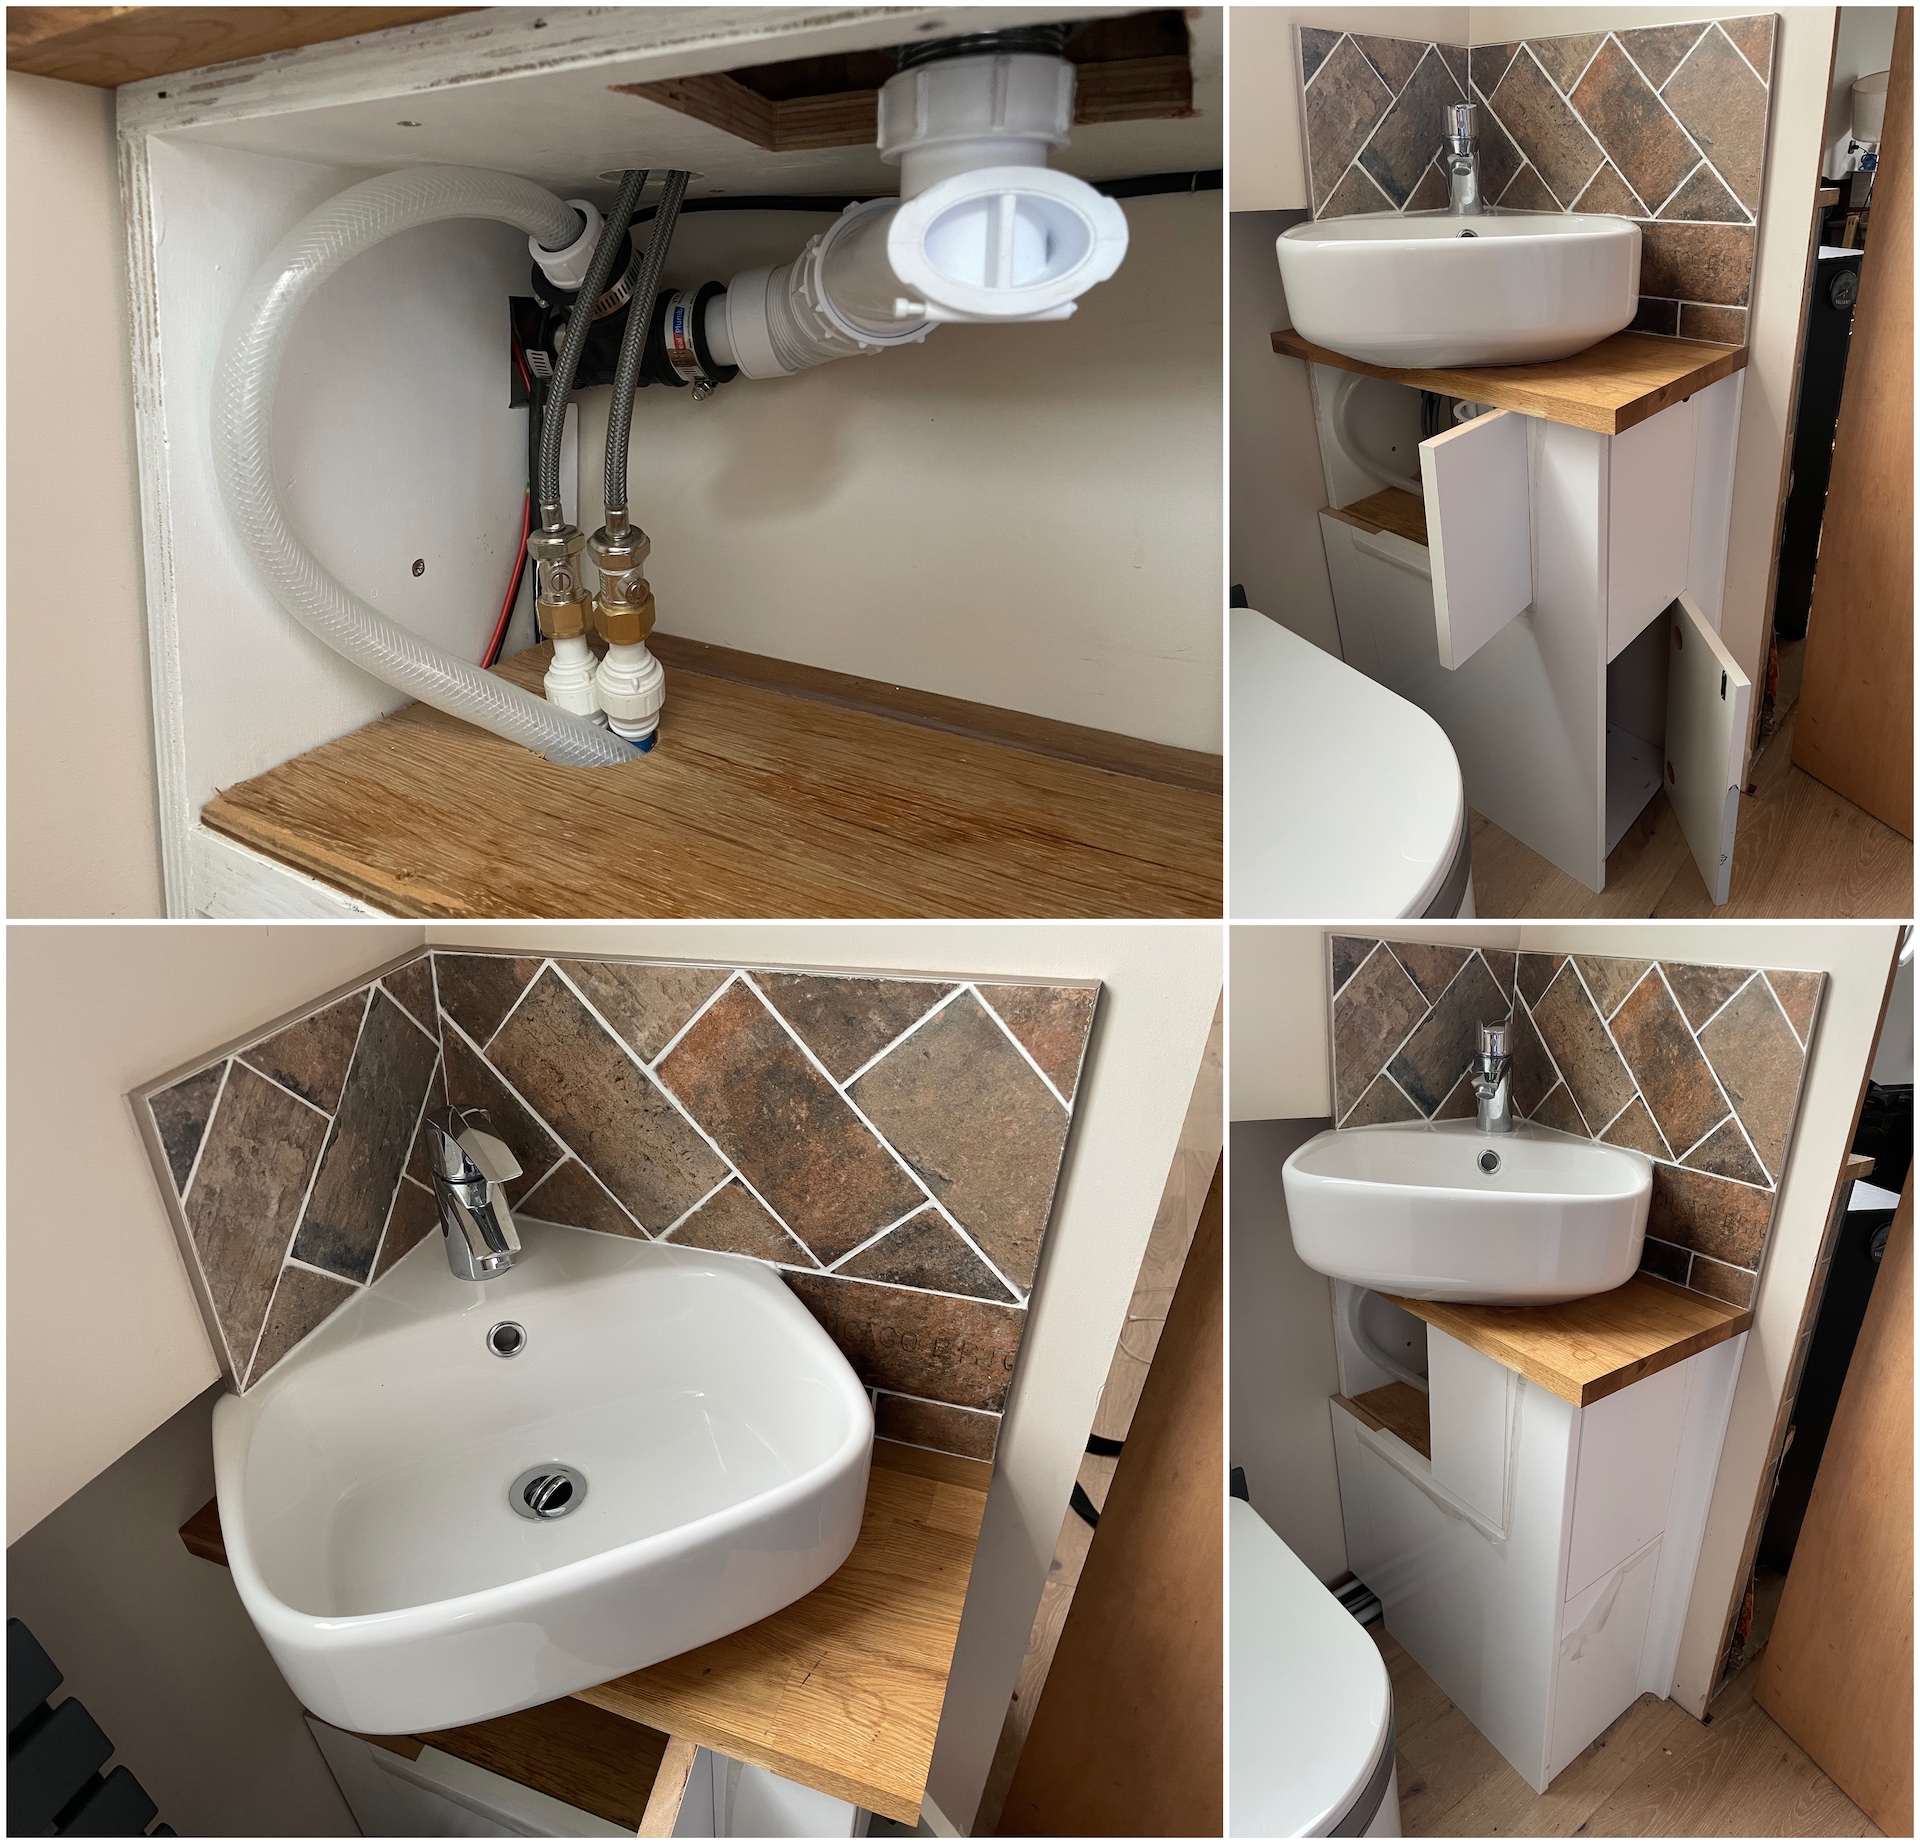
The bathroom cabinet is made up of left over kitchen worktops, cabinets (doors are a work in progress) and fireplace tiles. A corner sink was the only real option due to the limited space, am still trying to find a small wall cabinet with mirror to go above it. The same boat waste pipe is used for the sink and shower waste with a flexible T connecting the low profile sink waste and a reducer for the 19mm braided PVC hose from the shower pump. As I mentioned earlier there is no standard way for doing the waste, you just have to hunt around for a solution that fits your needs.
When I got the boat it had a cassette toilet, emptying this is a horrible process and as they fill up quite fast to add to fire anxiety (worrying about running of out firewood) you now have toilet anxiety as you always need to be thinking about where the next elsan station is to empty it (specialised emptying point as due to the chemicals involved cant empty down normal drains). I wanted an incinerator toilet but are too pricey so have gone for simplaoo composting/ separator toilet where the poo and pee go into different sections. The pee can be easily disposed off at an elsan station, normal drains or a even a field. The poo is a bit more difficult, thankfully should only need doing monthly (has a carbon filter fan to stop smells) but as the CRT have banned putting this in bins you need to compost it. I am still working on a composting solution, it needs a year to compost so eventually will have 2 smallish compost bins for this.