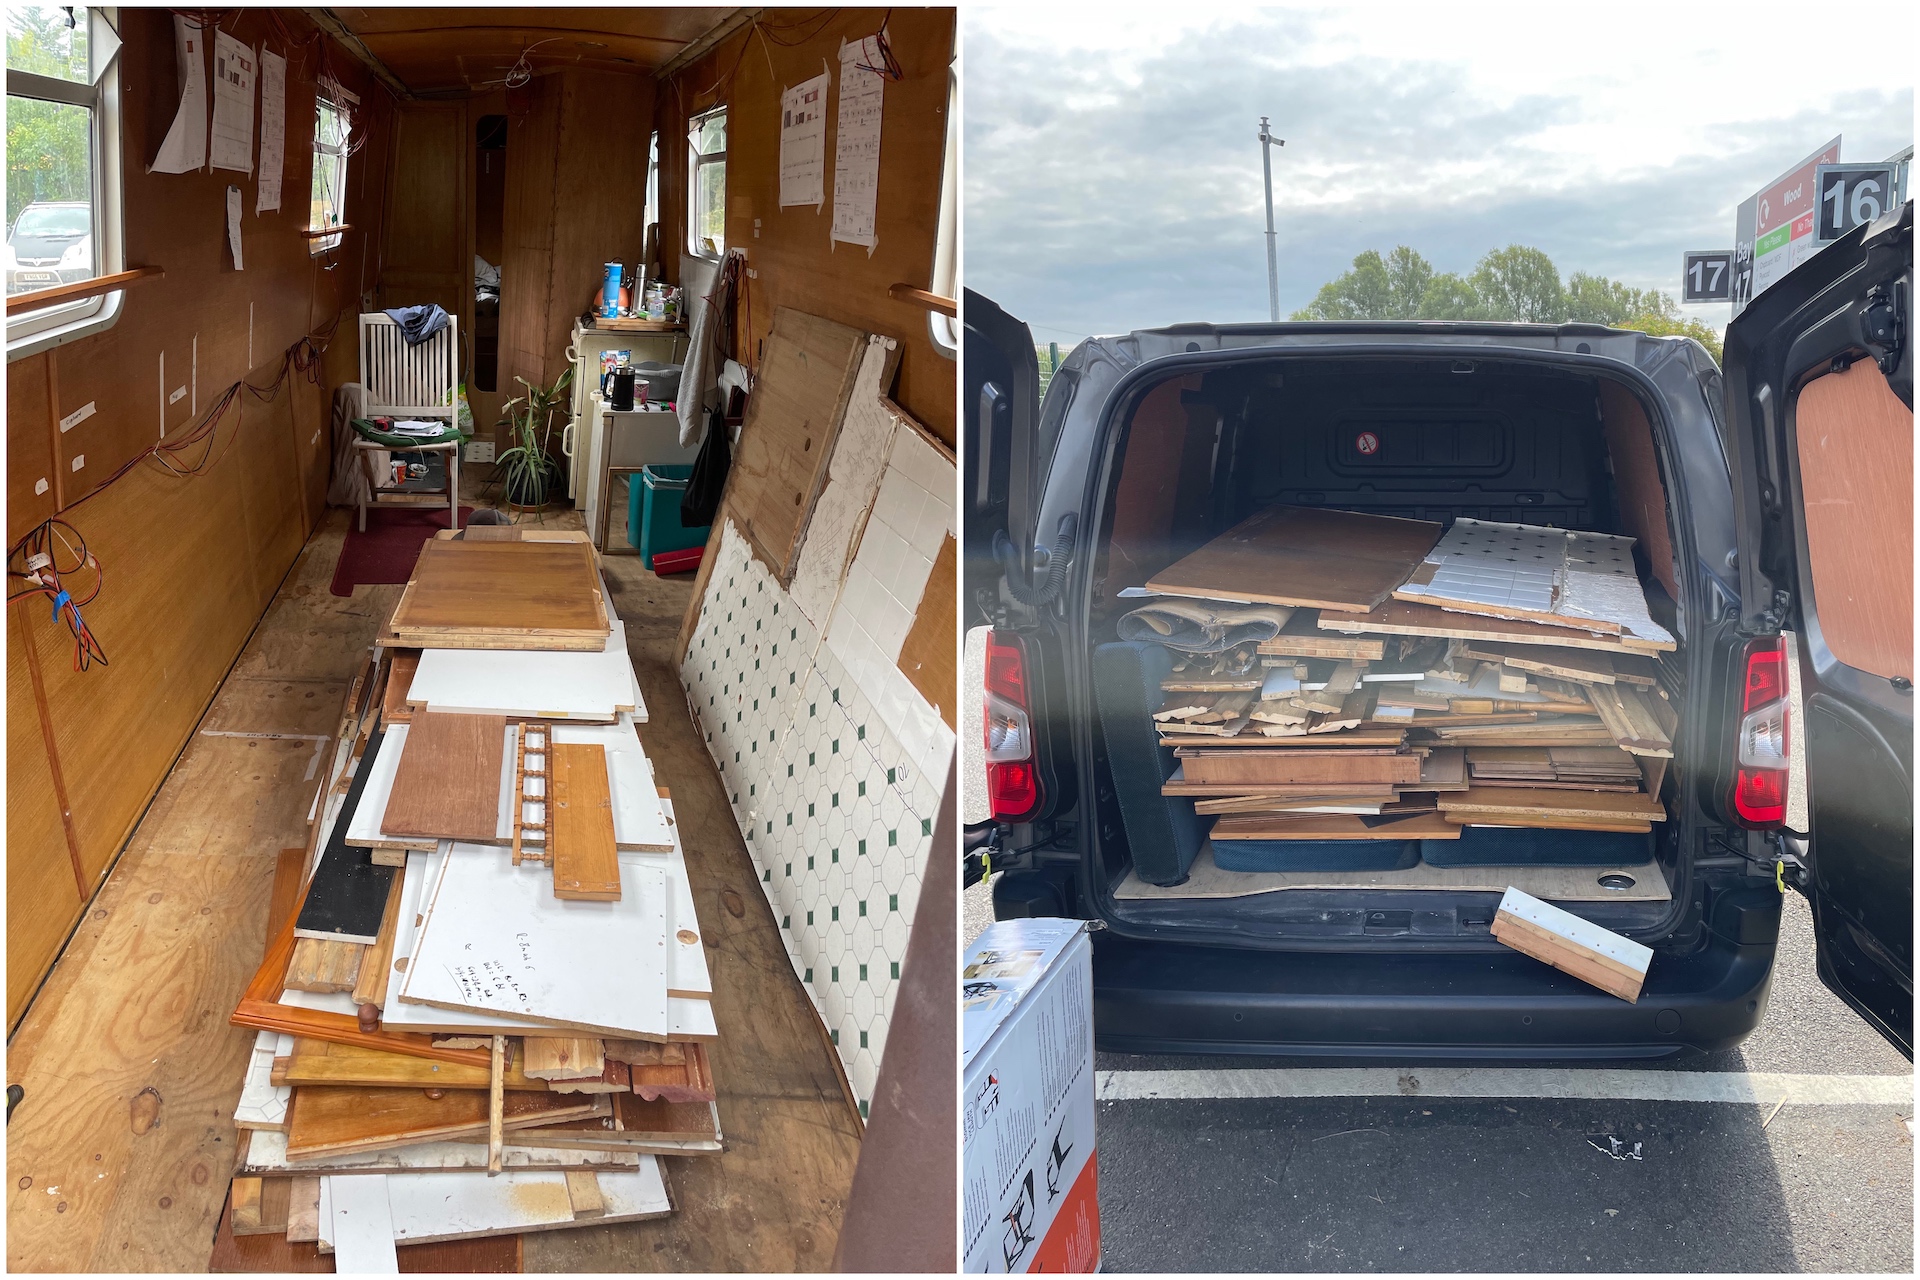
I purposely bought a boat that needed work so that I could customise it to my needs and learn how everything works. The wooden interior was dated and gloomy, it only had 1 DC socket, no working AC (no fuse board or inverter), no hot water (water heater broken) and a rusted up stove with 1 radiator run off it. After 5 months of hardship and an ever decreasing bank balance whether that was a good idea is debatable…..
Table Of Contents
Layout
The first thing to do was to rip everything out (except the bedroom) so I could start with a clean slate. Ideally I would have saved a lot of this wood to use for other things but unfortunately I didn’t have any space to store it so the majority of it went to the tip. At Debdale you can rent storage containers, if I were to do this again I would probably use a container for storage as well as a workshop for doing the cutting. I guess if you were daft enough to live on it whilst doing the work you could setup camp in the container.
There are 3 narrowboat stern types, I went for cruiser stern as I liked the idea of being able to put a table on the deck and sit outside when not cruising. Whether this works out in reality to be true only time will tell. The two main internal layouts are either traditional with the bedroom near the stern or reverse with the kitchen and galley near the stern. My main problem with traditional is that you always have to walk through the bedroom to get to the stern, and as the bed covers two thirds of the boat width this means constantly walking down the side of the boat. If the boat is more for a live aboard with occasional cruising I can understand why people would have the galley or kitchen at the bow (bow deck can be extended into a kind of conservatory), however I don’t think that layout works well if you are continuously cruising.
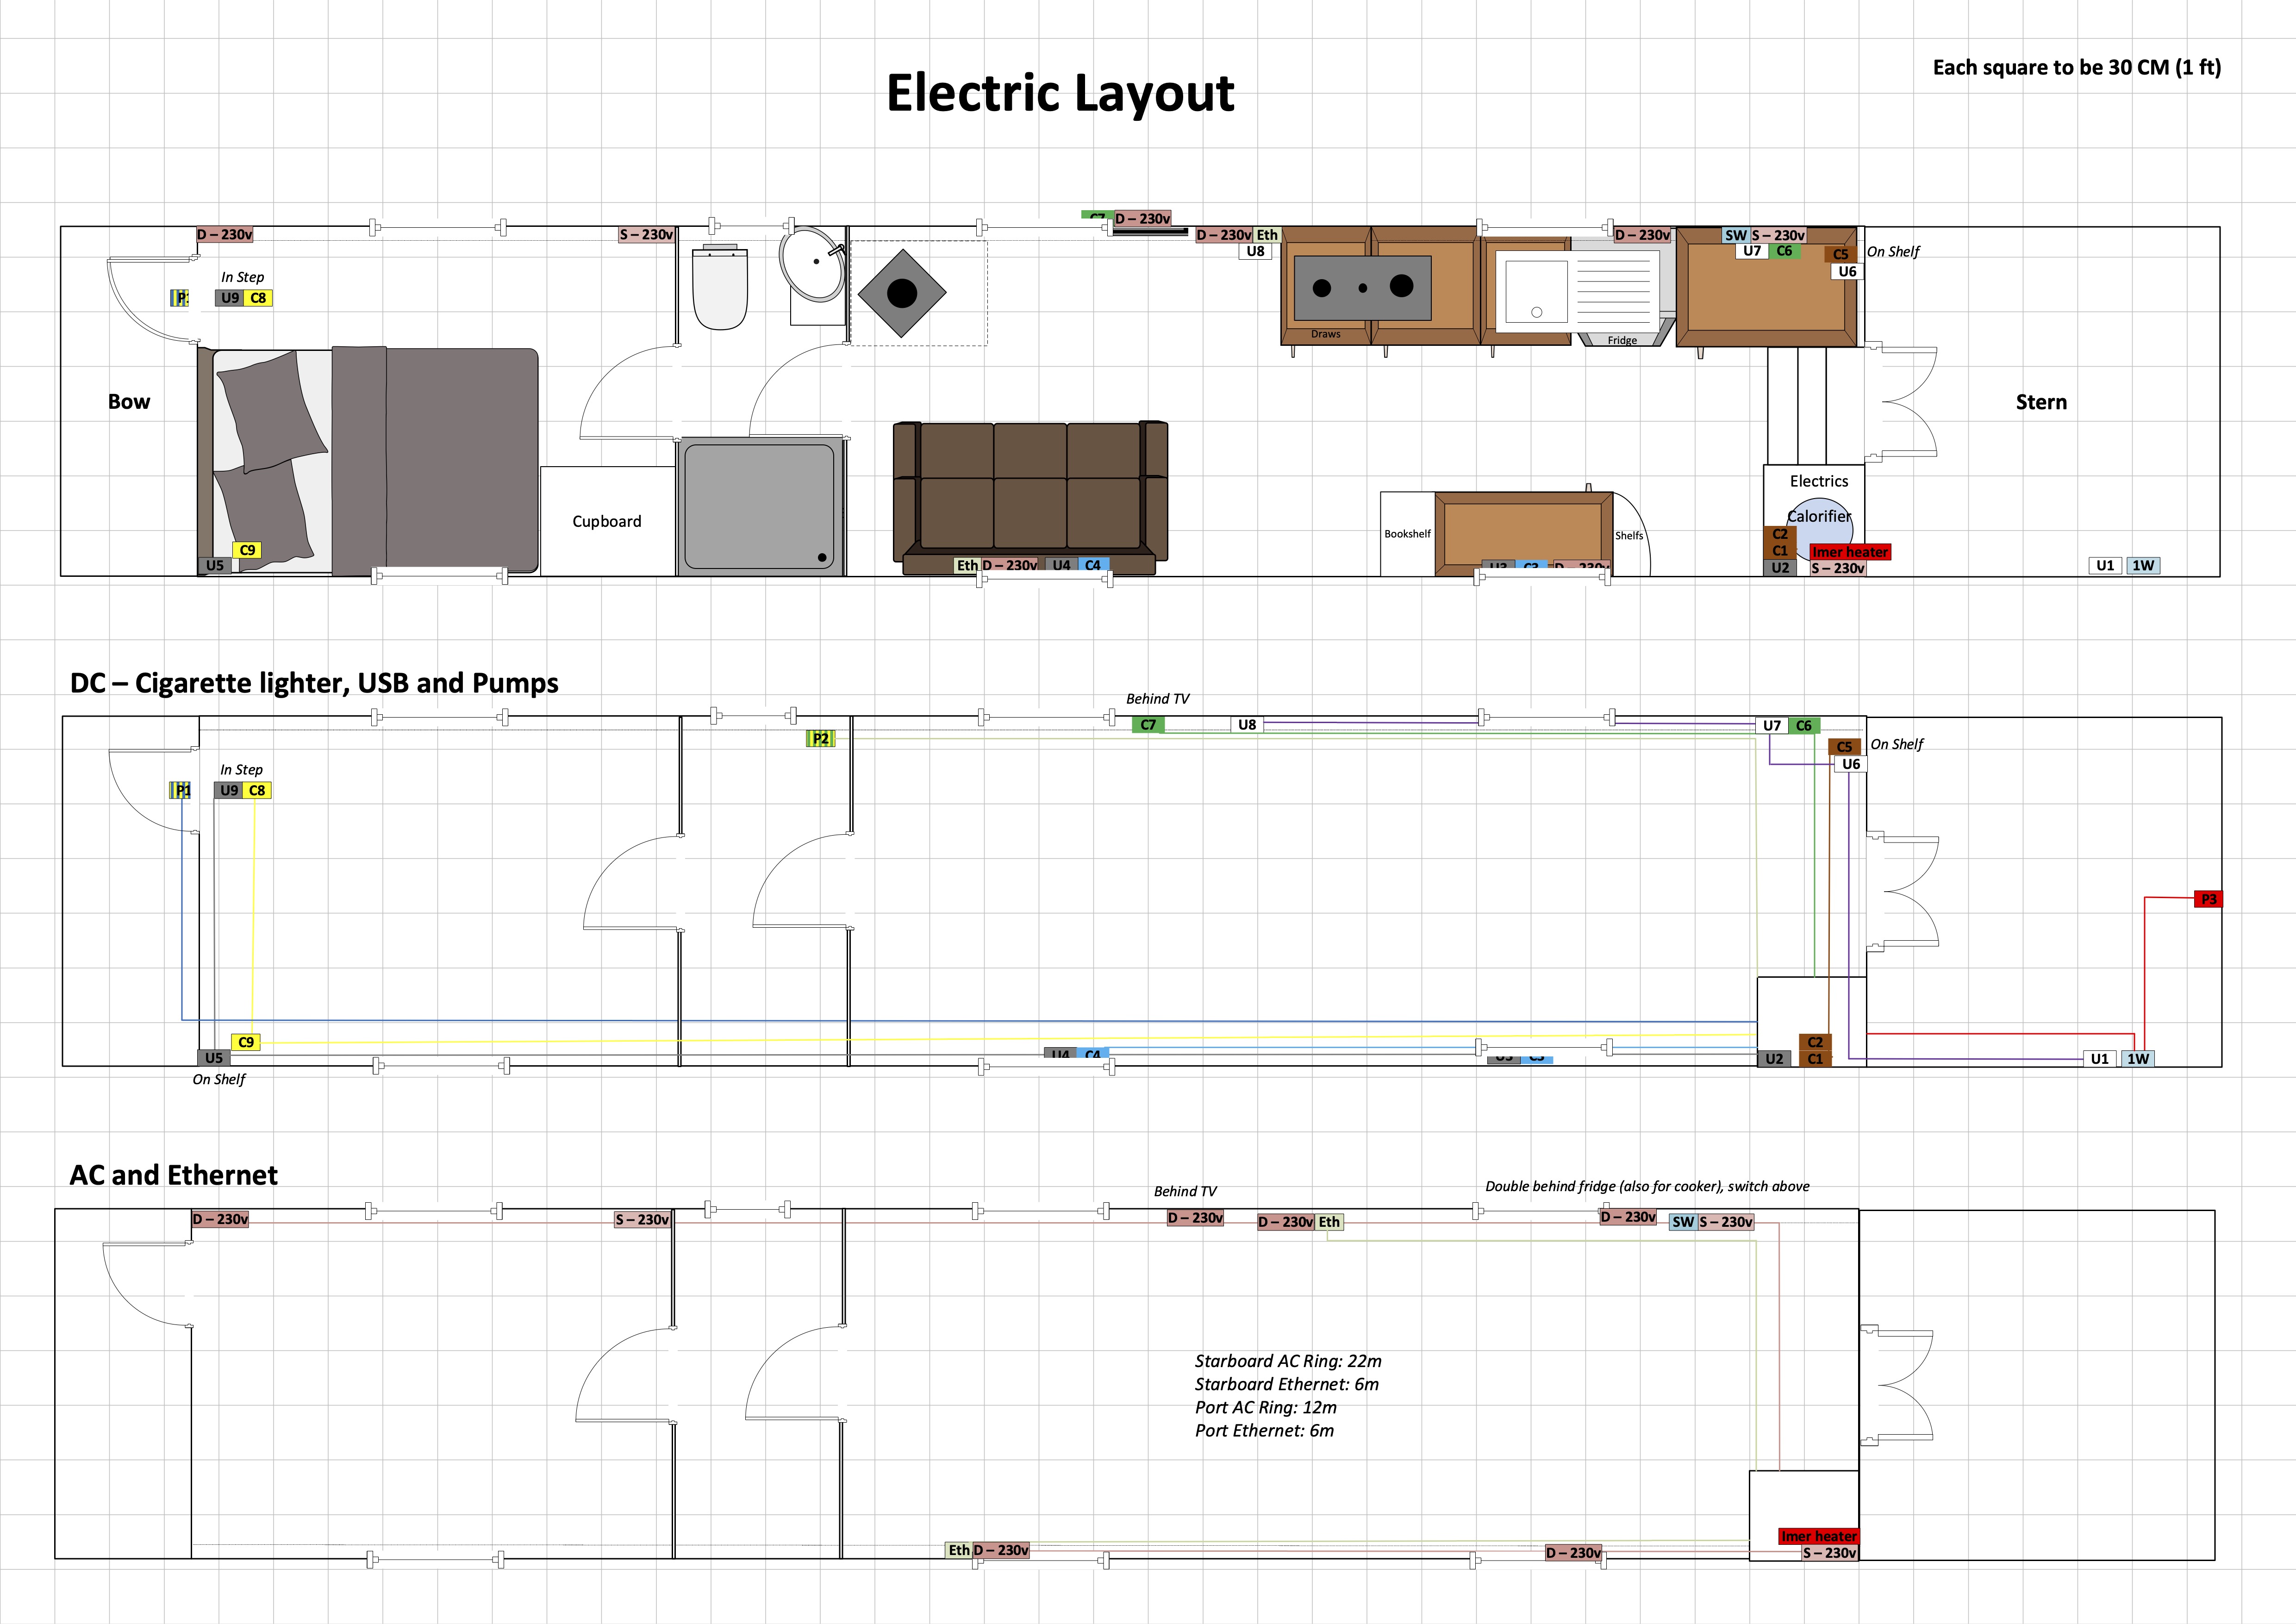
Below is the final layout I came up with, I have tried to keep the walk way down the middle of the boat as for a tall person walking down the sides can be awkward and makes the boat rock. When I do the bedroom later in the year I am considering moving the cupboard to behind the bed to keep the head board off the back wall and away from the door to hopefully make it slightly warmer in the winter. This will also allow for better distribution of weight as at present a lot of the storage is on the starboard side.
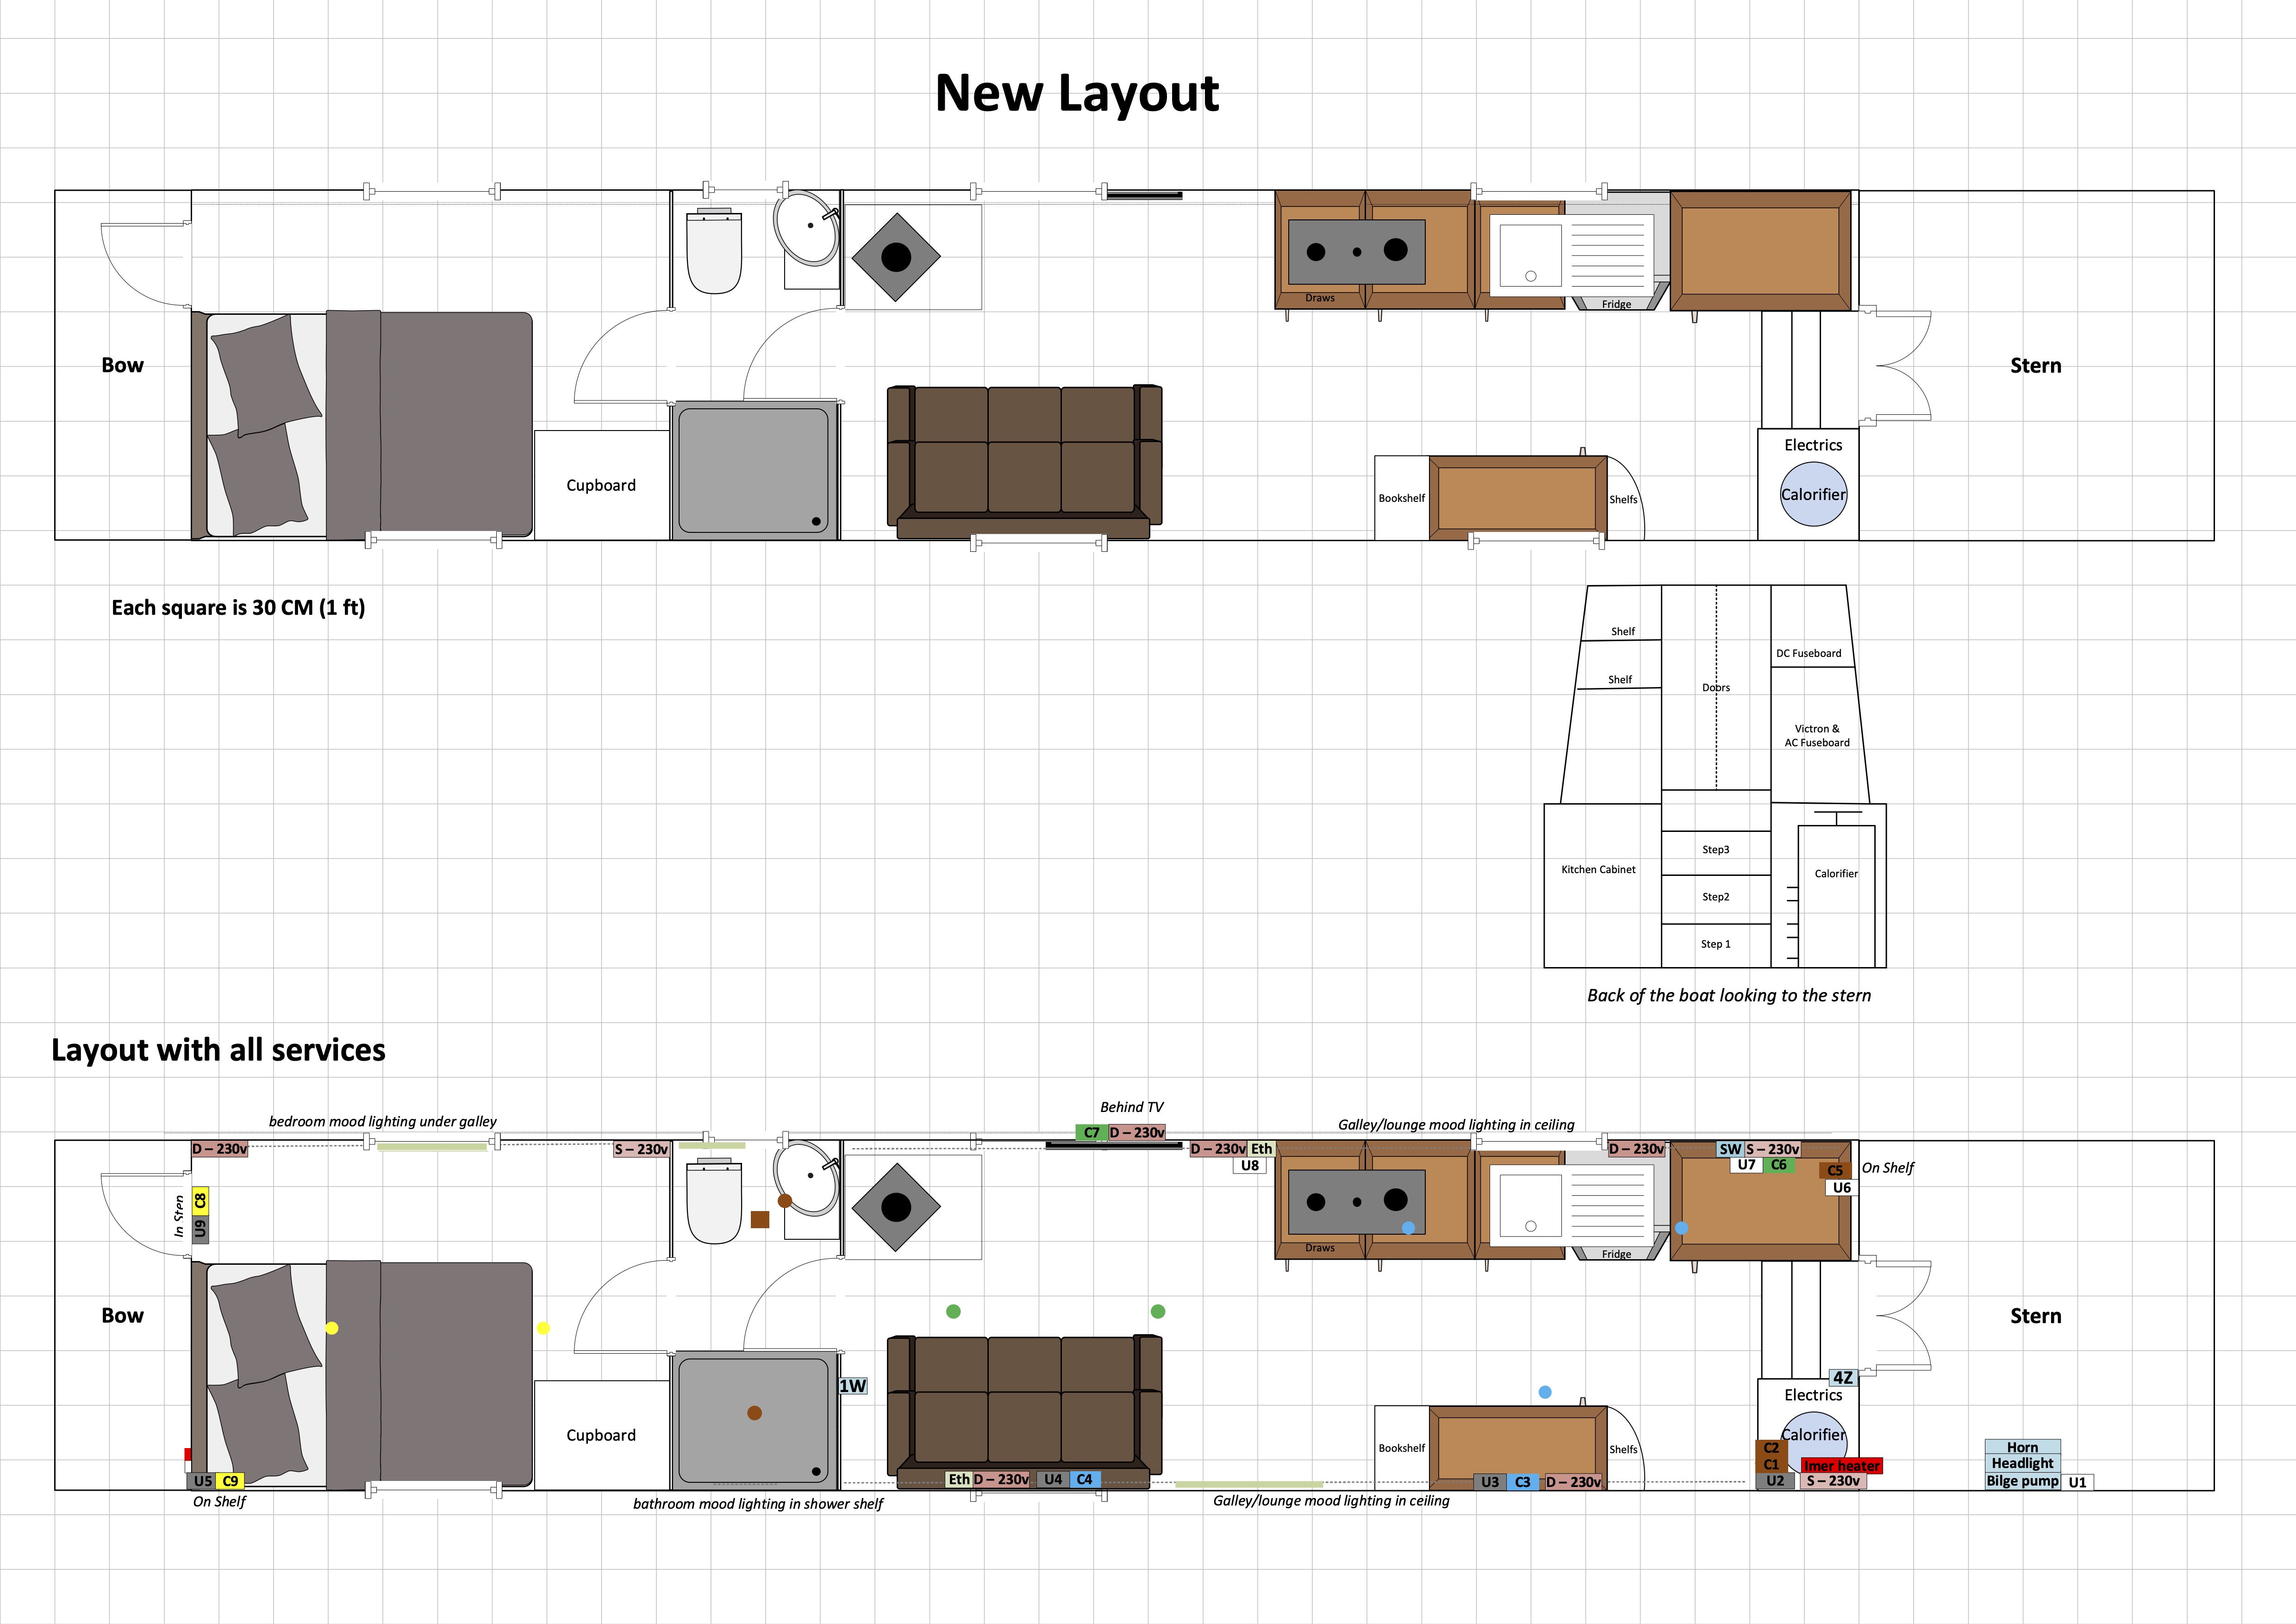
In houses I have done up in the past I never started any major work until I had lived in it at least 6 months as you need time living in it day by day to fully appreciate how you want everything to be layed out. Unfortunately I didn’t have that luxury with the boat as I needed to get started on the work before winter, hopefully any mistakes I make won’t be to hard to rectify.
Electrics
Although inverters (convert DC to AC) are a lot more efficient than they use to be, with the exception of the fridge my plan is to use DC as much as possible to get the most out of my leisure batteries. The boat will have a combination of traditional AC sockets, cigarette lighter sockets, USB-A and USB-C sockets. I have probably gone a bit OTT with the amount of sockets but I thought it was better to have more than less.
As a boat is a moving object you can not use single core cable like the traditional twin and earth you find in a house as there is risk of it breaking under the vibrations. If these multi-strand wires go into non-clamp screw terminals (such as a AC socket or chocolate block) they should first be crimped with bootlace ferrules. I don’t believe this is the case for Wago connections as they have clamps in them, that said I have seen that some people still use ferrules with them.
DC
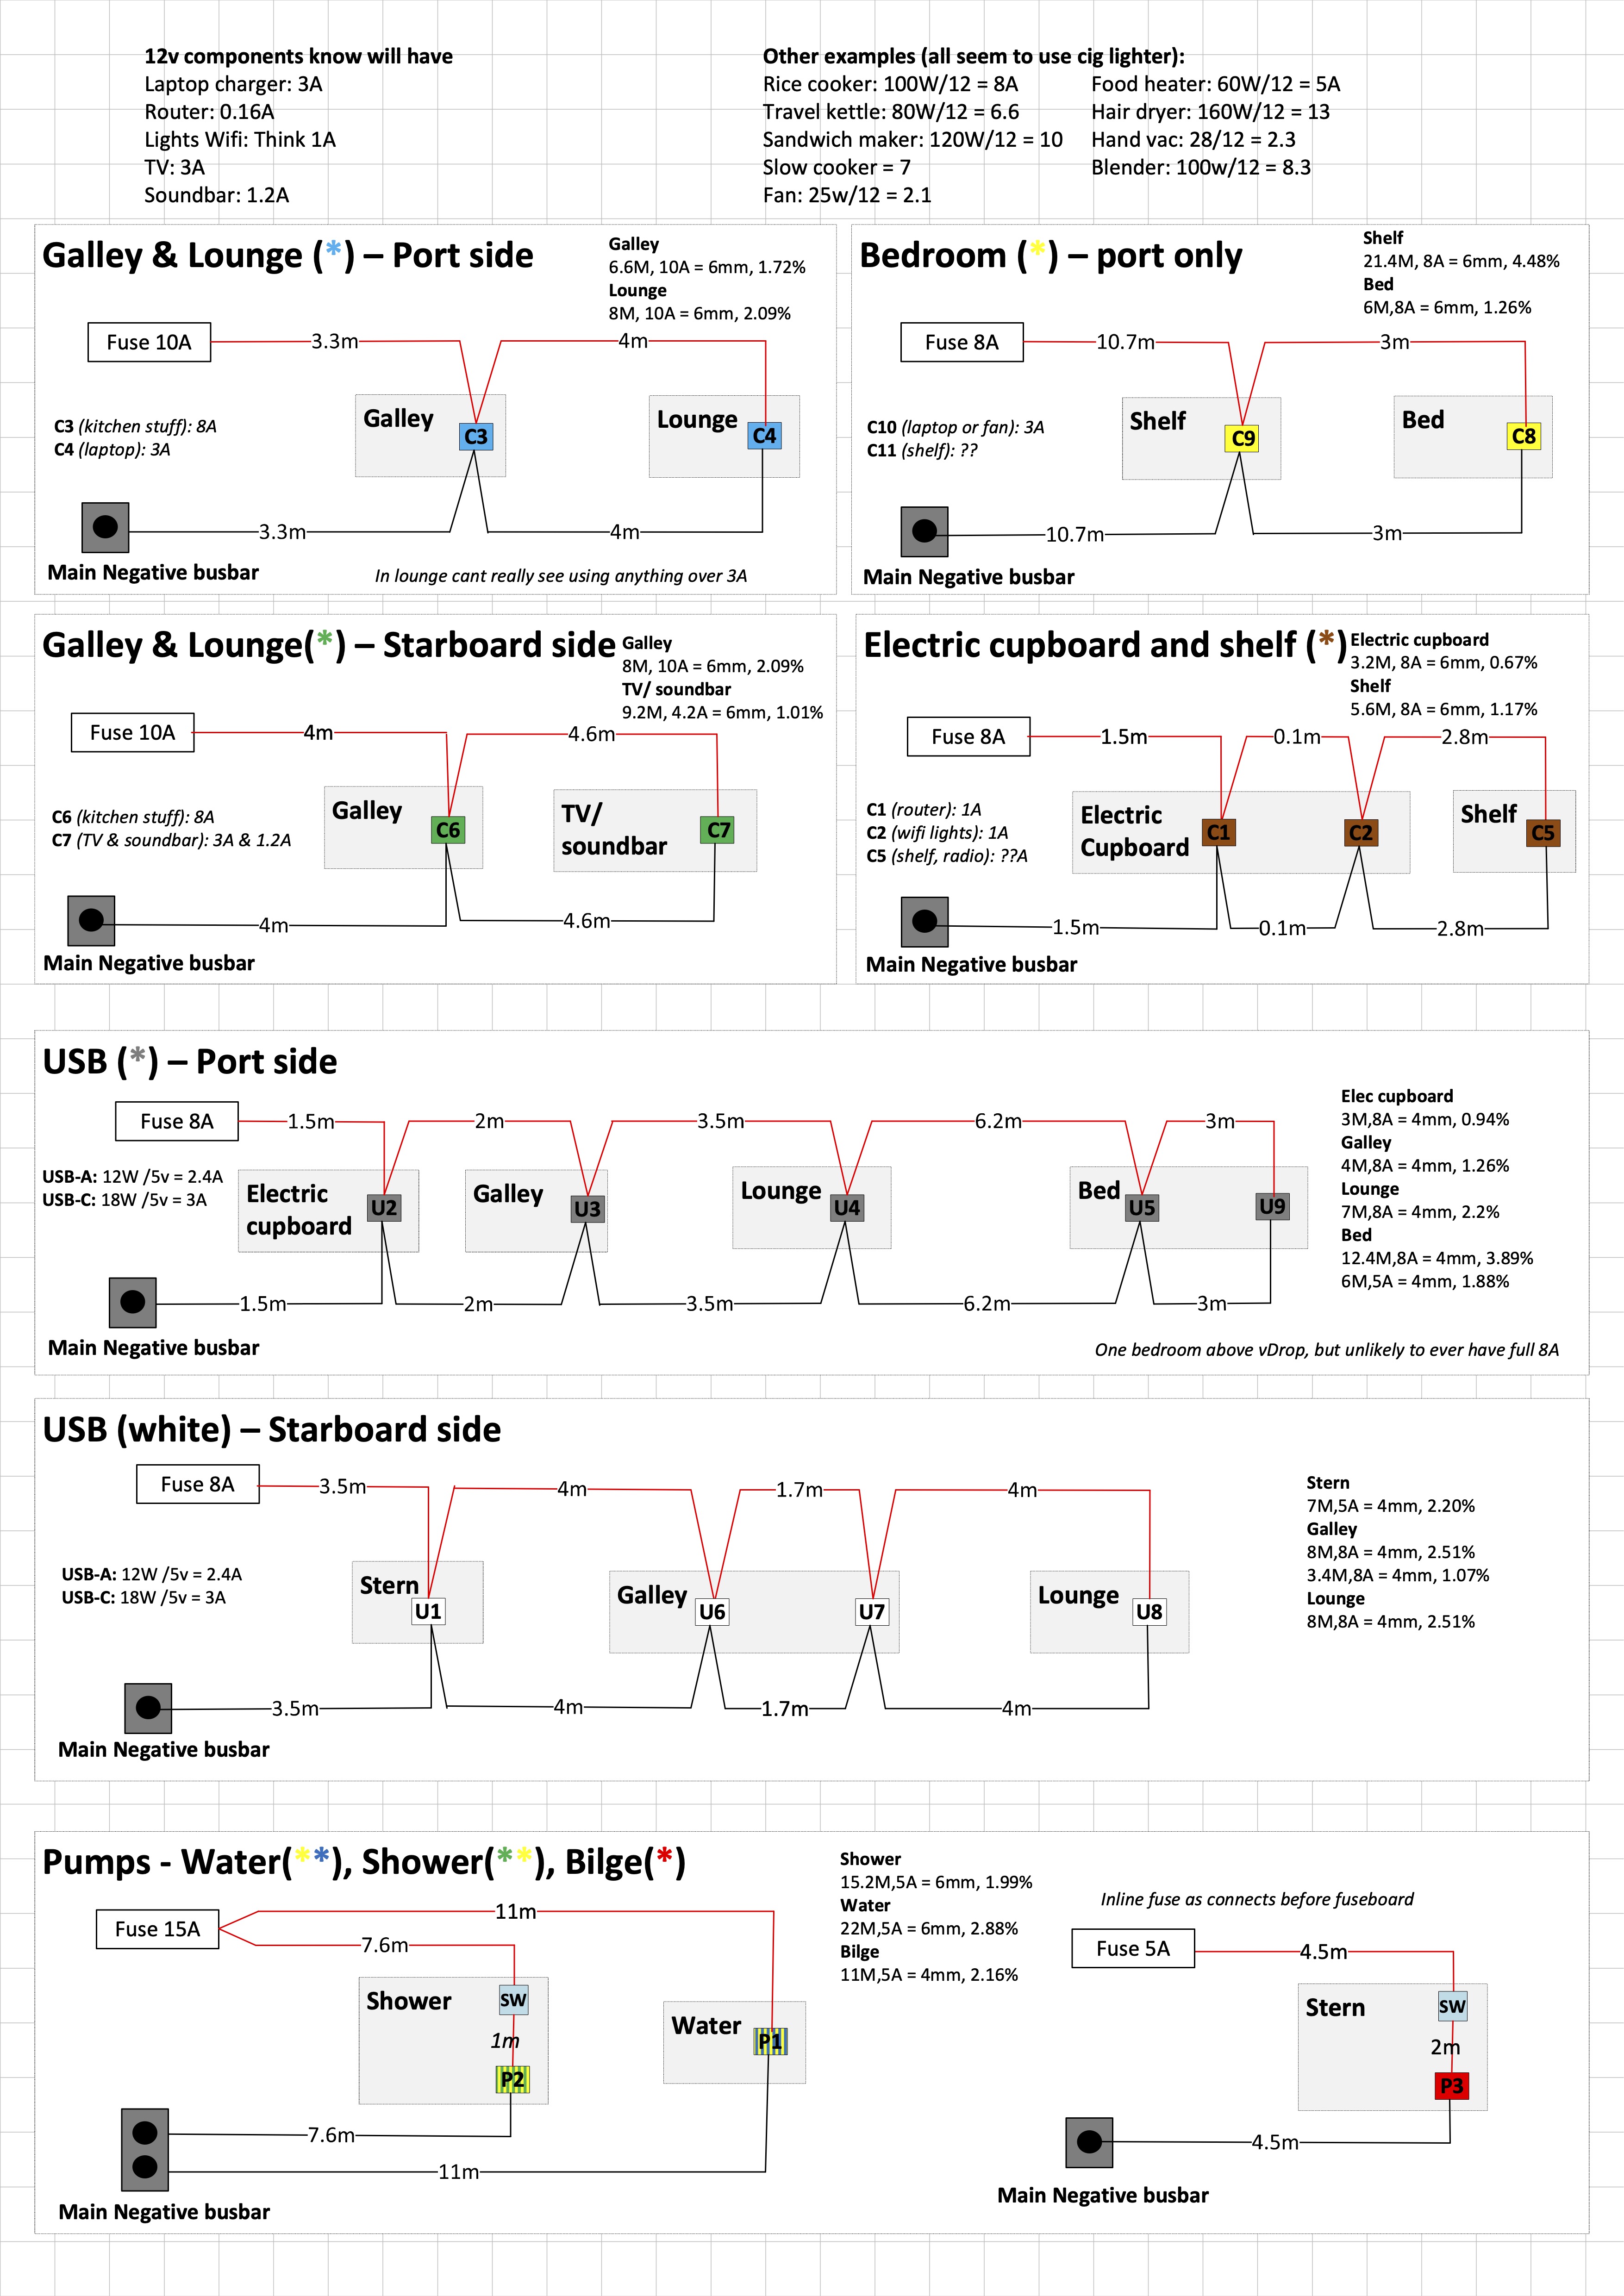
When working with DC the cable diameter is not fixed, the correct cable diameter needs to be selected based on the voltage drop of each specific cable run. Longer distance with higher current means thicker cable. The voltage drop has to be kept below 3%, this needs calculating for each cable run (is the total circuit, so both ways from the circuit breaker panel) with different cable sizes until you get a value below 3%. Like anything these days there are apps and websites to workout it out for you. You could just run thicker wires for all runs but then the costs rise and the thicker the wire the more awkward it is to work with.
Based on the calculations for each of my know DC use cases I standardised on a specific size (the biggest required) for all cable runs in that use case as it is cheaper to buy cable on reels in bulk lengths rather than buying lots of different sizes for all the differing cable runs.
- Lighting: 2.5mm
- USB sockets: 4mm
- 12v sockets: 6mm
- Pumps: 6mm
To differentiate the cables they will be tagged at 1 meter intervals with coloured insulation tape that corresponds with the colour scheme in the electrical diagrams. There are only so many available colours so the same colours will be used for lighting and sockets/pumps as they are in different cable runs so wont conflict (sockets/pumps under the gulley, lighting in the ceiling). At the circuit breaker panel they don’t really meet as lighting circuits all go behind RF receivers rather than directly onto the board.
Lighting
The obvious choice is to go for LEDs, the amount of current they draw is so minimal is makes them really efficient on the batteries. There are a lot of different options out there for 12v lighting solutions but in the end I went for Sunricher RF receivers as I liked the controller and the wall sockets, the only downside is that receivers dont have built in wifi. The downlights themselves need to be low profile as there is very little space between the ceiling and cabin shell, in the end I went with these.
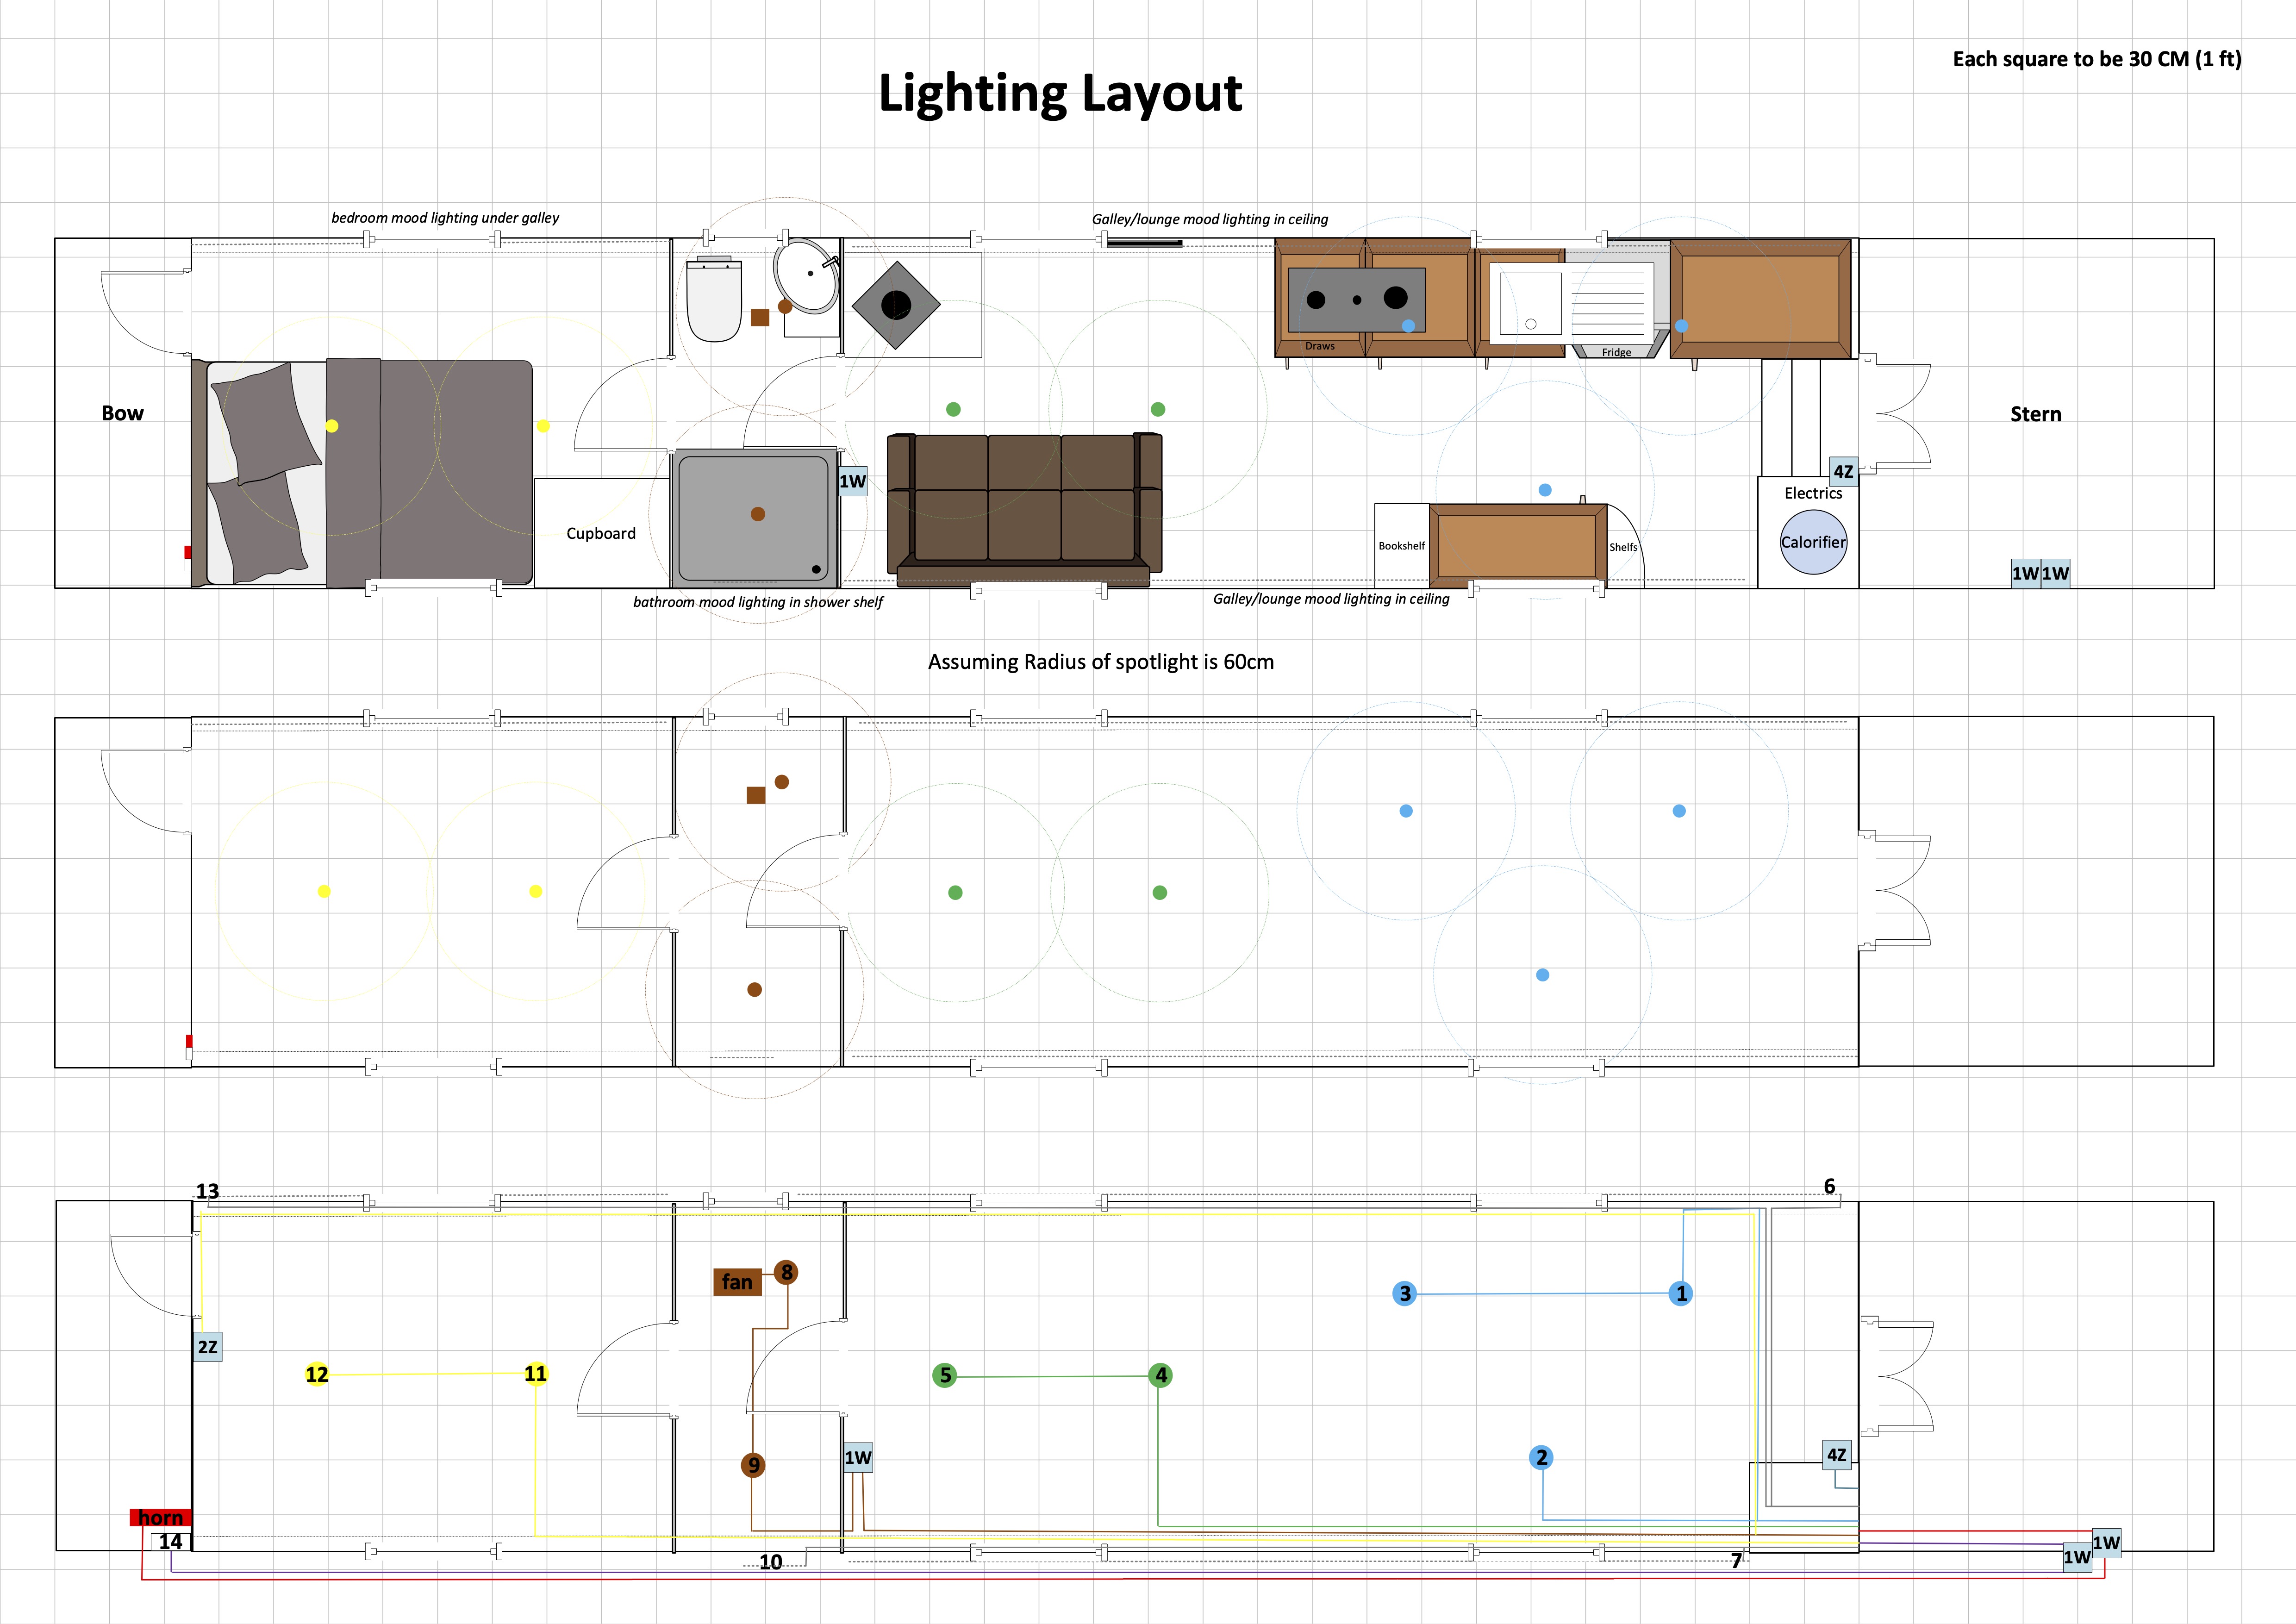
As the diagram shows the voltage drop for all lighting runs only really required 1.5mm sized cable, but as 2.5mm didn’t cost much more and seemed more robust I decided to use that instead.
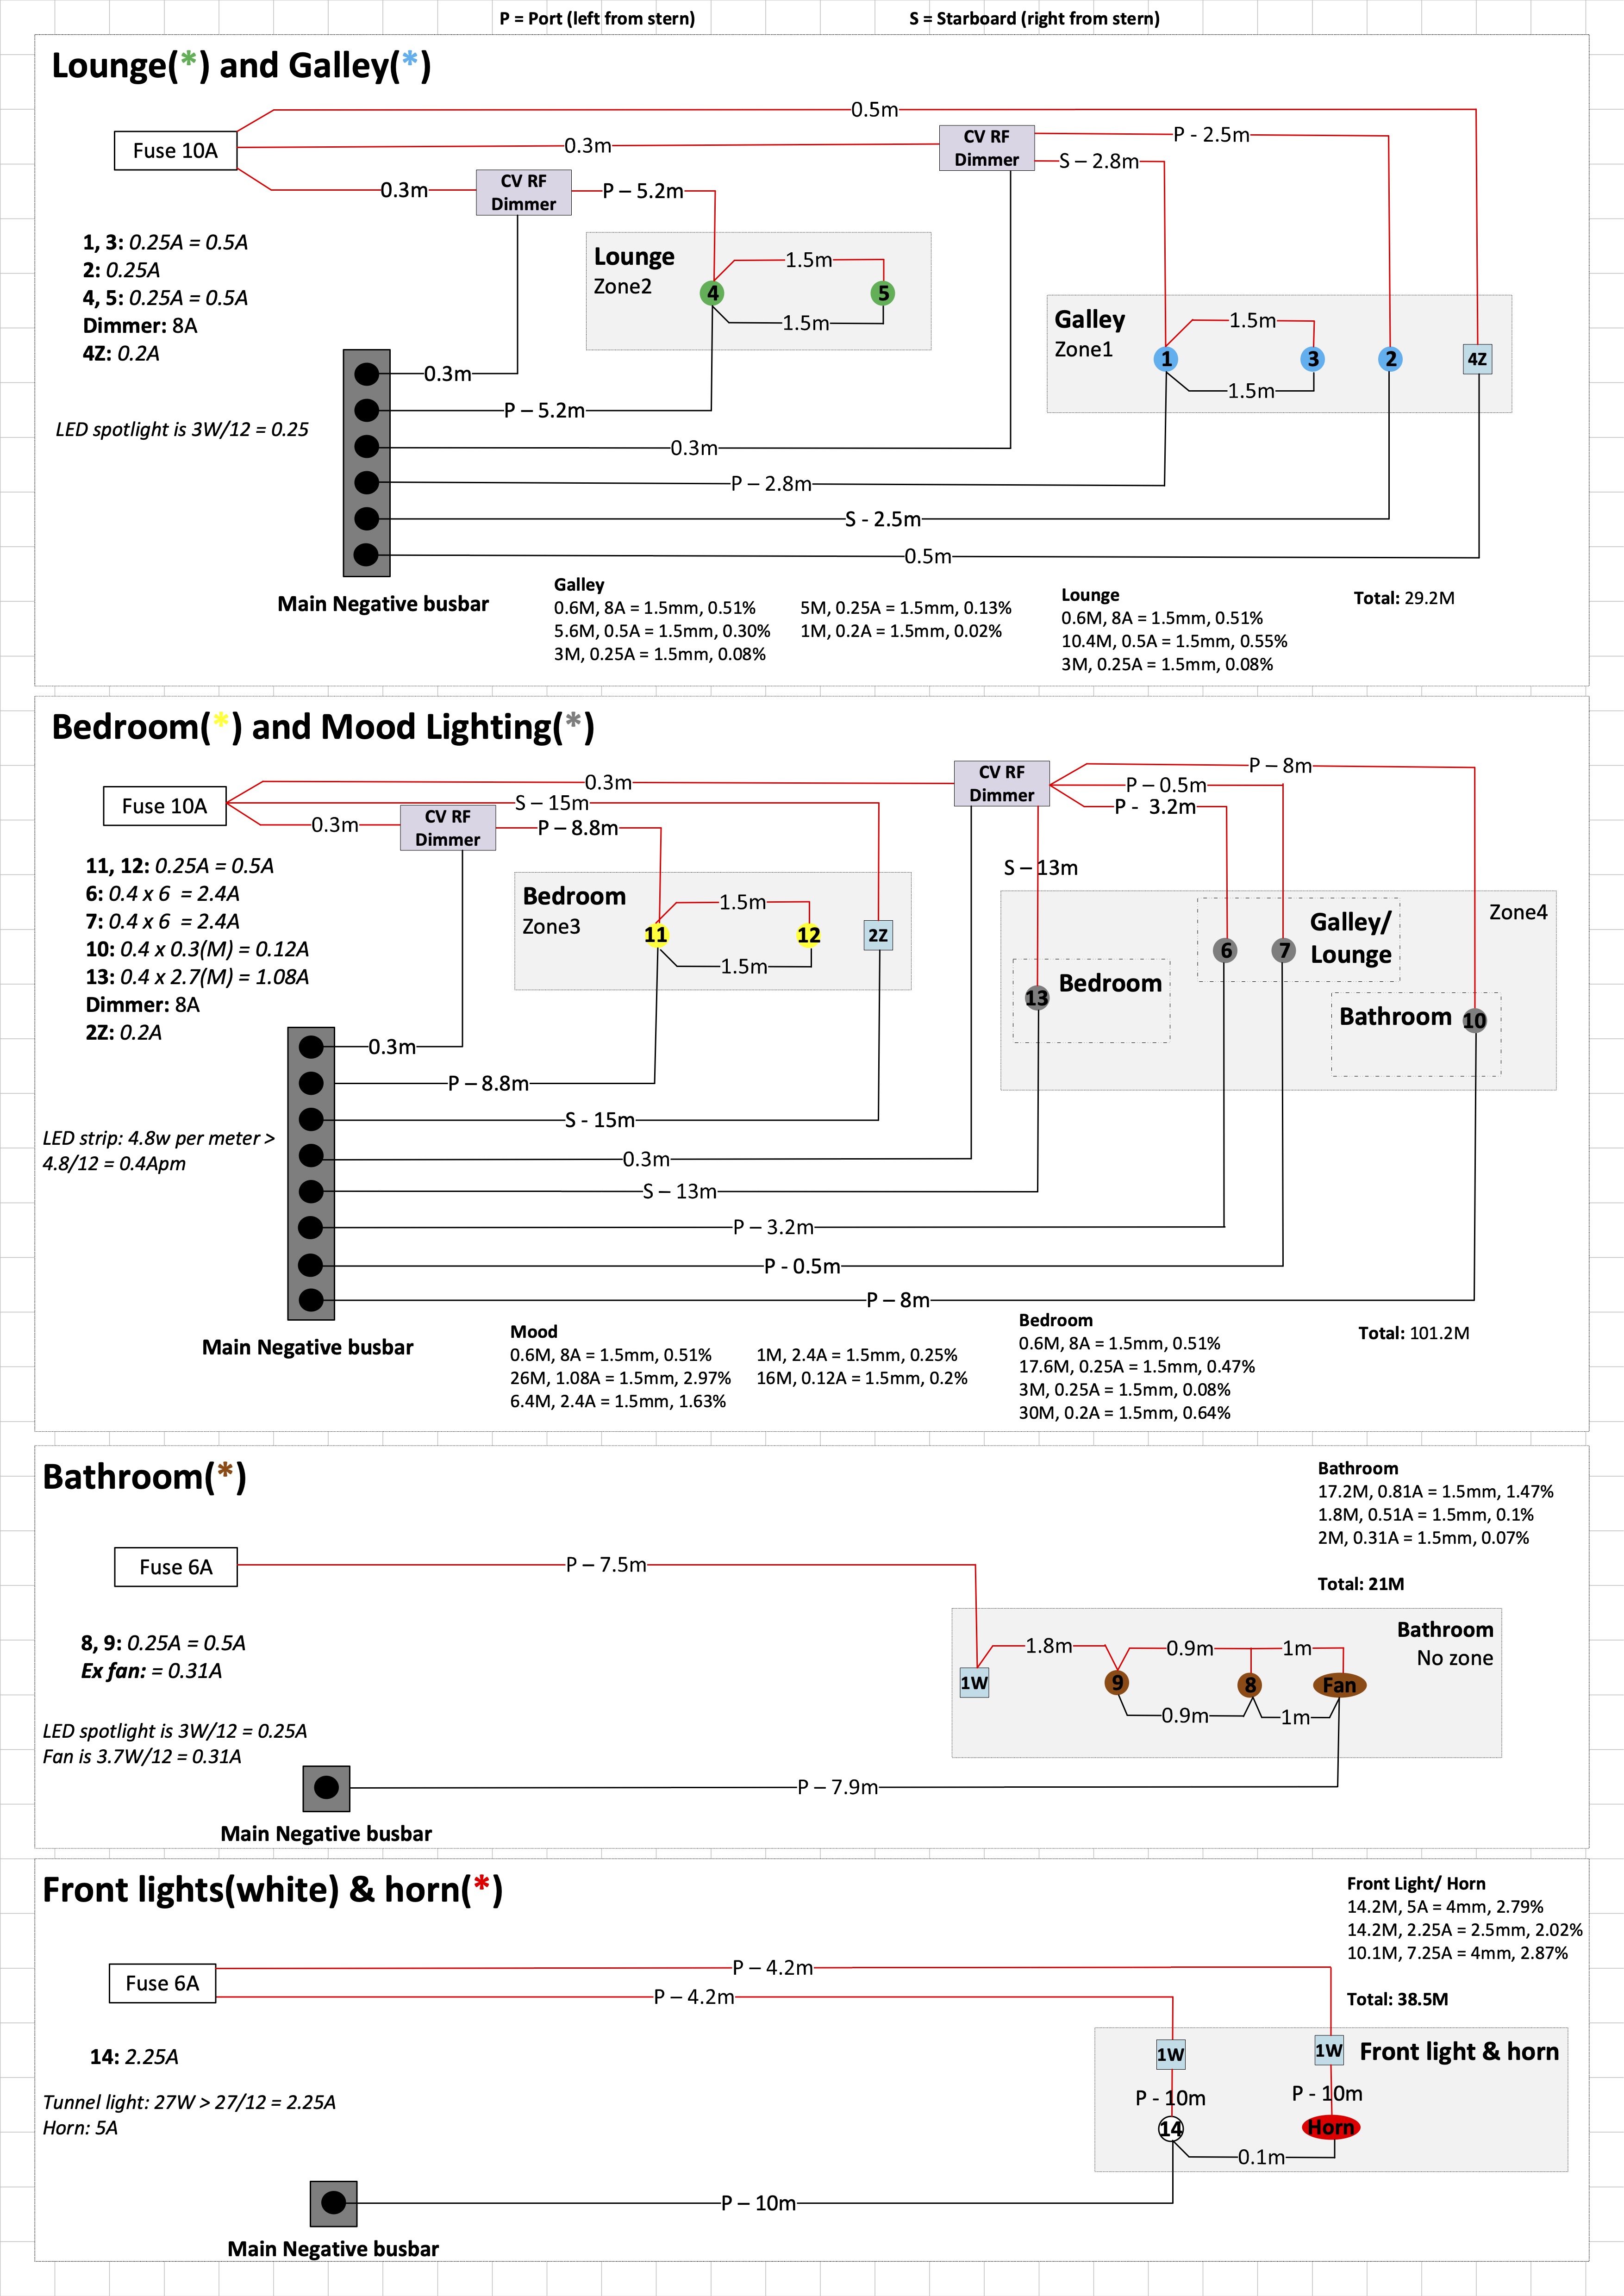
Circuits
Surprisingly there is no actual standard for 12v sockets, most of the 12v appliances you find use cigarette lighters. Seems a bit odd for boats as the rear of a cigarette lighter socket is deep to start with, so when you add add the crimps onto this it and becomes a right pain to recess into the wall. You could use non-ac sockets, but that would mean replacing cigarette lighter plugs on all 12v appliances to these plugs. This type of socket will only be used for the 12v TV and soundbar as a cigarette lighter would stick out too much, I can get a 12v multi socket and put a plug on this rather than changing the actual TV or soundbar plugs.
The DC electrics is split into the following circuits and will behind a 12 way circuit breaker panel.
| Circuit breaker size | Number of breakers | Usage |
|---|---|---|
| 6A | 2 | front light & horn, bathroom lights |
| 8A | 4 | USB port-side, USB starboard-side, 12v electric cupboard, 12v bedroom |
| 10A | 4 | 12v port-side, 12v starboard-side, galley & lounge lights, bedroom & mood lights |
| 15A | 2 | pumps (water pump, shower pump), spare |
Both the 12v sockets/pumps and USB are in same cable run so having 6mm and 4mm respectively helps to easily differentiate them. The bedroom 12v sockets are bordering on the voltage drop limit but I don’t envisage having much using 12v in bedroom so shouldn’t be a problem. Pumps are known to be power hungry so need to be at least 6mm, as the shower and water pump will be on at same time I put these on a 15A fuse.
On top of the above mentioned circuits there are two other 1.5mm cable runs (positive, negative and sensor signal) from the electric cupboard to the water pump and fuel tank for tank level monitoring. This will be covered in more detail in a future post on the Victron setup.
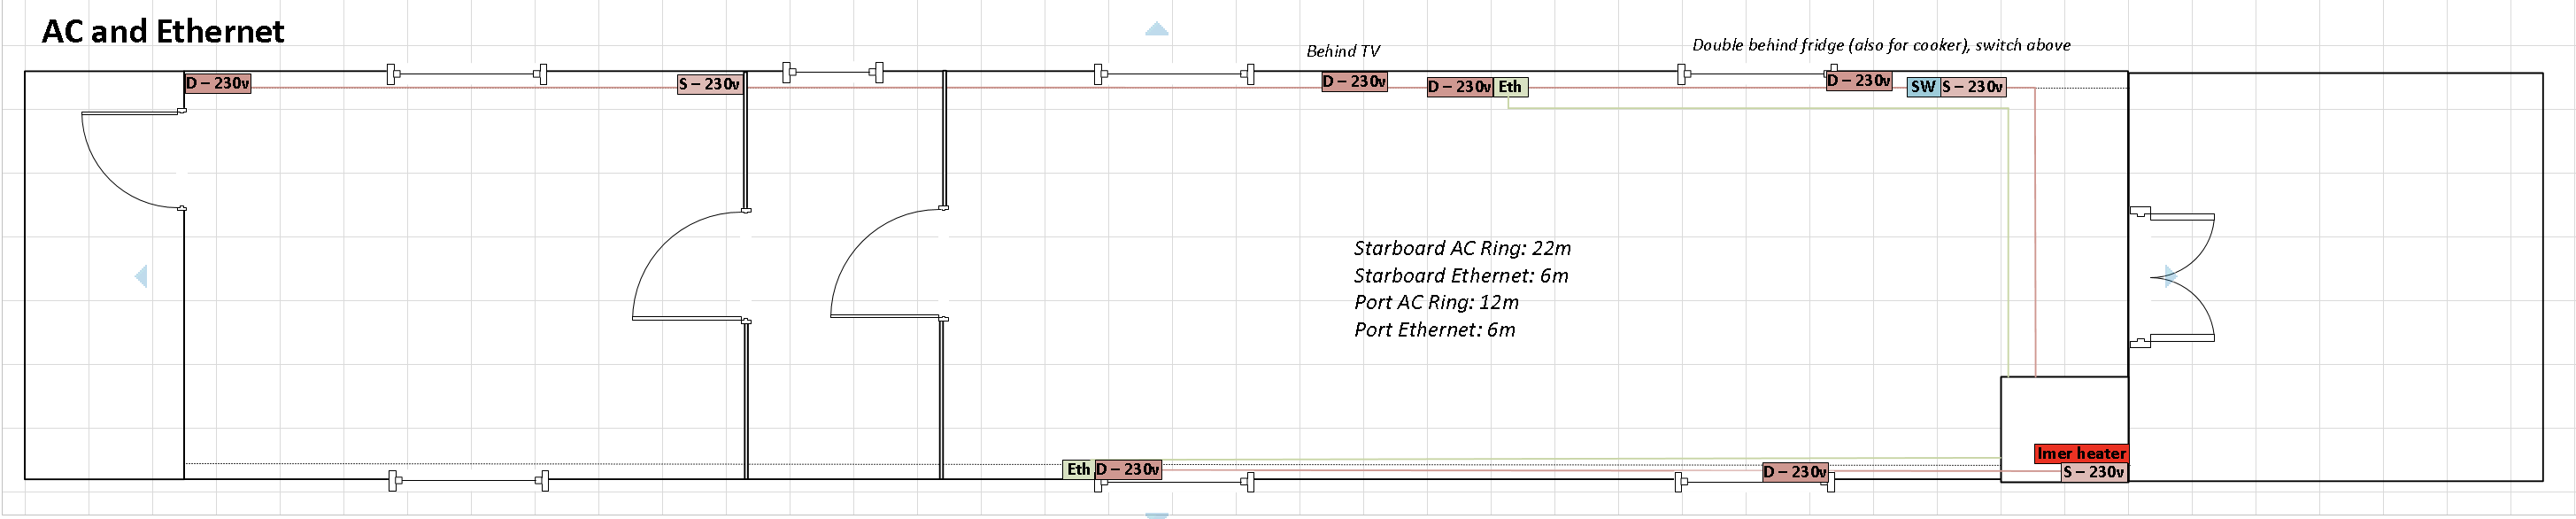
AC circuits
Arctic grade blue PVC flexible cable must be used as this is classed as suitable for outdoor applications where flexibility is required at sub zero temperatures. Given the size of the boat and the likely number of AC appliances you could get away 1 ring main, however I decided to split it into a starboard side ring, port side ring and immersion heater as it made the cable runs easier and gives better granularity for troubleshooting.
The only things that will be on AC from day1 is the fridge and oven. I initially planned to get a 12v fridge but decided against this as unlike AC fridges they dont have to abide by energy efficency ratings so apparently an AC fridge running on an inverter works out to be a similar draw on power. Also a 12v fridge cost about 4 times more so thought is worth trying out an AC fridge to start with and see how it goes.
Although the single oven will be gas it needs an AC supply for the light, ignition and the heat distribution fan. I was thinking that you wouldn’t need electric when not using these features, however the oven also has a safety cooling fan that runs automatically with the oven and grill to achieve optimum efficiency of the controls, ensure lower surface temperatures are maintained and to cool the internal components. I am assuming if you were to run the oven for a sustained period of time without electricity it would damage it.
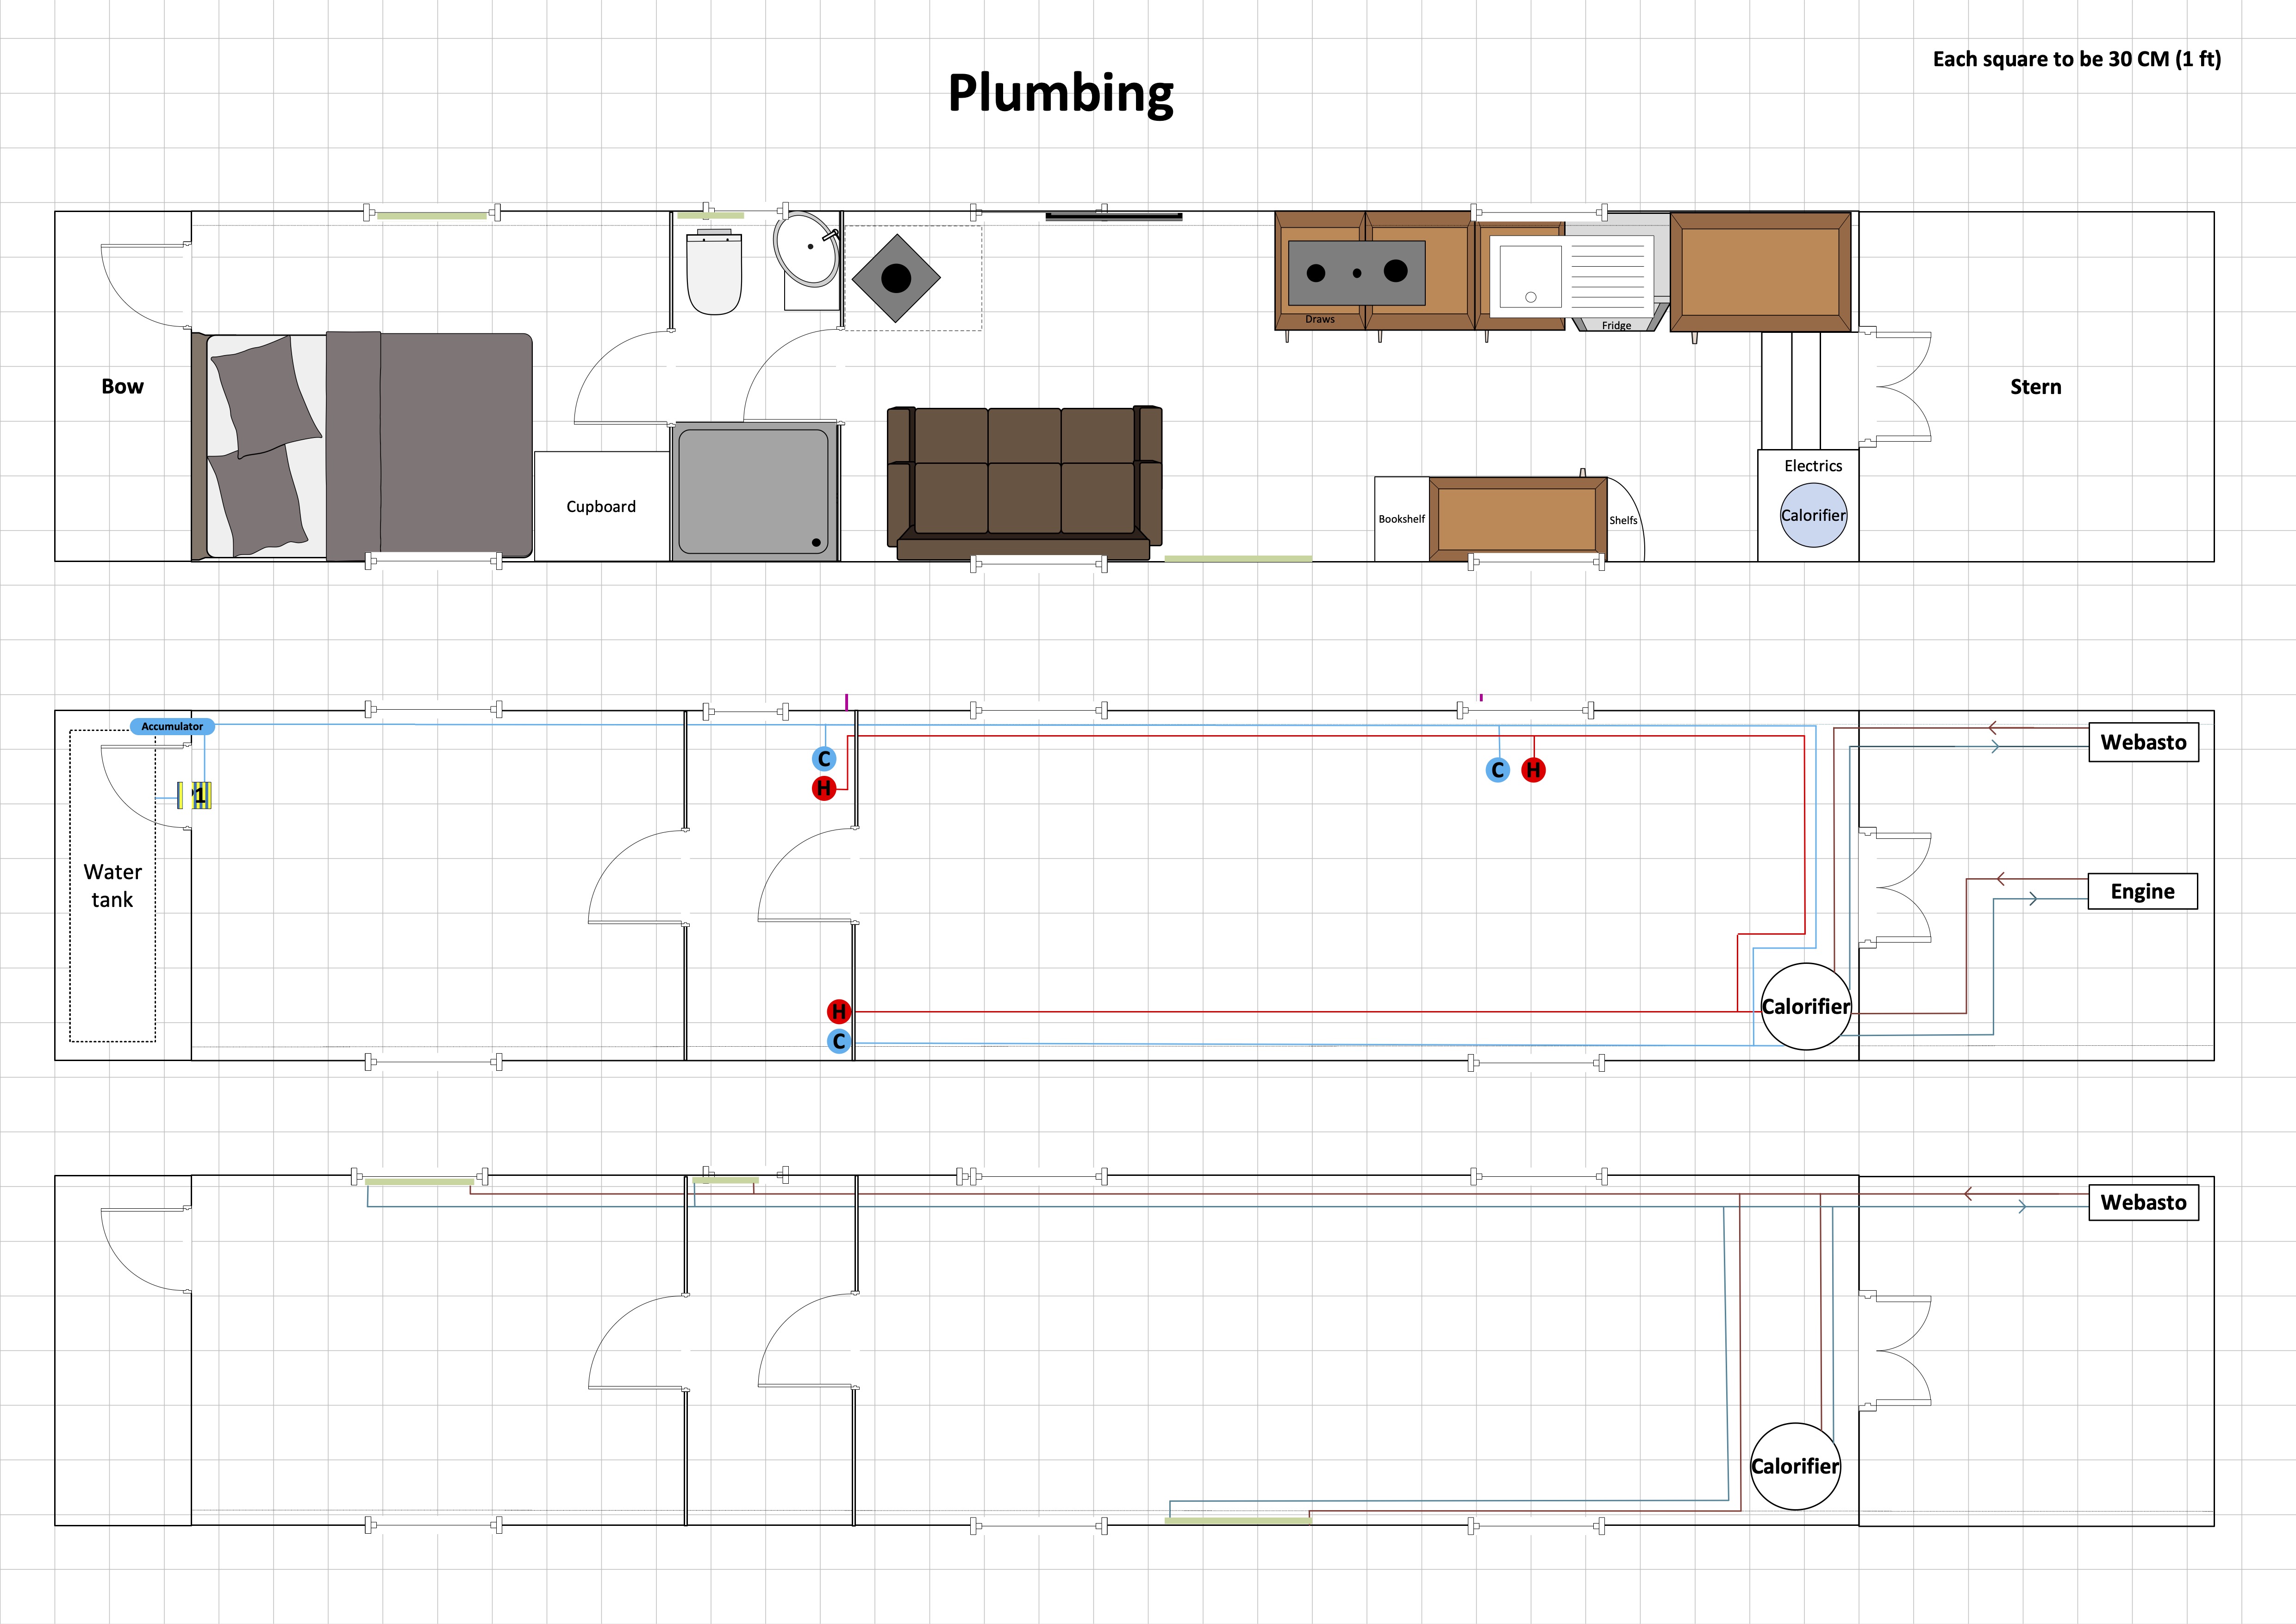
Plumbing
Hot water on a boat can be supplied using a gas water heater (I think BSS rules arround this are changing) or a calorifier (like a water cylinder you would find in a house). In terms of central heating two of the most common ways are to use a diesel heater or a stove with a backbolier on it. I thought it best to have redundant methods for providing both water and heating and liked the idea of a diesel heater as it makes it possible to get heating and hot water with very little effort. The methods I will use are:
- Heating: Dual fuel stove (logs and coal) or radiators fed by a diesel heater
- Hot water: Dual core calorifier heated from running engine (engine coolant passed through coil), diesel heater or an immersion element
The idea is that if I have been out cruising the water will have been heated up from running the engine, however if not on the move I can always run the diesel heater to heat the water. For the heating if I need pretty fast no messing arround heat (like in the morning) I can run the diesel heater to heat the radiators, or for full day heat or cozy evening heat use the stove.