When I went of in search of warmer climates in Australia I moored up at the Aylesbury Canal Society on the Grand Union’s Aylesbury arm. As fortune dictated the weekend before I got back a lock on the arm collapsed meaning I was going to be stuck there for sometime so decided to be productive and try and finish off the interior of the boat.
It is definitely worth a visit if you are in the vicinity, the Aylesbury arm is a lovely tranquil canal, you can moor at ACS for free for a week (2 weeks if not living aboard), the facilities are some of the best I have come across on my travels and best of all is that it has a shared workshop so no more living in dust whilst renovating….. They are located only a 15 minutes walk from the centre of Aylesbury where you can find plenty of DIY type shops, a God send compared to the remoteness of my original stop at Debdale wharf. As my funds are diminishing fast, wherever possible I have tried to reuse anything I had left over from the previous stages of the build.
Table Of Contents
Bedroom
In my initial designs I had planned to build a wardrobe at the foot of the bed on the port-side as that seemed to be the most practical solution in terms of use of space. I decided to change this and incorporate the wardrobe into the bow wall as this allows for better distribution of weight across the boat (port-side is already too heavy) as well as adding a bit of an air-gap between the bed and bow wall to provide a bit more warmth.
The bed was completely rebuilt with an Ottoman bed lifting mechanism to give better access to the storage space beneath. Based on the weight of the mattress and slats I was advised to go with 600N gas struts and swap them if they are not strong enough. What you don’t want is to have too strong struts to start with as the bed will never stay down. Apart from some extra timber for the slats I got away with reusing most of the existing bed base and covering the alterations with patches and wood filler as it wont be noticed once painted.

As I am reusing offcuts the wardrobe is fairly rudimentary, it certainly wont win any carpentry master class awards. There is a skeleton timber frame for the main section and a side section that gets its strength from pocket hole jigged shelves. I originally planned to not edge the plywood to give it an industrial look but unfortunately the quality of my plywood dictated it had to be done. Air vents have been fitted in the bottom and gaps left between shelves to allow for as much ventilation and air circulation as possible to try and alleviate dampness from condensation.

Despite having a workshop the mess and lack of storage was still an issue. Once again it goes to show don’t live on a boat whilst doing it up!!!
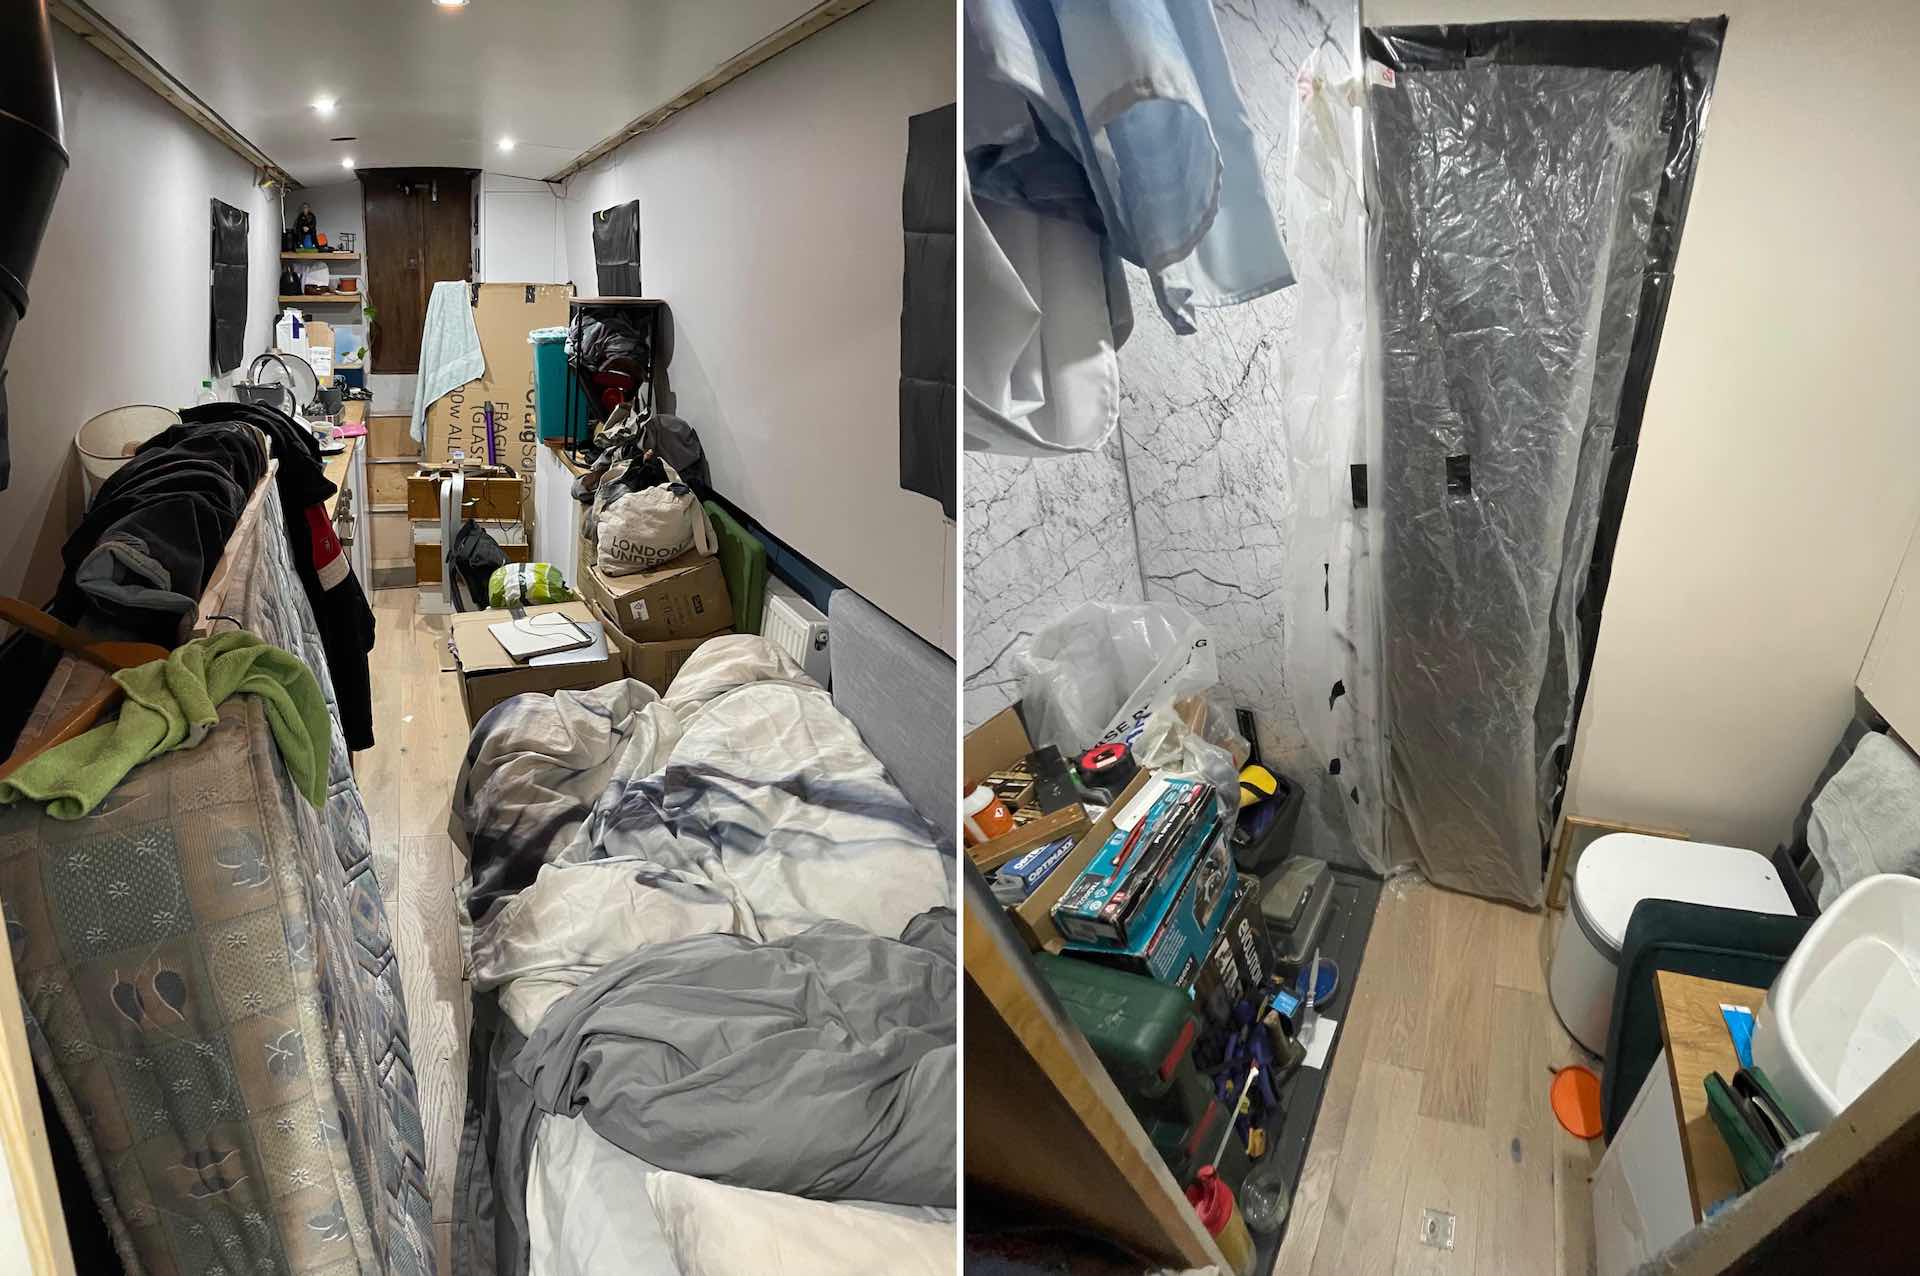
The finishing touches for the bedroom were very much the same as in galley and lounge, lots of filler and sanding to get the walls as best as I could and and then making use of the leftover paint. A thing to look out for when buying a boat is the condition of the wood underneath the windows, is a good indication at how bad the condensation has been on the boat.

Galley improvements
As mentioned in the lessons learnt post the half depth port-side cabinet didn’t work as the work surface wasn’t really wide enough for it to be practically usable. To address this and the lack of dinette space I removed the bookcase (repositioned on starboard-side) and fitted a new cupboard shell which this time only had 10cm removed from is depth. Luckily I had just enough worktop from under the gunnel to be able to pull it out to cover the new cabinet depth, although I did need to get creative in patching it up and add a splashback. This wider cabinet allowed for me to make a builtin dinette seat with some much needed extra storage, again this was made from leftovers. I also added an extra radiator in the wasted space between the new cupboard the electric cupboard, this should also help to bring the Webasto up a bit nearer to its proper capacity.
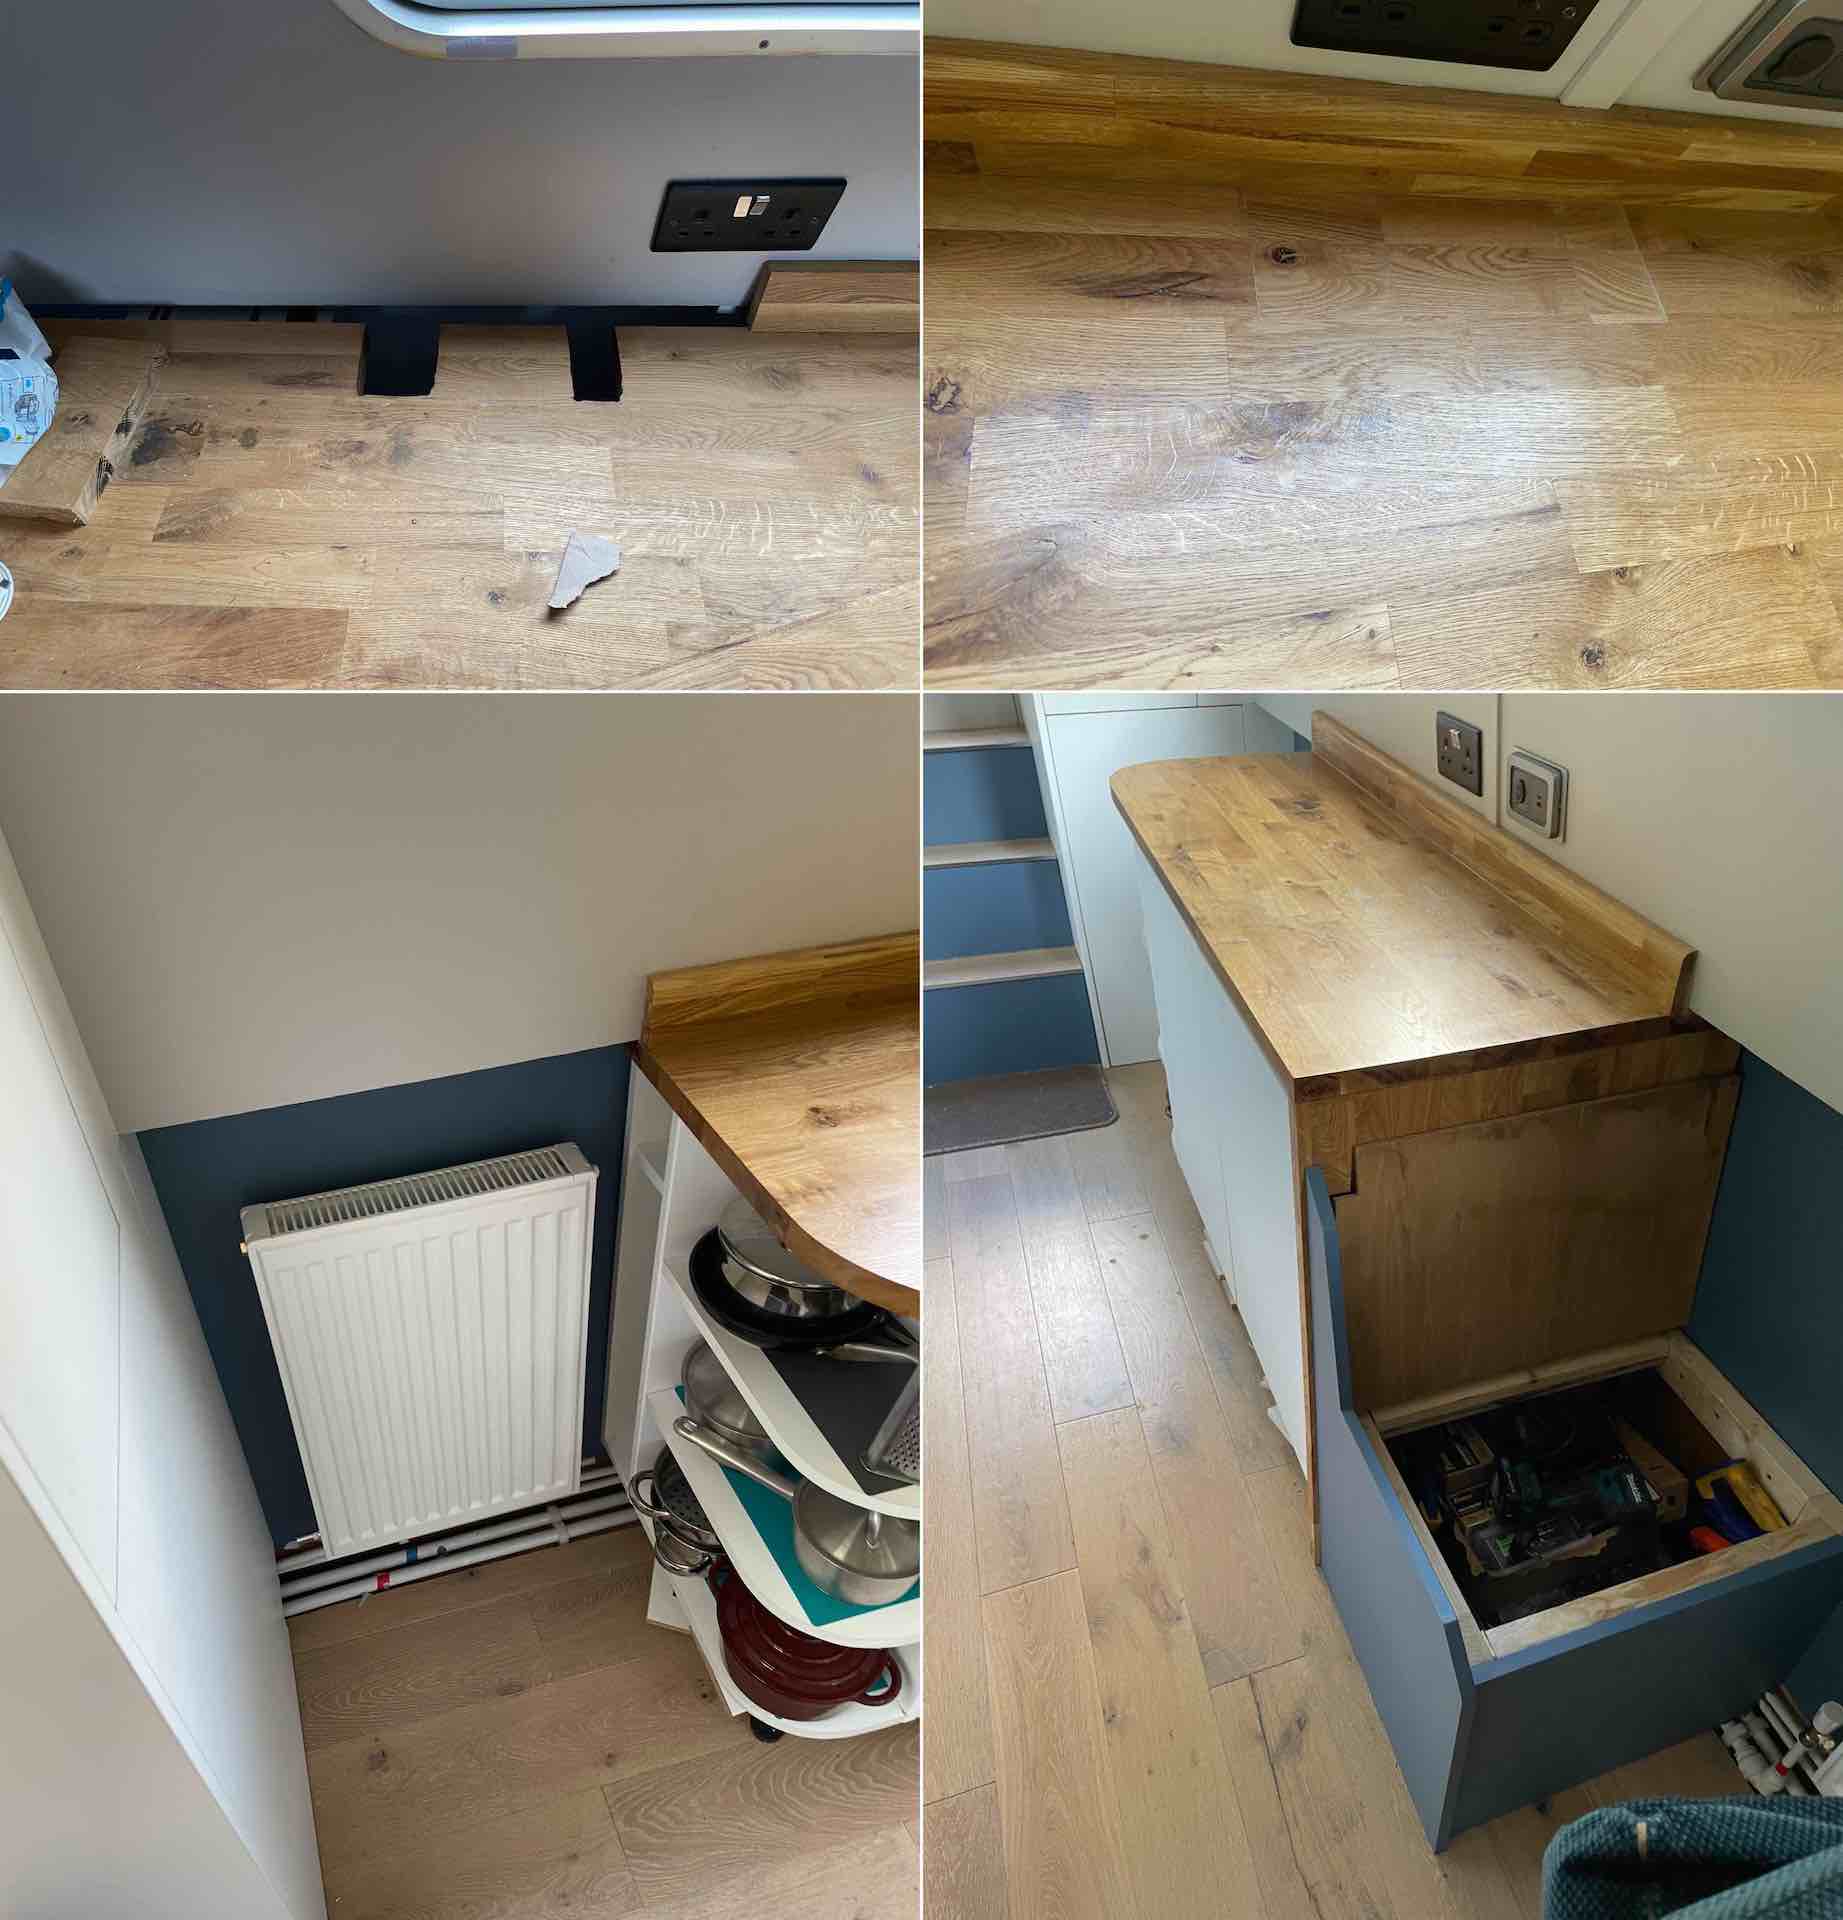
I went for a Nuova Map telescopic table leg with a turntable/sliding tabletop mechanism were the tabletop can be positioned horizontally or vertically. The reasoning behind this is that it can be positioned as either a dinette or work desk as well as having the added benefit of not being obtrusive when not in use. I got the electric version with the height adjusted by a switch fitted under the seat. Both this and the reclaimed wood tabletop (80x60x25cm) were picked up relatively cheaply off ebay.

Solar Power
I couldn’t find a definite answer or formula for what size solar array I needed. Logically it is proportional to the size of battery bank as this dictates how much you need/can store, but as the sun is not a constant in England the answer seemed to be ‘as much as possible’. I didn’t want the solar panels covering the whole width of the roof as being a solo boater I need to be able to walk on the roof at times such as in single locks. I went for 2 x 200W panels (147x68cm) and 1 x 130W panel (115x58cm) which gives me a total 530W, I am guessing that in summer that will be sufficient but the bigger test will be in the winter when there is less light.

Roof boxes
To make the most of the solar during the winter months when there is less light I am going to have to tilt the panels to catch the sun when it is low in the sky. I did think about going for triangle tilts as you have a full spectrum of tiltage to chase the sun, however as I need as much storage as possible for my winter fuel I decided to build roof boxes and mount the panels on top using triangle brackets.
To keep inline with being frugal the roof boxes are made from plastic decking offcuts (thanks Dad 🙂), I had to get creative in terms of joining them to get the correct lengths. The idea behind using plastic is that it doesn’t need treating or on-going maintenance, for that same reason the internal frame is minimal and uses non-stretching Dyneemarope for the majority of the support.

If I was to do these boxes again I would consider using different types of brackets as they are time consuming to open each time. You could possibly use triangle tilts or a tilt-mount ones that donn’t require assembling to open or adjust.
MPPT solar controller
The panels are wired in series back to a SmartSolar MPPT 100/30 (max input 100V, max output 30A) which was fitted as part of the electric fitout. The MPPT is a 3-stage charger, there is no storage stage as charging stops at night:
- Bulk (constant current): The solar charger delivers the maximum charge current to rapidly charge the batteries. During this stage the battery voltage will slowly increase and once the battery voltage reaches the absorption voltage bulk stops and absorption commences
- Absorption: (constant voltage): The charger switches to constant voltage mode and the current flowing to the batteries gradually decreases. Once the adaptive absorption time is reached or the current drops below the tail current, absorption stops and float commences
- Float: (constant voltage): The voltage is reduced and the battery’s fully charged state is maintained
The solar charger will commence battery charging as soon as the PV voltage (from the panels) is 5V higher than the battery voltage and will continue as long as the PV voltage remains at least 1V higher than the battery voltage.
- When only shallow discharges occur the absorption time is kept short to prevent overcharging of the battery.
- If the battery was deeply discharged the absorption time is automatically increased to a value that is based on the idle battery voltage in the morning at the beginning of the charge cycle (multiplier x maximum absorption time (default 6 hours)).
| Battery voltage at start up | Multiplier | Adaptive absorption time |
|---|---|---|
| < 11.9V | x 1 | 6h |
| 11.9V - 12.2V | x 0.66 | 4h |
| 12.2V - 12.6V | x 0.33 | 2h |
| > 12.6V | x 0.16 | 1h |
The adaptive absorption time counter starts once the charger has switched from bulk to absorption and the absorption stage ends (switches to float) when either the timer is reached or the battery current drops below a low (tail) current threshold (default of 2 Amp) for one minute. The following variations can effect the above expected absorption behavior:
- Paused absorption time counter: The timer counter will pause when the output voltage is below the configured absorption voltage such as when PV power is insufficient to charge the battery and power the loads due to clouds or a lack of light
- Restarted charge process: The charging algorithm will reset if charging has stopped for an hour. This may occur when the PV voltage drops below the battery voltage due to bad weather or shade
- Battery charged or discharged before solar charging begins: The absorption time estimation can be incorrect if there is an additional charge source (for example alternator) or load on the batteries
- Bulk charge cycle restarts: Once the battery voltage drops below 13.7V (float voltage (13.8v) - rebulk voltage offset (0.1V)) for one minute the charge cycle will restart
Solar and mains charging
When plugged into mains power ideally I want to still use your solar in some manner as is pointless paying for electricity I could be having for free. The Victron Multiplus has a function called Solar and wind priority (also known as sustain mode) where the powering of DC loads and charging of the battery bank prioritises solar. Shore power is only used for AC loads and to make sure that the battery voltage does not drop below the specified sustain voltage (float voltage - 0.2v). If after 7 days the battery bank has not reaching 100% SoC the Multiplus will come out of sustain mode and charge it up to 100% SoC. Therefore, solar priority only works for the first week after the boat is plugged into shore power, if you need to trigger sustain mode again after this time you have to disconnect/reconnect the mains or if remote toggle the Multiplus operating mode.
It is possible to also use solar power for AC loads (ignore AC input) whereby the Multiplus will ignore its AC input as long as certain load and battery conditions are met. The only constant AC load on my boat is the fridge (70W for 30 minutes at times throughout the day) and the only high wattage appliances are the calorifier immersion element (1000W), sandwich maker (1200W) and toaster (650W).
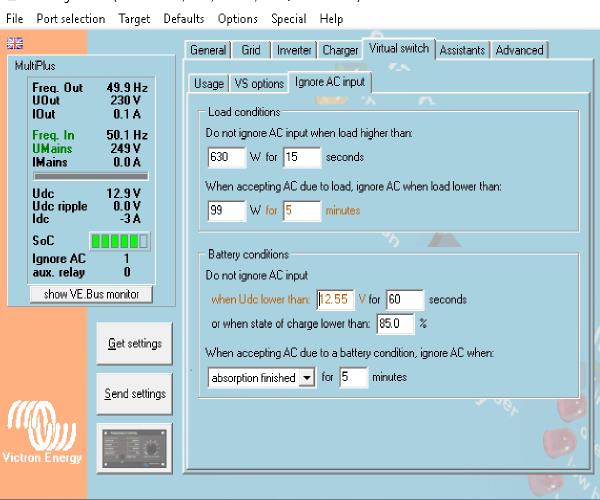
I set the values as per above based on the reasoning that I wanted to use shore power if I used any of these high wattage appliances. When setting these values you need to make sure don’t set the timers too low so that it doesn’t flip-flops between states too much.
-
Load Conditions:
- Do not ignore AC input when load higher than: Means that it will use shore power if toaster is used
- When accepting AC due to load ignore AC when load lower than: Remains on AC allowing time incase want to put another piece of toast on
-
Battery conditions:
- Do not ignore AC input when Udc lower than: Wont use the battery for AC loads when it is lower than 85%
- When accepting AC due to battery condition, ignore AC when: Absorption finished for 5 minutes is a good indication that the battery is fully charged, so go back to using solar for AC load
Water Pumps and pressurised tanks
I swapped out the existing water pump (was making strange noises) for a Jabasco Par Max 3 pressure-controlled pump. Within the pressurrised water system of a boat there are are two pressurrised tanks whose values are based on the specifications (cut in and cut out values) of the pump.
- Accumulator tank: Fitted close to the discharge port of the water pump, the accumulator tank acts as a pressure buffer ensuring a smooth flow of water from the outlets. It basically keeps a reserve of water so that the water pump only starts after extended water use which helps to stop constant on-off cycling of the pump resulting in smooth water flow (important in showers) and an extended pump life
- Expansion tank: Is a safety device that absorbs excess water pressure in a closed water heating system, such as when a calorifier is used on a boat. It’s designed to handle the thermal expansion of water as it heats up, which can prevent damage to the calorifier and pipes. Without one would get a constant drip from the calorifier pressure release valve (PRF) every time the water in the calorifier heats up
The Jabasco Par Max 3 pressure switch cuts in at 1.4bar (20psi) and cuts out at 2.8bar (40psi), based on these values my tanks are set as follows:
- Accumulator: Should be set 2 or 3 psi below the cut-in pressure, so 17psi (1.17bar)
- Expansion: Should be set to the cut-out pressure, so 2.8bar (40psi)
When setting the tank pressures there should be no pressure in the system, so turn the pump off and open an outlet. If you don’t do this it is not going to register the the open pressure of the tank so will have incorrect values. Ideally you should check the tanks performance in this way every 6 months and adjust the pressure if necessary. These jabsco instructions are really good at explaining how these tanks work. It is worth noting that these pump instructions state “the expansion tank should be fitted in the cold water feed line to the calorifier, between the non-return valve and the calorifier”, where as the calorifier instructions state “a calorifier expansion tank should be fitted on the hot supply between the thermostatic mixer and the first take off, or taps”. I went for the later, but from what I understand it can be fitted in either location.
Trim
The last big job internally left to do was the ceiling and skirting trim. I toyed with different ideas of trying todo on a budget but just couldn’t come up with a suitable solution that I was happy with so in the end bit the bullet and went for hardwood. Whilst in Nantwich I came across Richard Potter Timber merchants that had a good selection of hardwoods in stock, in the end I went for oak.
All the lengths were cut to size which saved me a lot of time and took off the some of the added pressure of making expensive mistakes. As it was good quality hardwood I decided to plug the fixing holes rather than use wood filler as it was never going to match. Like with most things you need the proper tools for the job, a countersink and plug cutter set has a cutter to make the plug and a drill that also countersinks the hole ready for the plug. I didn’t worry too much about matching the grain for the plug, if doing something like furniture I guess this would be more important.
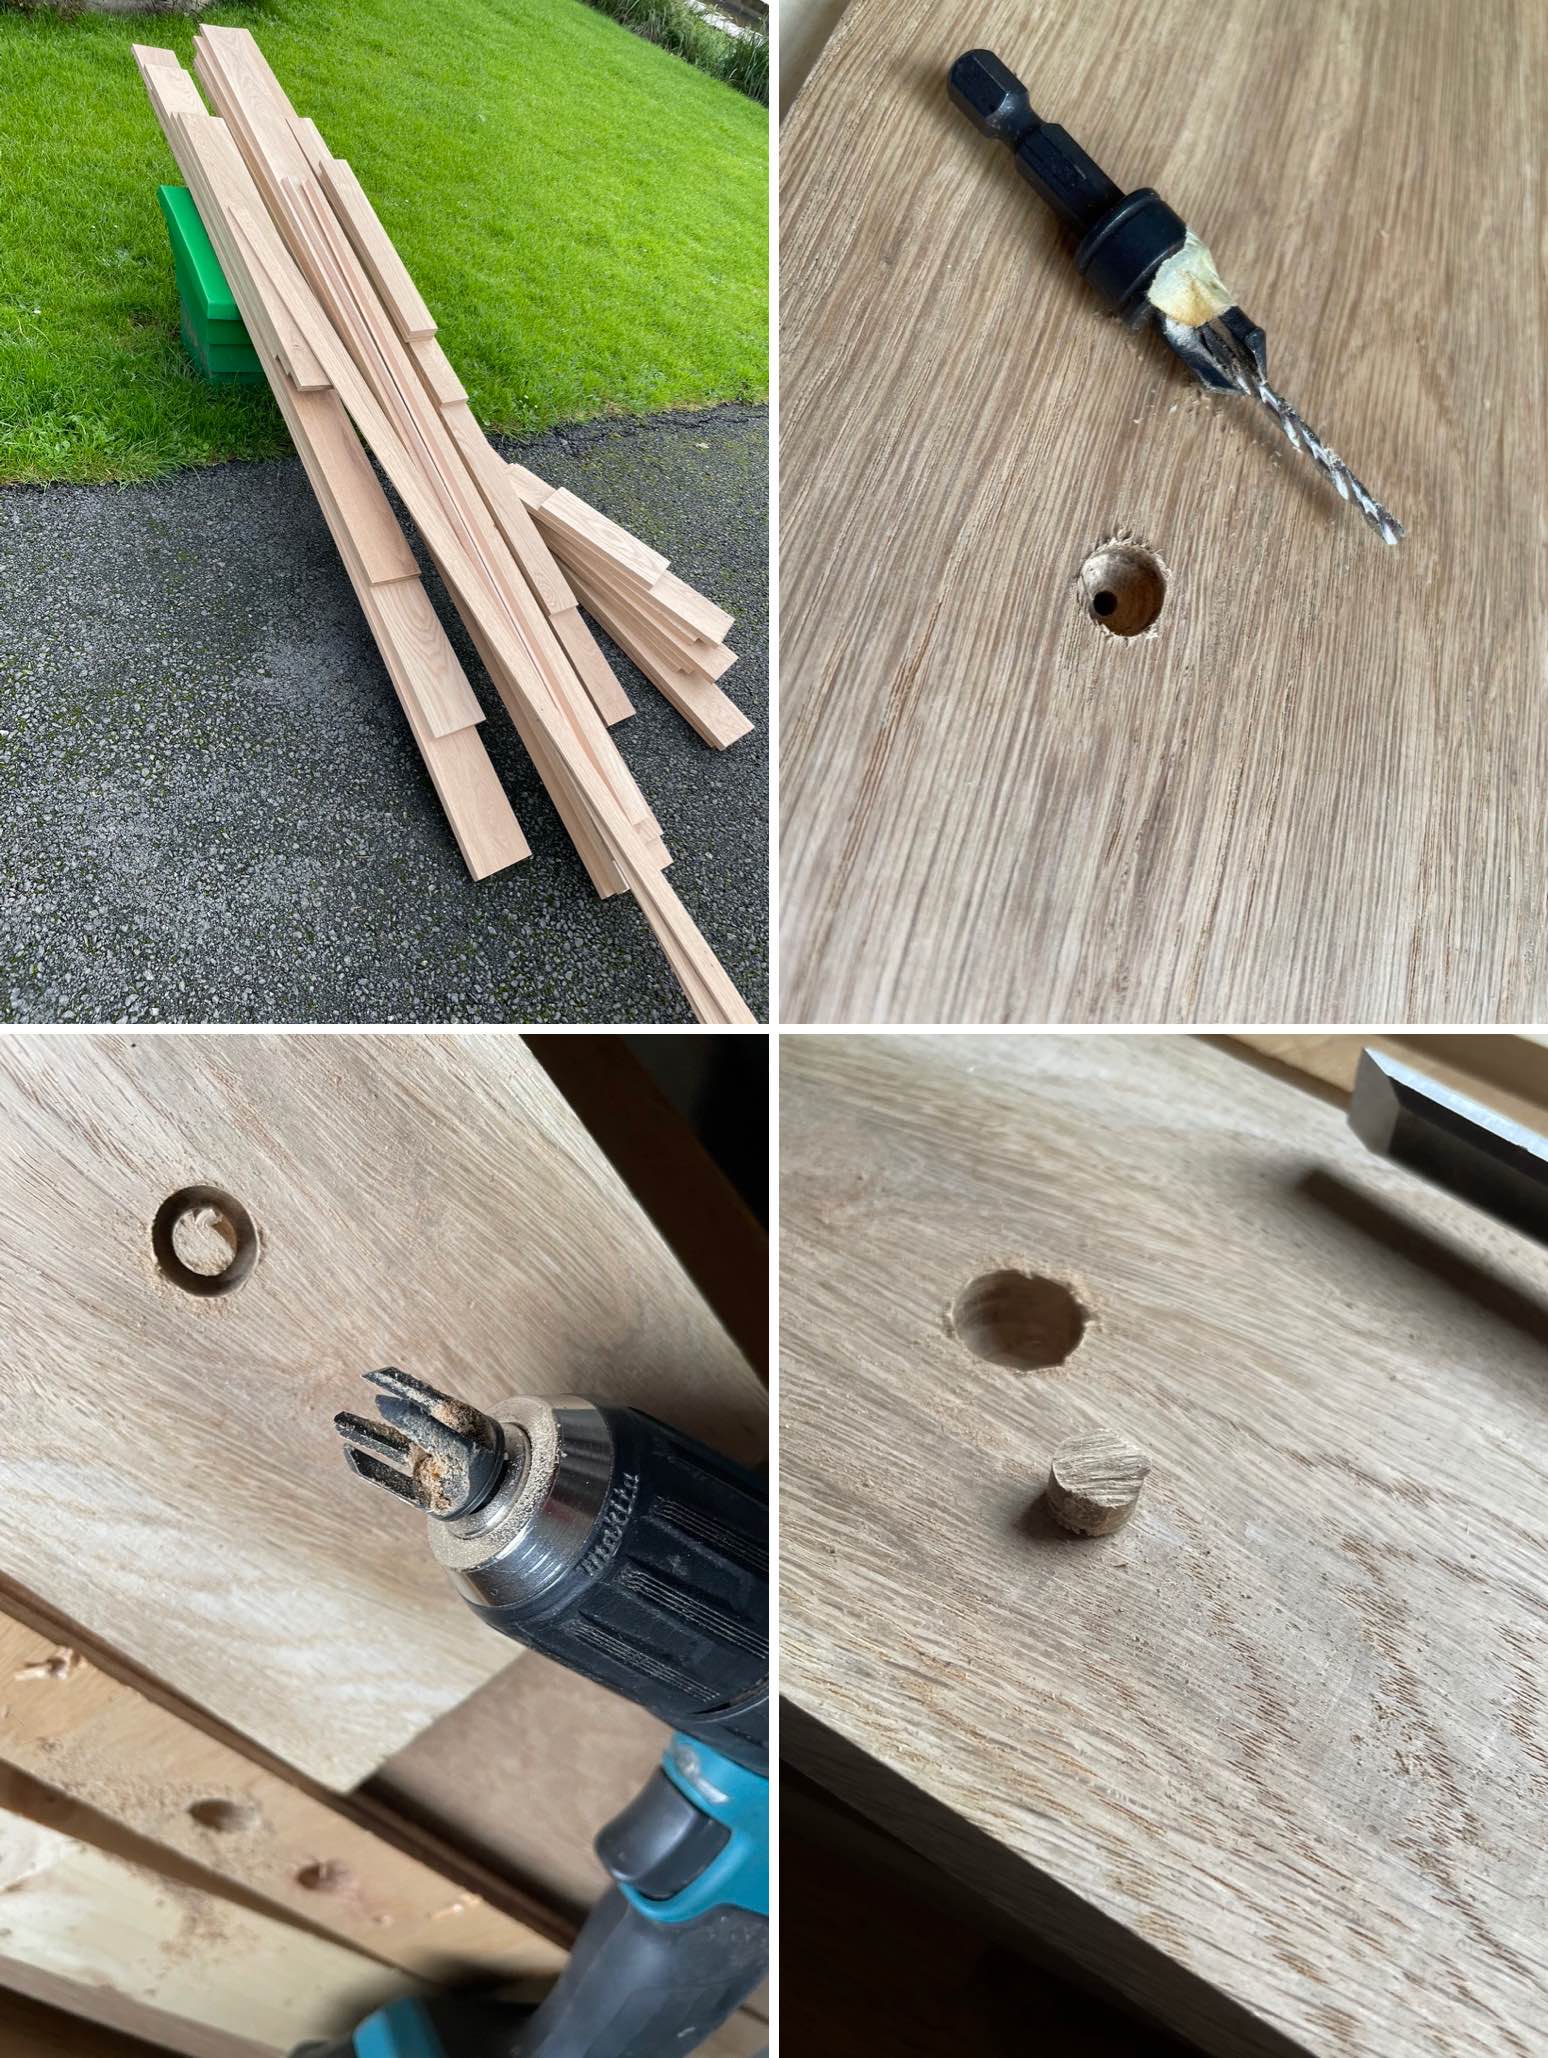
The galley mood lighting (5 metre LED strips) is stuck onto the back of the trim before being screwed and plugged. The ends of the plugs are sawn off with a flush cutting Japanese saw, it is surprising how good this flexible saw as it didn’t cause any damage to the surrounding wood.

To box in the pipes the front section was screwed directly into the floor with the top section resting on this and the top of the pipe clips at the back. Batons where needed on the underside of the top section along the front edge to keep it fixed in place.

Due to the environmental conditions on a boat the underside and back of all wood was given 3 coats of varnish before being mounted, the front had 1 coat of wood dye to bring out the grain. Obviously the final coats of varnish on the front was done after it was fitted and all holes plugged.

Curtains
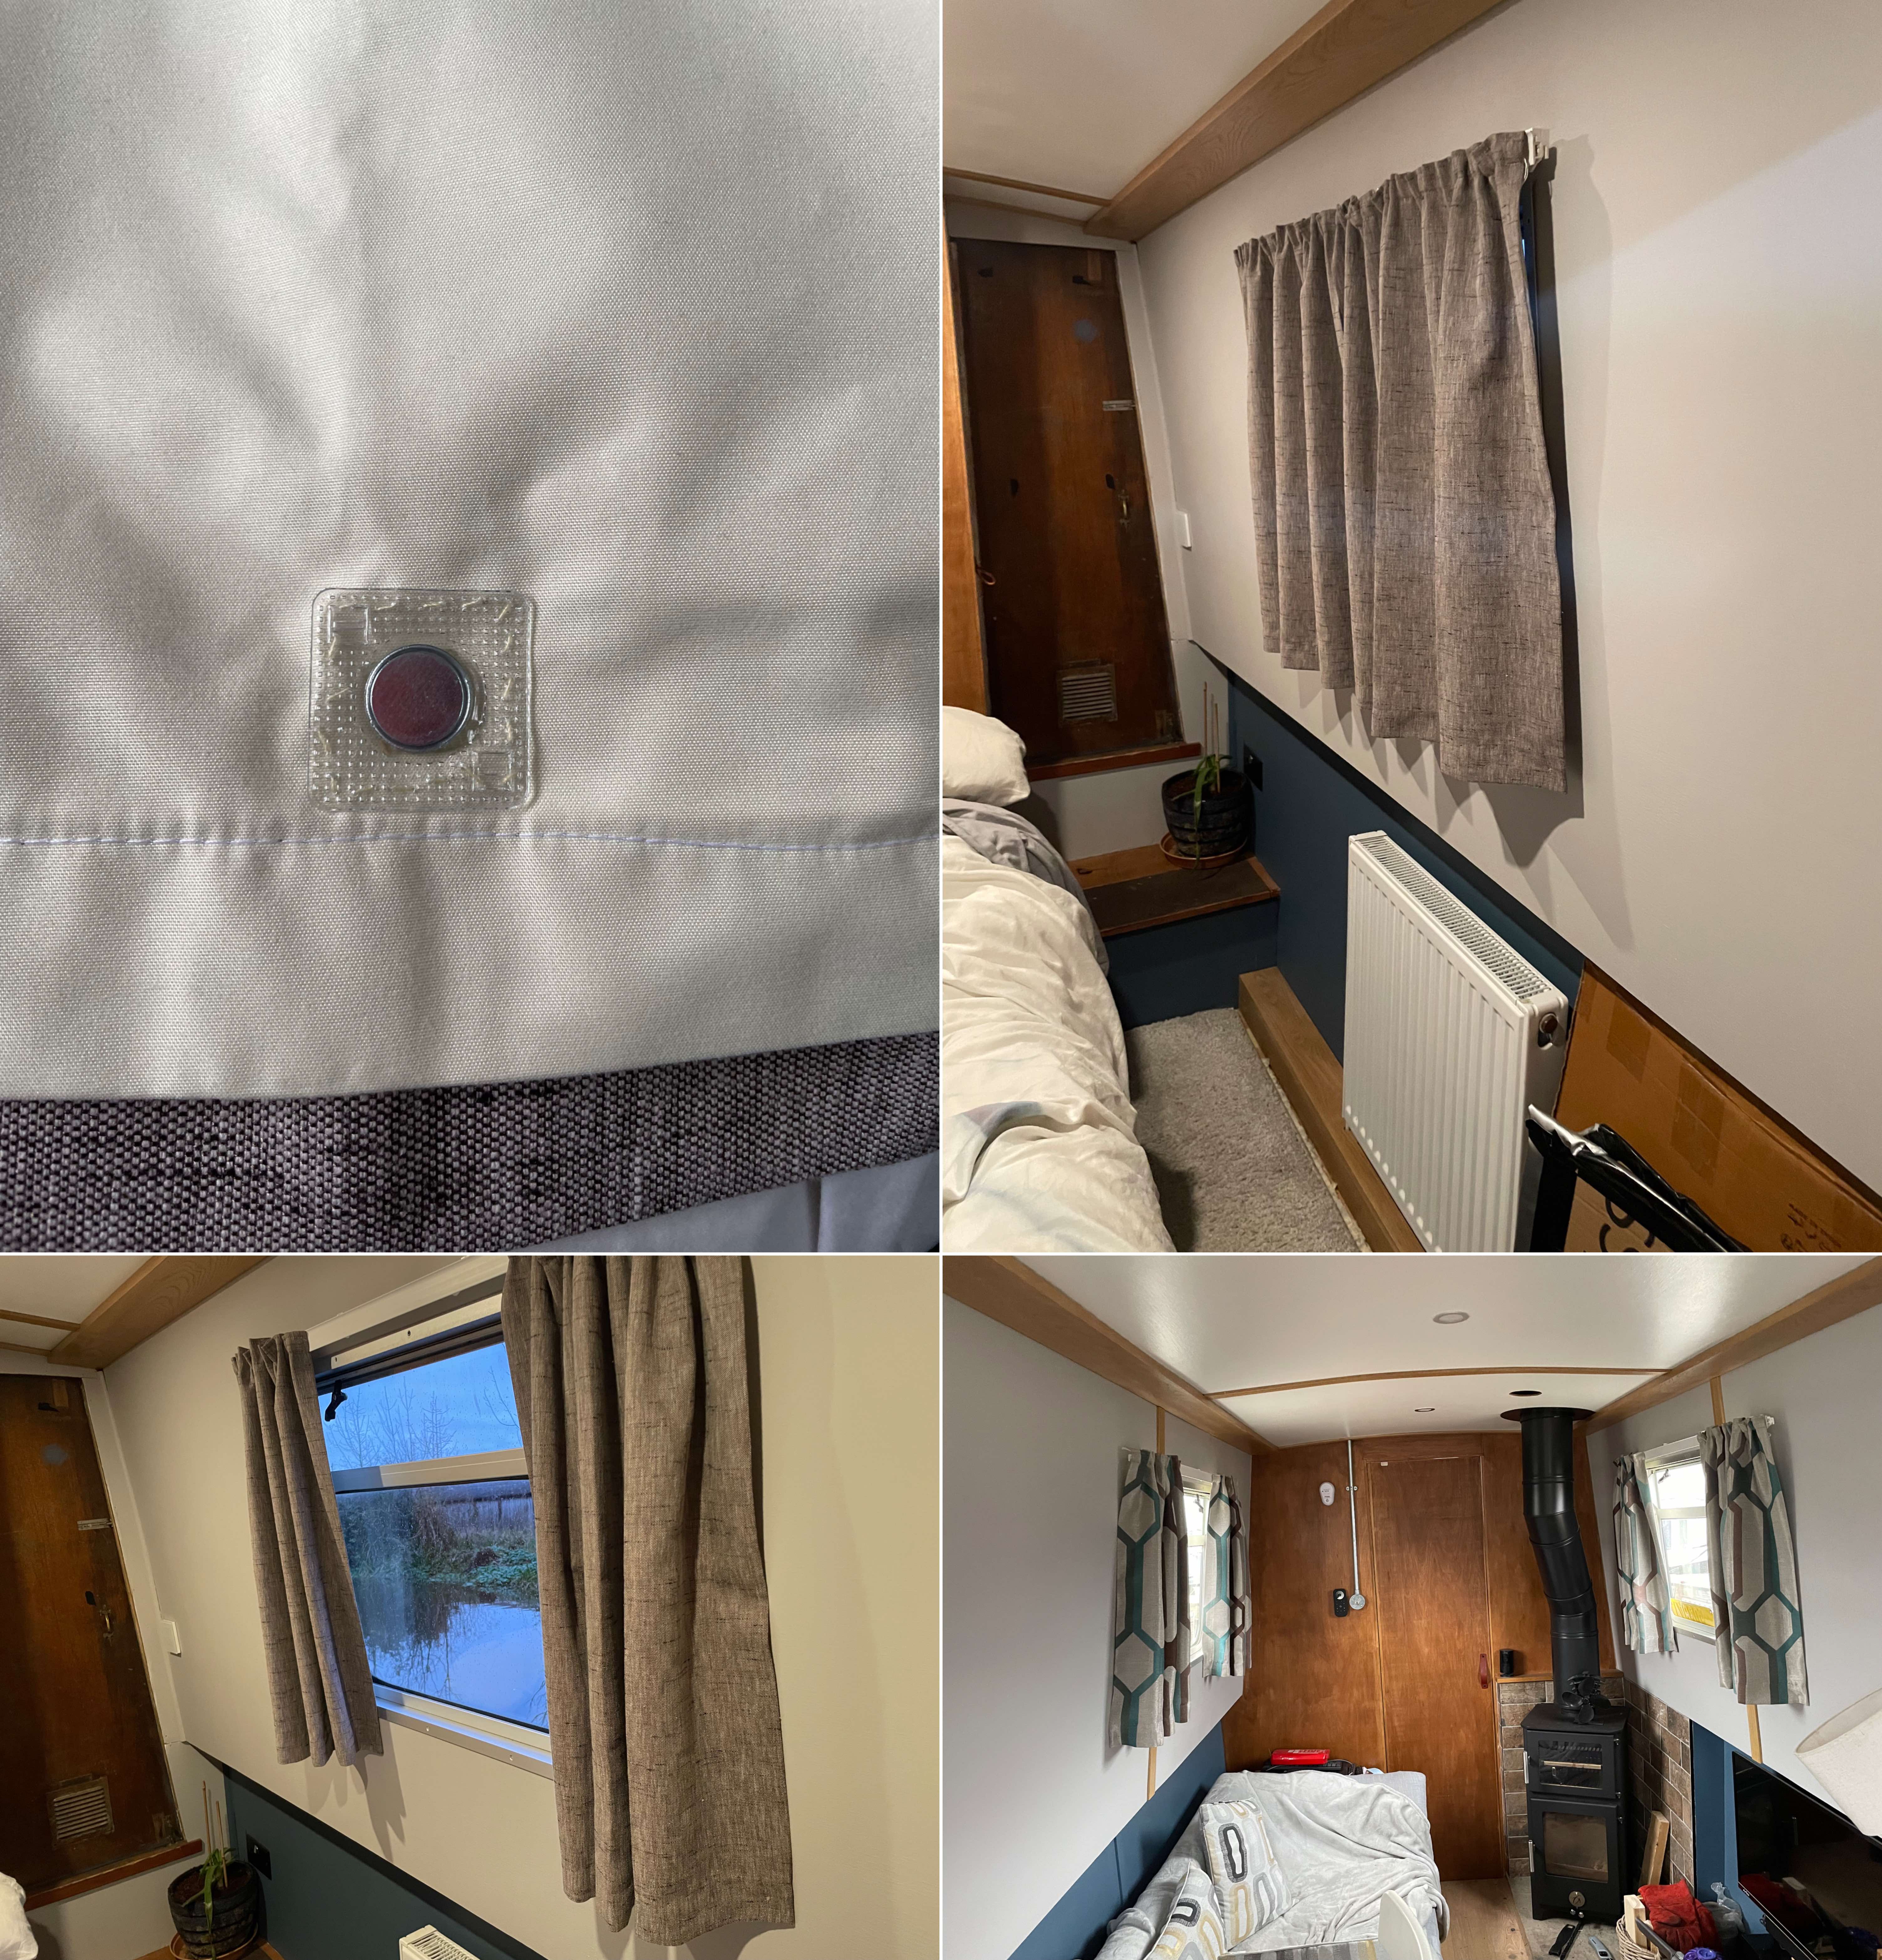
Who would have thought curtains would be such a pain, I assumed you could just get an off-the-shelf pair and alter them but it wasn’t viable. In the end I had to get them custom made, luckily I found Carolines Caravan Curtains who did really good for reasonable price.
In contrast to a house the walls of a boat are angled meaning that the curtains will hang off them too much, this is why boats have bar across the bottom to keep them flush against the wall. I wasn’t too keen on this and thin minimalistic bars are extortionately pricey so thought I would try and solve it with magnets. I sewed 4 textile magnets to each curtain and added adhesive steel tape under the aluminum window frame as well on the wall where the curtail overhands the end. It may need a little tweaking but on a whole it seems to work quite well.
So whats left???
This will probably be my last blog on boats as there is not much left to do on the inside. The bow and stern door linings need changing to fit in with the rest of the boat, but this will have to wait till the summer when we get some warmer weather. The only other things are covers for the ceiling vents and some sort of blinds for the 2 remaining galley windows, but as with with the curtains this needs some sort of customization that I haven’t worked out yet.