Checkpoint Firewalls are not zone based Firewalls so have a different type of policy compared to ASA and Juniper. A typical build consist of a Security Gateways managed by a centralised Management Server using the Checkpoint Smart Dashboard software. Firewall policies are created and managed on the management server and pushed to the security gateway.
Table Of Contents
Build
The software deployed on a management server and gateway is the same, you just need to designated the devices role when running through the initial First Time Configuration Wizard. A a distributed deployment is when the gateway and management server are deployed as one appliance.
Use the following specifications when deploying in ESX (VMtools are automatically installed):
- Guest OS: Other Linux (32 bit)
- CPU: 2 Cores per socket
- Memory: Minimum 4GB (works with 2, but need 4 for initial build)
- SCSI Controller: LSI Logic Parallel
- Disk: Thick Provision Lazy Zeroed (At least 70GB for manager, 32 for gateway)
Mount the ISO and when prompted choose the size of the partitions, admin password and IP address for the interface the device will be managed from. If the VM has insufficient memory during the build it will get stuck on Finalize Configuration in the wizard.
Once the initial OS (GAIA) has been installed log in via a web browser (GAIA portal) and run the First Time Configuration Wizard. Once this has been done you can then configure any other settings via ssh or GUI.
Manager
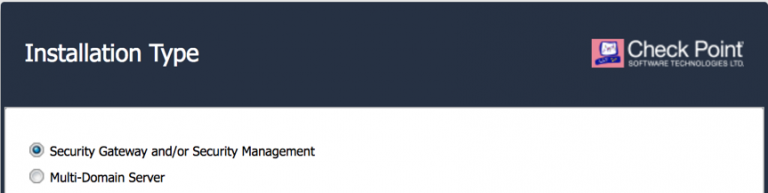
After configuring the IP details, DNS and NTP on the Installation Type window select Security Gateway or Security Management.
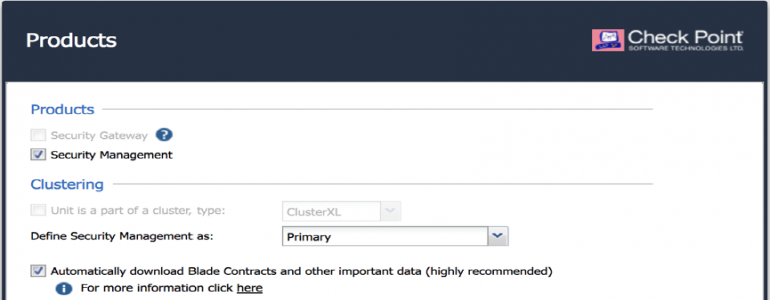
In the Products window select Security Management and under Define Security Management set the device as Primary. If it was a HA setup could select Secondary or if the device as only going to be a reporter Log server/ Smartevent only.
On the next window create an Administrator user. The default admin account has privileges for SSH and web GUI access to the device itself, where as the administrator account will be the main account to be used in the Smart Dashboard. Optionally set the networks that are allowed to access the device. Only once the the First Time Wizard is complete can the remaing configuration be done from the CLI.
To change any of the wizard configured settings:
set dns suffixstesworld.com
set dns primary10.10.20.254
set dns secondary8.8.8.8
set domainnamestesworld.com
set hostnameckp-mgmt1
set ntp activeon
set ntp server primary10.10.10.51 version3
set management interfaceeth0
Turn off update, configure SNMP, users and the banner
set installer policy check-for-updates-period0
set installer policy periodically-self-updateoff
set snmp agenton
set snmp communityst3sw0r1d_c0mmun1ty read-only
add snmp interfaceeth0
set snmp locationDC1
add useruser1 uid 0 homedir/home/
set useruser1 gid 100 shell/bin/bash
set useruser1 password
add rba useruser1 roles adminRole
set message banner on msg valuemy_banner
set message motd on msg valuemy_message
smart dashboard is used to login into the mangers and administer them, this can be downloaded directly from the manager.
Gateway
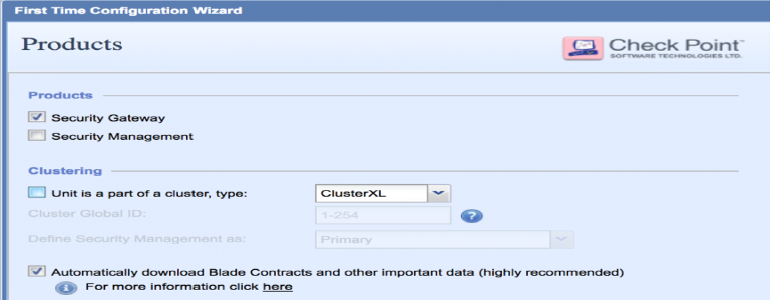
The installation procedure is the same as the mangers. Only need to the one management interface in the First Time Configuration Wizard,others can be configured after. On the products page select Security Gateway and check Automatically download Blades Contracts and other important data.
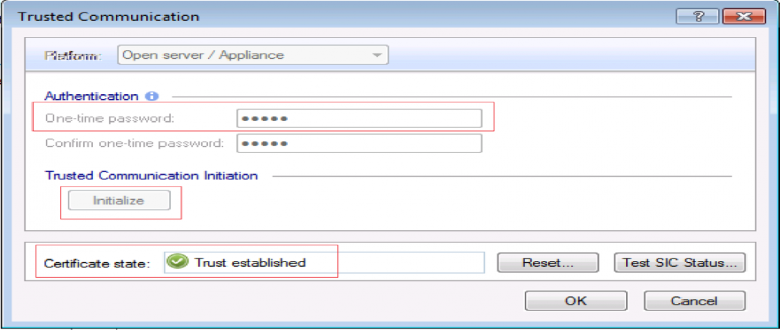
The Secure Internal Communication onetime password is what will be used to form the trust between gateway and Management Server.

Once the installation is complete log into the CLI to add additional interfaces and any other configuration such as routing.
installer policy check-for-updates-period0
set installer policy periodically-self-update off
installer agent updateTo manually update if turn periodic off
set snmp agent on
set snmp communitymy_c0mmun1ty read-only
add snmp interfaceeth1
set snmp locationhome
add netflow collector ip10.10.10.71 port2055 export-format Netflow_V9 srcaddr172.168.255.4 enableyes
set interface eth0 commentsOutside (n7k1)
set interface eth0 stateon
set interface eth0 ipv4-address192.168.1.4 mask-length24
set router-id172.168.255.4
set ospf areabackbone onThe backbone is area0
set ospf interfaceeth0 areabackbone on
set ospf interfaceeth0 priority255
set ospf interfaceeth1 area1 on
Static routes can be redistributed from GUI (but don’t show in cli) or from the cli using a route-map. Route-maps can match multiple things such as interface, IP/network, protocol, route-type, tag, community or AS.
set routemapCONN->OSPF id 1 on
set routemapCONN->OSPF id 1 allow
set routemapCONN->OSPF id 1 match protocol static
set ospf export-routemapCONN->OSPF preference 1 on
area1 range onAdvertise a summary route
area1 range restrict onIs not advertised to other areas
Updates
Check and install updates Hotfixes and HFAs (minor versions) and Majors.
installer check-for-updates not-interactiveCheck for updates
show installer packagesTo see what is installed/ available
installer verify ?List the available updates
installer verifyChoose update to see can install it or not
installer downloadDownload the update
installer installInstall the update
Hotfixes contain all the latest hot fixes combined, they are generally not new features. Can be downloaded and installed from the device or downloaded directly from Checkpoint and copied over.
set user admin shell /bin/bash
scpCheck_Point_R77_30_JUMBO_HF_1_Bundle_T216_FULL.tgz admin@ckp-gw1:
set user admin shell /etc/cli.sh
installer agent update
show installer packages installed
show installer packages imported
installer import local/home/admin/Check_Point_R77_30_JUMBO_HF_1_Bundle_T216_FULL.tgz
show installer packages importedWill list all hotfixes, look for accumulator
installer verifyEnter the number of the accumulator
installer install
Join Gateway to the Manager
Within SmartDashboard under network objects, right click Gateways and servers and choose gateways. In the next window choose classic mode and enter a name and IPv4 Address.
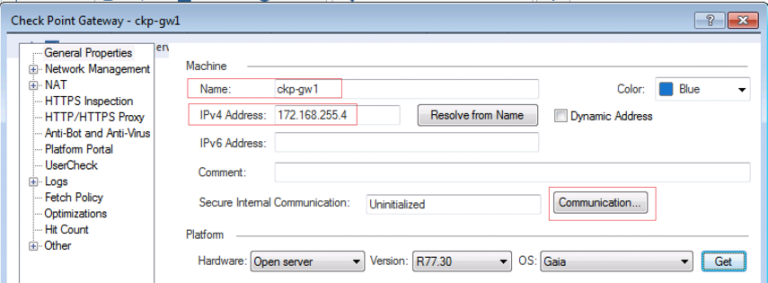
Finally click Communication, once initialization is complete the certificate state will be Trust established. If you encounter any issues at this stage the password may need to be reset.
A window will appear with all the interfaces of the security gateway to indicate this is what has been discovered when the gateway was added and secure communication was established. Finally choose install database from the main menus which creates the objects and save the changes to the manger
Configuration
Install database just pushes to manager, whist install policy pushes to both the managers and the gateways
Enabling smartevent on the manager adds audit and logs to the Smart Dashboard logging and monitoring tab. Enabling smartevent server and smartevent collation adds views and reports.
Policy
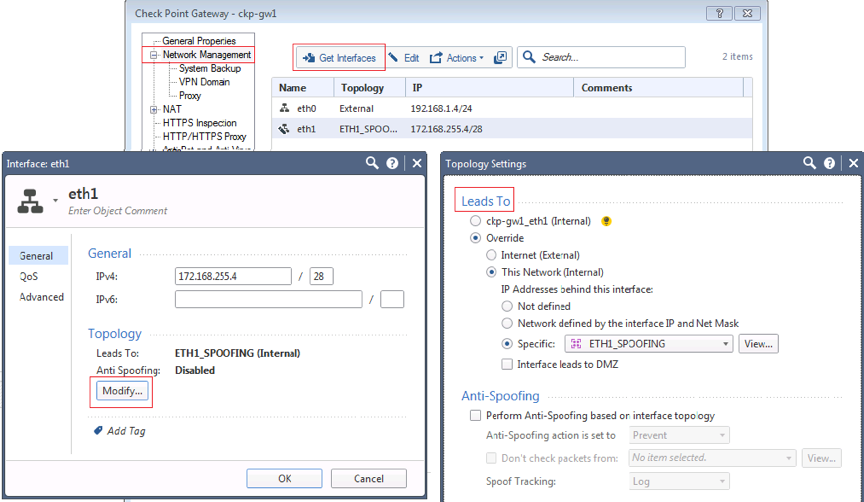
Before applying policy must first define the interfaces roles; whether they lead to internal or external networks. Double-click the gateway, select network management and either let Checkpoint discover interface roles and the networks behind them using (get interfaces) or manually define them.
For all interfaces except external can enable spoofing specifying a group of all networks that can be accessed through that interface.
For control plane traffic to the gateways such as ICMP or OSPF will need to allow that within the policy. Any features that are run on the checkpoint such as IPSEC or Identity awareness will use the default stealth rule 0.
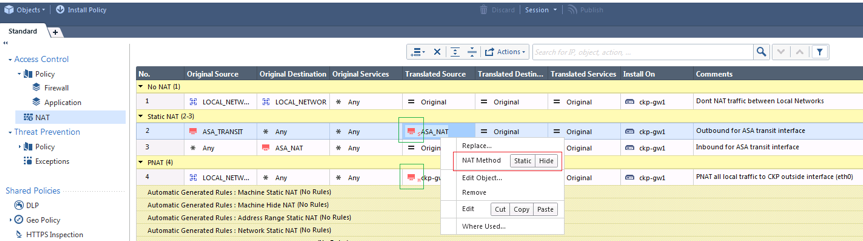
NAT
The translated object within the NAT policy will either have a H for Hide NAT or S for Static NAT. This can be changed by by right clicking on the translated object.
Hide NAT is the same as PNAT where everything is translated behind the same IP.
Static and Hide NATs are both one-way.
There are two methods for configuring NAT:
-
Automatic NAT - Configure the NAT under the network object and the NAT rules will be automatically created. Under the NAT tab of the network object tick add automatic Address Translation and choose either:
- static - Specify an IP to create 2 static NAT entries (inbound & outbound) in the NAT table
- hide - Specify an IP or interface to create 2 NAT entries, 1 NONAT for the internal traffic and 1 PAT for outbound traffic
-
Manual NAT - Manually added NATs to the NAT policy. It is a better option than doing auto NAT (with network objects) as you have more control over the structure of the NAT policy. By default NAT rules are only uni-directional, to make them bidirectional need a rule in either direction.
In addition to the NAT may also need to use proxy ARP to tell the gateway to respond to requests for this IP. This is enabled in global properties » NAT » merge manual proxy ARP config and a static entry added in the CLI./ Even though enter proxy arp from cli, the policy needs to be pushed for it to take effect.
add arp proxy ipv4-address192.168.1.253 interfaceeth0 Can also optionally add fw int IP
show arp proxy allWill show even if policy not pushed
expert
fw ctl arpWont show in here until policy is pushed
Manual Hide NAT (PAT) uni-directional rules can be created in the same manner by creating by defining the translated source object as Hide. If not using the interface IP for the PAT will also need add a Proxy ARP entry.
Extra Gateway configuration
To add an extra vNIC on a virtual Gateway it will need to be rebooted it to see it.
To add a trunk and add or remove a VLAN over it.
set interfaceeth2 state on
add interfaceeth2 vlan99 Add VLAN to the interface
set interfaceeth2.99 state onCreate the sub interface
set interfaceeth2.99 commentsblah Give it a description
set interfaceeth2.99 ipv4-addressip mask-lengthmask Define the IP details
delete interfaceeth2 vlannum Delete the vlan removes sub-interface and all its config
Set default or static route.
set static-route default nexthop gateway addressnext_hop_ip priority 1 on
set static-routenetwork/mask commentblah
set static-routenetwork/mask nexthop gateway addressnext_hop_ip priority 1 on
set static-routenetwork/mask nexthop gateway addressnext_hop_ip priority 2 on
set static-routenetwork/mask nexthop gateway addressnext_hop_ip offTo delete the route