This is the follow on to part1 where I was looking at how easy it is to deploy initial EVE-NG and CML lab setups from a declarative YAML file. Although both products are not really designed with that in mind I did manage to accomplish it with a relatively minimal amount of complexity in the topology file using a custom lab_builder tool. Next up is to give it a go with containerlab and netlab, I am expecting these to be a whole lot simpler as lab as code is the very ethos that they are designed for.
Table Of Contents
containerlab (clab)
As the name suggests containerlab is designed to build labs using containers rather than VMs which gives you a much more lightweight lab that can be deployed and destroyed in next to no time. In terms of native containerised images unfortunately there is still only a dozen or so out there, luckily there are containers for Cisco IOL (IOS-XE) and Arista cEOS which allows for labbing on a big subset of routing and switching features. I am hopeful that support for the ASA container (asac9-22-1-1.tar) will be added to this list in the near future, although I doubt we will ever see containerised C8Ks or N9Ks. There is also support for a limited number VM based images, however as the VM is just packaged up in a container it kind of defeats the object of why you are using containerlab in the first place.
As containerlab topologies are designed to be deployed from code it already does natively what I have been struggling to do with 3rd party tools for EVE-NG and CML. I am not going to go through too much detail about how containerlab works as there is a plethora of blogs online and its documentation is really good. The best way to go through it in comparison to what I have been doing so far is to delve into the topology file.
Topology file
Surprisingly the topology file is very similar to what I did with the lab builder script, it is split up into 4 parts:
-
lab/mgmt: Naming syntax and management network details. The management network is a docker network that can be viewed with
docker network lsanddocker network inspect <name>, the first interface of every node is automatically connected to this.name: # The lab name is by default added to each node name, so they are named in the format clab-{{lab_name}}-{{node_name}} prefix: # Replaces "clab" so becomes {{prefix}}-{{lab_name}}-{{node_name}}, or if you use "" removes everything so you just have {{node_name}} mgmt: # This is optional, if you omit creates the a docker network called 'clab' (type bridge) with a subnet of 172.20.20.0/24 network: # Name for the docker network ipv4-subnet: # Subnet assigned to the management network, so what the node IPs will come from (local only to docker host) -
kinds: Defines the attributes of the different device types (kinds), they can be configured here or at the node level. Configuring here means less repetition keeping the topology file cleaner, you can always override any of these settings on a per-node basis. Below is just a few of the attributes, are a lot more optional attributes which again can be set here or under the node.
topology: kinds: KIND_NAME: image: # The device type (kind) image, follows the same naming rules as any other Docker image type: # A further classification for a kind, such as 'l2' for IOL switch -
nodes: Dictionary of nodes with the key being the node name and value the node details. kind is mandatory but all other attributes are optional, there are many more available. The mgmt network is only accessible locally from the clab host, to access nodes remotely add a port binding. There is no option to template the startup config, this is not really an issue as clab goes one step further than EVE-NG and CML in that you have SSH access (node_mgmt_ip or clab_ip:port) without needing breakout switches or any additional node config.
nodes: NODE_NAME: kind: # The type of device image: # The device type image type: # A further clarification for the device type startup-config: # Files of either full config (replace/override the default config) or partial to amend to existing (file name ends .partial). Can also just add raw config inline mgmt-ipv4: # Optionally set static IP, if omit is automatically assigned by DHCP from the mgmt range ports: - # List of ports to "expose", the port translation is in the format "clab_server_port:node_port" -
links: List of links between nodes using Linux interfaces (true container interface name) or interface aliases (true node OS interface name). The first interface of any device cant be used as it is automatically reserved for management. Links can be defined in brief format (as below) where you just define the device and interface name or in extended format where you can define the link type (veth, mgmt-net, vxlan, etc) and other link parameters such as mac, mtu and link type specific settings.
  links:
    - endpoints: ["node_a:intf_a","node_b:intf_b"]
The full clab_topo.yml topology file that will be deployed.
|
|
Deployment
Deploying the lab is pretty straightforward, if you are using just containerised images it is amazing how fast everything comes up. The lab layout is the same as from the previous blog but to avoid using non-native container images the CSR and ASA have been swapped for cEOS and IOL.
$ containerlab deploy -t clab_topo.yml
You can use docker logs -f <container-name> to actively view the boot process of any of the containers. Once the lab build is complete it lists the nodes and there management details, containerlab inspect -t clab_topo.yml prints the same output.
╭──────────┬─────────────────────────────────┬─────────┬────────────────╮
│   Name   │            Kind/Image           │  State  │ IPv4/6 Address │
├──────────┼─────────────────────────────────┼─────────┼────────────────┤
│ CORE-SWI │ cisco_iol                       │ running │ 192.168.255.31 │
│          │ vrnetlab/cisco_iol:L2-17.12.01  │         │ N/A            │
├──────────┼─────────────────────────────────┼─────────┼────────────────┤
│ ISP      │ ceos                            │ running │ 192.168.255.10 │
│          │ ceos:4.33.1F                    │         │ N/A            │
├──────────┼─────────────────────────────────┼─────────┼────────────────┤
│ R1       │ cisco_iol                       │ running │ 192.168.255.11 │
│          │ vrnetlab/cisco_iol:17.12.01     │         │ N/A            │
├──────────┼─────────────────────────────────┼─────────┼────────────────┤
│ R2       │ cisco_iol                       │ running │ 192.168.255.12 │
│          │ vrnetlab/cisco_iol:17.12.01     │         │ N/A            │
├──────────┼─────────────────────────────────┼─────────┼────────────────┤
│ SVR01    │ linux                           │ running │ 192.168.255.32 │
│          │ ghcr.io/hellt/network-multitool │         │ N/A            │
├──────────┼─────────────────────────────────┼─────────┼────────────────┤
│ WS01     │ linux                           │ running │ 192.168.255.33 │
│          │ ghcr.io/hellt/network-multitool │         │ N/A            │
├──────────┼─────────────────────────────────┼─────────┼────────────────┤
│ XNET-FW  │ cisco_iol                       │ running │ 192.168.255.22 │
│          │ vrnetlab/cisco_iol:17.12.01     │         │ N/A            │
├──────────┼─────────────────────────────────┼─────────┼────────────────┤
│ XNET-SWI │ cisco_iol                       │ running │ 192.168.255.21 │
│          │ vrnetlab/cisco_iol:L2-17.12.01  │         │ N/A            │
╰──────────┴─────────────────────────────────┴─────────┴────────────────╯
As you would expect under the hood you have docker containers, from here you can verify the port-forwarding:
$ docker container ls
CONTAINER ID   IMAGE                             COMMAND                  CREATED         STATUS         PORTS                                                        NAMES
1fafef007c74   vrnetlab/cisco_iol:L2-17.12.01    "/entrypoint.sh"         5 minutes ago   Up 5 minutes   0.0.0.0:65021->22/tcp, [::]:65021->22/tcp                    XNET-SWI
87abcd513ab9   vrnetlab/cisco_iol:17.12.01       "/entrypoint.sh"         5 minutes ago   Up 5 minutes   0.0.0.0:65022->22/tcp, [::]:65022->22/tcp                    XNET-FW
38444ba39f4c   ghcr.io/hellt/network-multitool   "/docker-entrypoint.…"   5 minutes ago   Up 5 minutes   80/tcp, 443/tcp, 0.0.0.0:65032->22/tcp, [::]:65032->22/tcp   SVR01
5945e2f55bd5   vrnetlab/cisco_iol:17.12.01       "/entrypoint.sh"         6 minutes ago   Up 5 minutes   0.0.0.0:65012->22/tcp, [::]:65012->22/tcp                    R2
7b76cad307ae   vrnetlab/cisco_iol:17.12.01       "/entrypoint.sh"         6 minutes ago   Up 6 minutes   0.0.0.0:65011->22/tcp, [::]:65011->22/tcp                    R1
2f15ce504702   ceos:4.33.1F                      "bash -c '/mnt/flash…"   6 minutes ago   Up 6 minutes   0.0.0.0:65010->22/tcp, [::]:65010->22/tcp                    ISP
c11ea7d5ff03   vrnetlab/cisco_iol:L2-17.12.01    "/entrypoint.sh"         6 minutes ago   Up 6 minutes   0.0.0.0:65031->22/tcp, [::]:65031->22/tcp                    CORE-SWI
a56c60dd9bd8   ghcr.io/hellt/network-multitool   "/docker-entrypoint.…"   6 minutes ago   Up 6 minutes   80/tcp, 443/tcp, 0.0.0.0:65033->22/tcp, [::]:65033->22/tcp   WS01
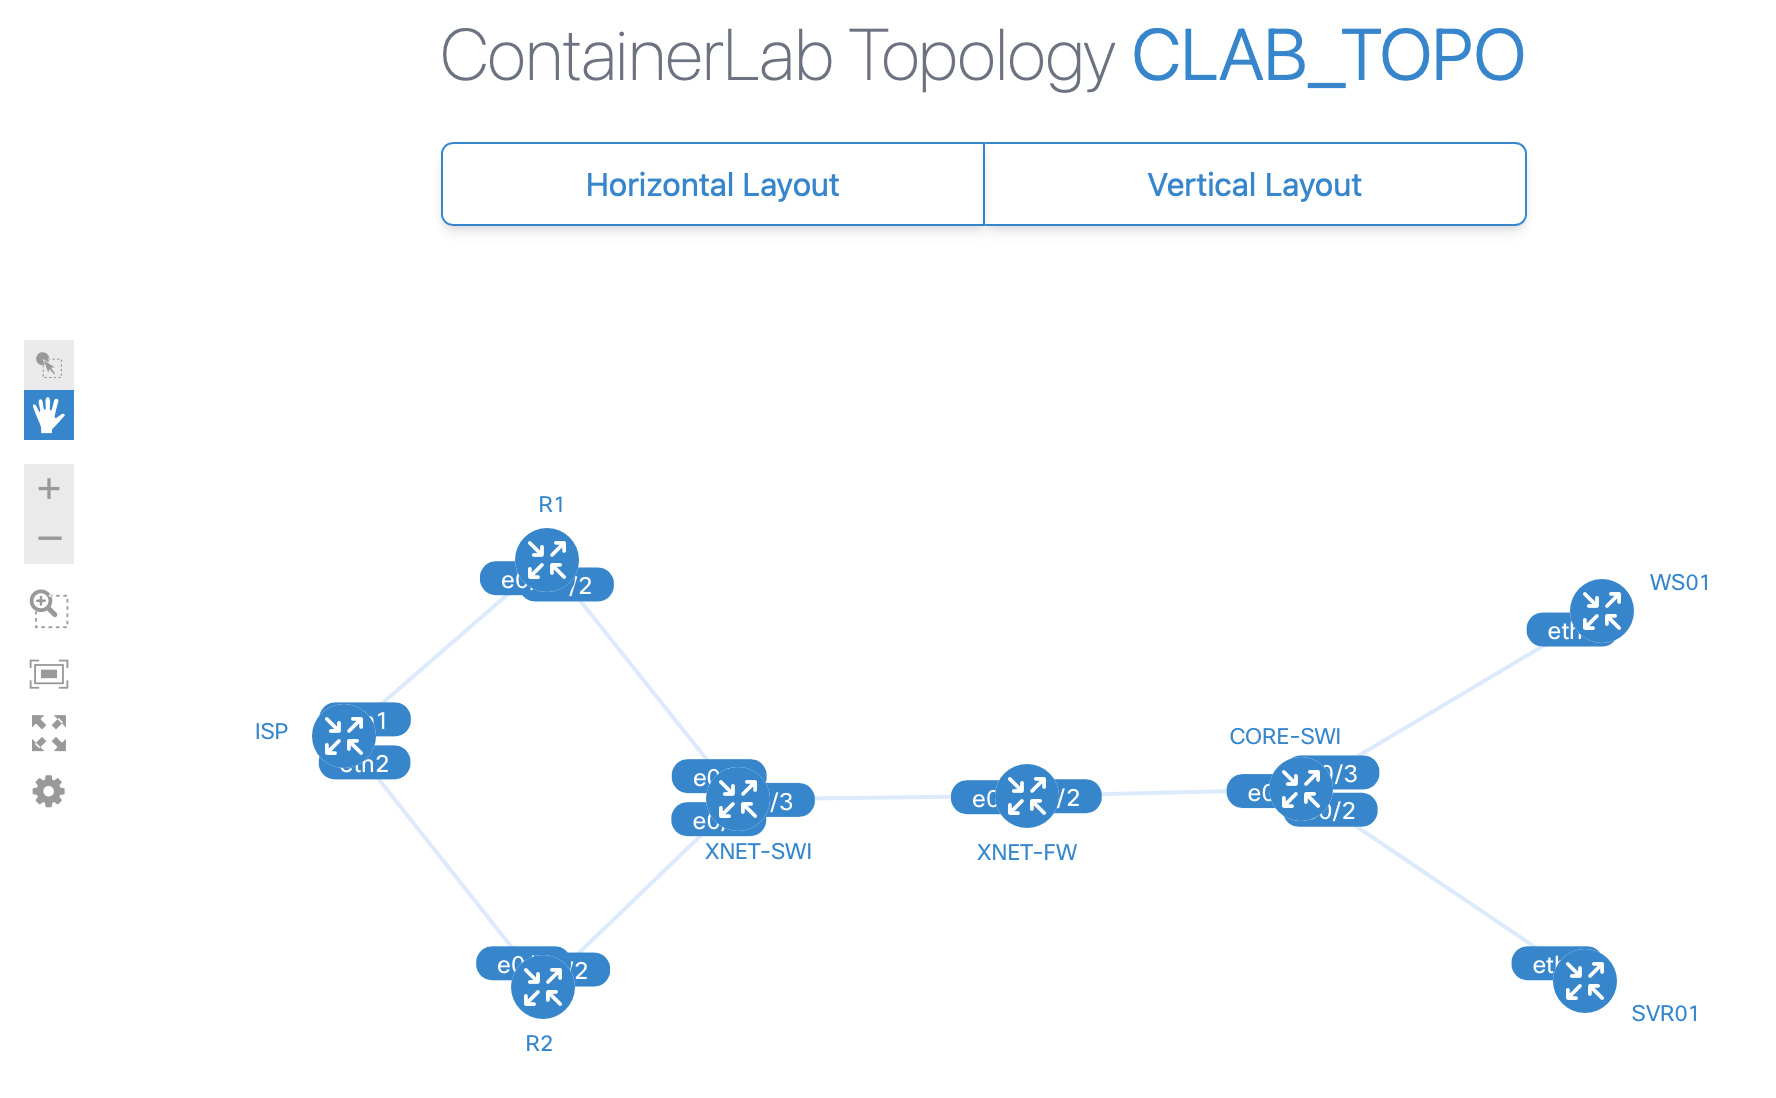
A really nice feature is the interactive topology map, you render it locally and access in a browser with http://<containerlan_ip>:50080
$ containerlab graph -t clab_topo.yml
INFO[0000] Parsing & checking topology file: clab_topo.yml
INFO[0000] Serving topology graph on http://0.0.0.0:50080
A Cisco IOL container starts with a bootstrap config that uses Ethernet0/0 for management (clab always uses 1st interface for management) in the clab-mgmt VRF and enables SSH. Have 3 ways to access the nodes, the username/password is whatever the default is for that device_type:
- SSH to the management IP from the containerlab host
- SSH remotely to the containerlab host IP using the exposed port
- Access the container using
docker exec -it <device_name> bash. This is limited as can only access the CLI on certain nodes such as SRL (swap bash for sr_cli), is no option for IOL
When a lab is deployed containerlab creates a local directory that holds things such as device configs and an ansible inventory file. Once finished with the lab are a few options for tearing it down:
$ containerlab destroy -t clab_topo.yml                 # Shuts down everything in the lab maintaining any saved configurations
$ containerlab destroy -t clab_topo.yml --cleanup       # Shuts down everything in the lab and factory resets the devices (deletes the lab folder)
$ containerlab redeploy -t clab_topo.yml                # Combines the `destroy` and `deploy` commands into a single operation so you can edit the lab topology without losing current configs
Summary
Got to say I am pretty impressed with containerlab, it does exactly what I am after and due to the great documentation is not really that steep a learning curve. I am not sure whether I will use it for non-containerised devices (need to mess with this side a bit more), but for playing with cisco routing configs it is ideal. It ticks all the boxes in terms of topology file not being too complex and having instant SSH access to the lab. In hindsight is probably better to use DHCP rather than static mgmt IPs, this would again decrease complexity and reduce the topology file size.
Another really nice thing about this compared to CML or EVE-NG is the error messages, whenever I came across issues the stdout error messages where really clean telling me in plain english what the problem was and the available options I could use.
Going forward am going to have to extend networks out of the clab server to be able to combine clab nodes with physical devices and labs run on EVE-NG or CML. This is done using a Linux bridge or Openvswitch (Ovs) bridge, the bridge needs to be manually created (clab wont do this) and then be referenced inside the topology file in the same manner as you would do with any other node (kind of bridge or ovs-bridge).
netlab
Wow, it is almost like Alexa has been listening and gone and built netlab off the back of everything I have been rabbiting on about. netlab is a Python package that relies on other orchestration tools to provide an abstraction from the high-level design and low-level functionality:
- Build topology and devices
- VMs: Vagrant » libvirt » KVM
- Containers: containerlab » Docker
- Configure devices
- Ansible
Netlab is designed to deploy labs from a very minimalistic high-level yaml topology file abstracting the specific implementation details:
- Parameters and attributes are set globally and overridden on per-node basis to keep the topology file to a minimum
- Interfaces are automatically assigned meaning that you just need to declare to whom nodes connect
- Network and interface IP addresses are automatically assigned from differing address pools based on the link type (PtP, Lan, management, loopback). This can be extended to define custom pools with differing prefix lengths
- Supports a mix of vagrant and containerlab nodes in the same lab (these are called providers)
- Extendable beyond just the initial configs using modules to define other node features such as VLANs, LAG, prefix lists, routing protocols, etc
The documentation is extensive with a ton of tutorials, although as you dig deeper into all the different features and modules you can feel a little lost at times. The installation process is pretty straightforward, afterwards I just imported my clab containers and followed the guides to build vagrant boxes for the ASAv and CSR.
Some useful commands that can help with getting attributes and formatting for the topology file:
netlab show defaults: All default attributesnetlab show defaults providers: All provider default attributesnetlab show defaults providers.clabnetlab show defaults providers.libvirt
netlab show defaults addressing: To see the default addressing pools from which networks are assigned to the different link typesnetlab show defaults addressing.mgmt: Just the mgmt address range attributes
netlab show attributes node: See all the possible node attributes that can be setnetlab show defaults devices: See default attributes for all device typesnetlab show defaults devices.iolSee the default attributes for a specific device type
netlab show defaults vlan: Show the VLAN module default settingsnetlab show attributes --module vlan: Show all the possible VLAN module attributes
Topology file
The YAML topology files can use the standard dictionary format, the more minimal dotted decimal format, or a mix of the both.
-
defaults/addressing: Global settings which are either lab specific or provider specific. The address ranges and prefixes can be changed for any of the default address pools (mgmt, p2p, lan, loopback, vrf_loopback, router_id) or you can define a custom range. Port-forwarding is done globally on a per-service basis, define the service and seed port and each node is auto-assigned a port based on seed and node_id.
name: # Optional lab name, it uses the directory name if undefined provider: # Provider used for all nodes (default is libvirt), can be overridden on a per-node basis tools.graphite: # Creates an interactive topology similar to clab defaults: providers.clab.forwarded.ssh: # clab ssh port-forwarding, maps this value + node_id to 22 on each host (verify with 'docker container ls') providers.libvirt.forwarded.ssh: # vagrant ssh port-forwarding, maps this value + node_id to 22 on each host (verify with 'netlab report mgmt') device: # Default node device type for the whole lab, can override on per-node basis devices.eos.clab.image: # clab default image (OS version) for that device type ('netlab show images') devices.eos.libvirt.image: # vagrant default image for that device type ('netlab show images') addressing: mgmt.ipv4: # The mgmt range, default is 192.168.121.0/24 mgmt.start: # The offset of the first VM mgmt addr (default 100), offset + node_id = mgmt ip MY_CUSTOM_POOL: ipv4: # Address range of a custom pool that networks will be assigned from prefix: # Prefix used for networks assigned from this range -
nodes: If no node attributes are being changed (they all use “defaults.device”) they can be defined as a list of string objects, otherwise it has to be a dictionary with the key being the node_name and the optional value defining nodes attributes. By default all nodes are automatically assigned a loopback interface (if supported) and node IP addresses assigned based on the node ID.
NODE_NAME: id: # Statically set node identifier for this specific node provider: # Override the globally set provider for this specific node device: # Overrides "defaults.device" to set device type for this specific node image: # The vagrant box or docker container used, can see default images with 'netlab show images' mgmt.ipv4: # Override the default mgmt IP that would be auto assigned from mgmt range using node id loopback.pool: # Override the pool that the loopback IP is automatically assigned from loopback.ipv4: # Override the automatic default loopback IP allocation with a static IP address -
vlans: VLANs are defined at global (recommended) or node level and assigned at global (access only), link or interface level. If no VLAN ID is set the ID is auto generated starting at 1000 (change with
defaults.vlan.start_vlan_id). The default VLAN mode is irb (SVI/bridge groups with BVI interface) with a /24 address coming from the lan pool, the other options are bridge (VLAN/Linux bridge, no L3) or route (routed subinterfaces under VLAN trunk interface). It is recommended to define VLANs globally.- Globally defined VLANs will not be configured on a switch if not also associated to the switch at link or interface level
- Node-level VLANs will be configured on that switch regardless of whether they are associated to the switch at link or interface level
- VLANs listed within a vlan.trunk attribute must be defined as global VLANs
groups: GROUP_NAME: members: # List of nodes that are group members module: # Have to enable the VLAN module for these switches vlan.mode: # To change the VLAN mode for this group of switches, by default is bridge device: # Set the device_type for this group of switches vlans: VLAN_NAME: id: # VLAN ID, if not defined is auto generated using 'defaults.vlan.start_vlan_id` (1000) mode: # To override the default mode for this VLAN, by default is 'irb' and creates an SVI with an IP from lan pool pool: # To change the pool (and that pools mask) from which addresses are assigned from (default is lan) links: # List of switches to add access ports/links (switchport access vlan x), a simple way to do host ports -
links: A list of links with the interconnecting nodes defined under the same loop object. In a similar manner to nodes, if no attributes need to be set it can be defined as a simple string. To define attributes for the link or any of its associated node interfaces it must be a dictionary. Interfaces, networks (from address pools based on the link type) and IP addresses are all automatically assigned to links.
links:
  - r1 # Stub link with a single node attached, assigned next /24 from lan pool (network + node_id = interface IP)
  - r1-r2 # PtP link between 2 devices, assigned next /30 from p2p pool (alphabetically, node_a = .odd, node_b = .even)
  - r1-r2-r3 # Multi-access, assigned next /24 from lan pool (if L2 change pool to l2only and use VLAN module)
  - r1:
      ipv4: # Manually assign an IP address to this specific node interface
    r2:
    type: # To change the default interface type (lan, p2p, stub, loopback, lag, tunnel)
    pool: # Assign network address for this link from a specific address pool (also uses prefix of that pool)
  - SW1:
    SW2:
    vlan.trunk: # Trunk link with a list of VLAN names to allow over trunk link, can also set set VLAN attributes
The full netlab_topo.yml topology file that will be deployed.
|
|
You can further streamline the topology files by setting the system defaults in alternate locations (in order of preference):
- Runtime CLI argumnets: Override the virtualization provider (–provider), device_type (–device) and lab parameters (–set)
- Lab topology: Topology file referenced at runtime
- Environment variables: Are all prefixed with
netlab_orNETLAB_, so for exampleexport NETLAB_DEVICE=eos - User defaults: Applies to all labs, unlike global doesn’t need ‘defaults.' top-level prefix. Can be set in:
- topology-defaults.yml file in the lab directory
- .netlab.yml file in the user home directory
- System-wide /etc/defaults/netlab.yml file
- Global defaults: The netlab package topology-defaults.yml file under the defaults top-level attribute
Deployment
Before deploying the lab is good idea to first do a dry-run to pick up errors and check the configuration files without having to wait for the nodes to be built. This is a 2-part process where you first ‘build lab topology files’ such Ansible files, netlab snapshot and the clab.yml topology or Vagrantfile. The second command ‘builds the device config snippets’ which are saved in per-device /config folder and split up into separate files for initial and module configs. Can use the flags -i, -m and -c to only generate the initial, module or custom config snippets.
$ netlab create mylab.yml                 # Build lab topology files (Ansible files, netlab snapshot, clab.yml or Vagrantfile)
$ netlab initial -o                       # Builds the device config snippets and save in /config
Deploying the lab is slower than native containerlab as once the devices are up netlab uses Ansible to deploy the initial config. Vagrant boxes take longer than containers with the time taken dependant on the device type. The vagrant-libvirt plugin tries to start all VMs in parallel, to reduce CPU strain can instead deploy in batches using providers.libvirt.batch_size. By default all config will be applied (initial, module and custom), can use --no-config to start the lab without configuring the lab devices (doesn’t run Ansible).
$ netlab up netlab_topo.yml
netlab status will show a table of all the lab devices, can add -l to show a log of all the commands run by netlab when building the lab.
$ netlab status
Lab default in /home/ste/labs/blog_lab1
  status: started
  provider(s): libvirt,clab
┏━━━━━━━━━━━━┳━━━━━━━━┳━━━━━━━━━━━━━━━━━━━━━━━━━━━━━━━━━┳━━━━━━━━━━━━━━━━━┳━━━━━━━━━━━━━┳━━━━━━━━━━┳━━━━━━━━━━━━━━━━━━━━━━┳━━━━━━━━━━━━┓
┃ node       ┃ device ┃ image                           ┃ mgmt IPv4       ┃ connection  ┃ provider ┃ VM/container         ┃ status     ┃
┡━━━━━━━━━━━━╇━━━━━━━━╇━━━━━━━━━━━━━━━━━━━━━━━━━━━━━━━━━╇━━━━━━━━━━━━━━━━━╇━━━━━━━━━━━━━╇━━━━━━━━━━╇━━━━━━━━━━━━━━━━━━━━━━╇━━━━━━━━━━━━┩
│ ISP        │ csr    │ cisco/csr1000v                  │ 192.168.255.101 │ network_cli │ libvirt  │ netlab_topo_ISP      │ running    │
├────────────┼────────┼─────────────────────────────────┼─────────────────┼─────────────┼──────────┼──────────────────────┼────────────┤
│ R1         │ iol    │ vrnetlab/cisco_iol:17.12.01     │ 192.168.255.102 │ network_cli │ clab     │ R1                   │ Up 4 hours │
├────────────┼────────┼─────────────────────────────────┼─────────────────┼─────────────┼──────────┼──────────────────────┼────────────┤
│ R2         │ iol    │ vrnetlab/cisco_iol:17.12.01     │ 192.168.255.103 │ network_cli │ clab     │ R2                   │ Up 4 hours │
├────────────┼────────┼─────────────────────────────────┼─────────────────┼─────────────┼──────────┼──────────────────────┼────────────┤
│ XNET-ASA   │ asav   │ cisco/asav                      │ 192.168.255.104 │ network_cli │ libvirt  │ netlab_topo_XNET-ASA │ running    │
├────────────┼────────┼─────────────────────────────────┼─────────────────┼─────────────┼──────────┼──────────────────────┼────────────┤
│ CORE_SWI   │ ioll2  │ vrnetlab/cisco_iol:L2-17.12.01  │ 192.168.255.105 │ network_cli │ clab     │ CORE_SWI             │ Up 4 hours │
├────────────┼────────┼─────────────────────────────────┼─────────────────┼─────────────┼──────────┼──────────────────────┼────────────┤
│ ACCESS_SWI │ ioll2  │ vrnetlab/cisco_iol:L2-17.12.01  │ 192.168.255.106 │ network_cli │ clab     │ ACCESS_SWI           │ Up 4 hours │
├────────────┼────────┼─────────────────────────────────┼─────────────────┼─────────────┼──────────┼──────────────────────┼────────────┤
│ SVR01      │ linux  │ ghcr.io/hellt/network-multitool │ 192.168.255.107 │ docker      │ clab     │ SVR01                │ Up 4 hours │
├────────────┼────────┼─────────────────────────────────┼─────────────────┼─────────────┼──────────┼──────────────────────┼────────────┤
│ WS01       │ linux  │ python:3.13-alpine              │ 192.168.255.108 │ docker      │ clab     │ WS01                 │ Up 4 hours │
└────────────┴────────┴─────────────────────────────────┴─────────────────┴─────────────┴──────────┴──────────────────────┴────────────┘
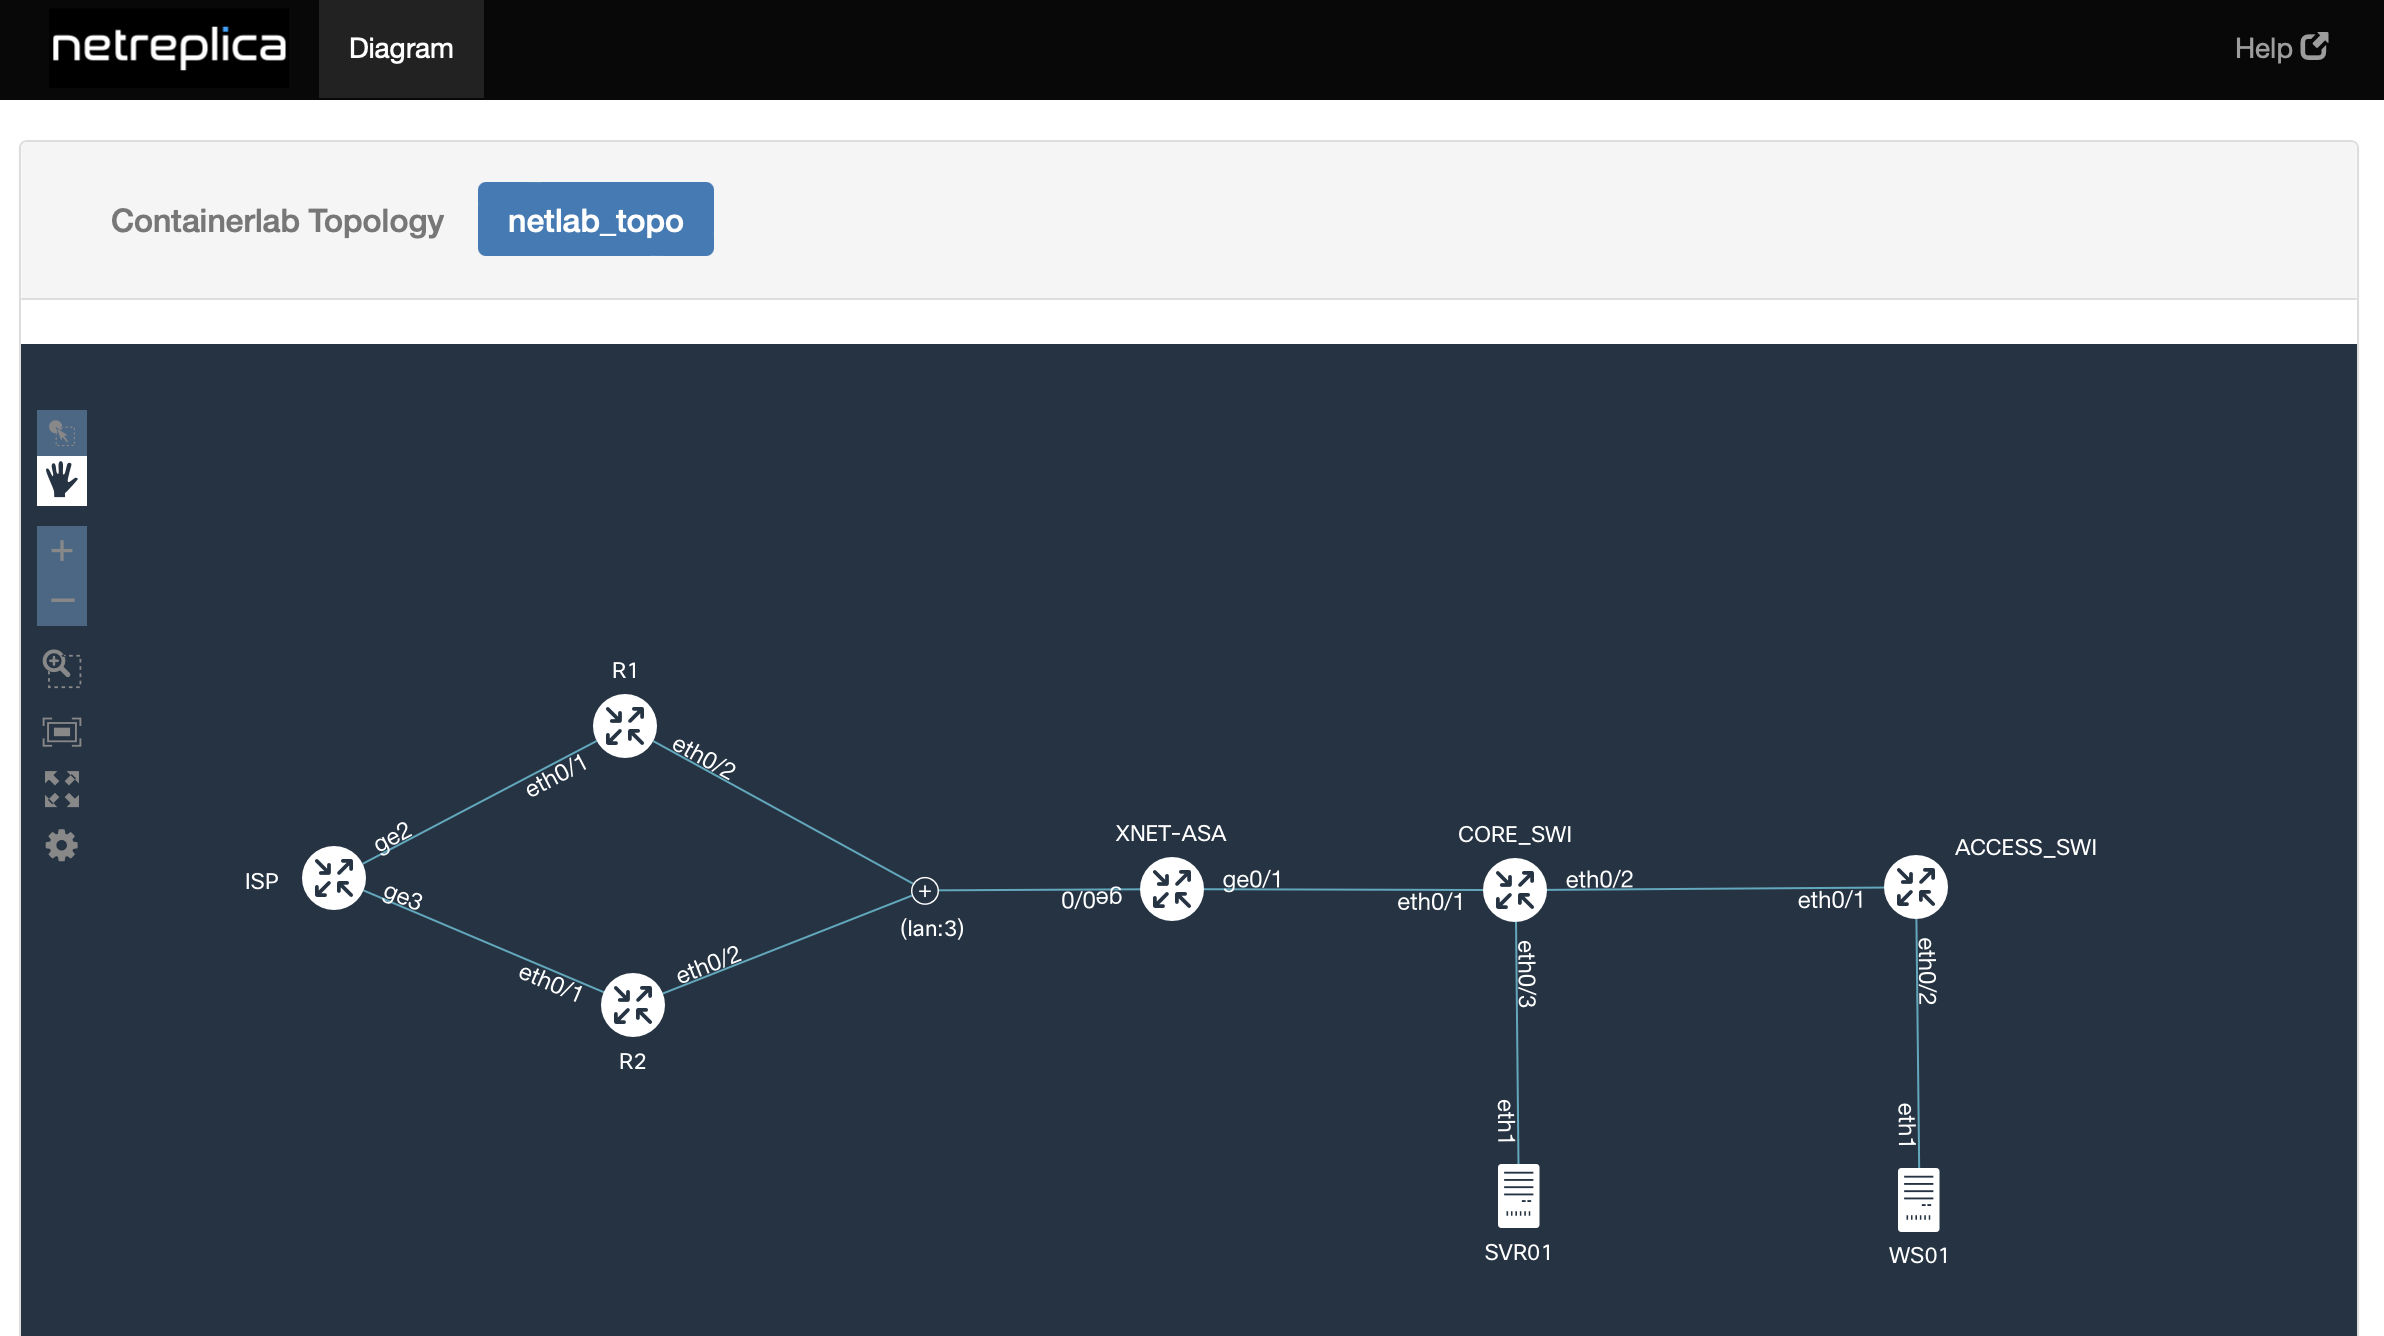
By adding the graphite external tool (Web UI/graphing tool used with containerlab) to the topology file netlab up also creates an interactive topology map that can be accessed using http://netlab_host_ip:8080/graphite/ (deploys a graphite container with port-forwarding).
Can connect locally to any of the nodes using netlab connect (don’t need to accept SSH key or enter credentials) or via SSH to the mgmt address (use netlab report mgmt to get the node default credentials).
$ netlab connect iol1
To connect remotely can either use port-forwarding (defaults.providers.clab/libvirt.forwarded.ssh: xxx) or add an extra NIC on the netlab host (disable DHCP for this network in fusion) put it into the management Linux bridge.
$ sudo ip link set ens34 master libvirt-mgmt                  # Add ens34 to the bridge if lab is libvirt or multi-provider
$ sudo ip link set ens34 master br-8c6a5186dfd1               # Add ens34 to the bridge if lab is clab only
$ brctl show                                                  # See all the bridges and member interfaces
Netlab can also create tabled reports that can be saved as text files, markdown or html pages. A few useful ones for this topology:
netlab report mgmt.html mgmt_report.html: mgmt_report.html shows mgmt interfaces, addresses, default creds and port-forwardingnetlab report wiring.html wiring_report.html: wiring_report.html show lab wiring topology, so PtP and Lan linksnetlab report addressing.html address_report.html: address_report.html shows node interface and link interface addresses
Once finished can just lab shutdown the nodes or use --cleanup to delete all the files and folders that where created in the working directory.
$ netlab down
$ netlab down --cleanup
Summary
I was impressed with containerlab, but netlab takes to the next new level. Everything I set out to do originally when I started these blog posts is done by netlab, it is just such a well throughout project. With its extensive use of global parameters it is designed in a way that labs can be deployed from the most minimalistic topology file, yet the hierarchical structure allows for it to be more complex and niche if you wish. A perfect example is port-forwaridng, whereas with clab you configured it on a per-node basis (so more lines in topo file), netlab takes the premise that you don’t really care what port number is used so just requires a global base port and takes care of the actual port assignment under the hood.
I cant see any reason why if you are using containerlab you wouldn’t use netlab, it takes all the good things from containerlab and adds to it. As the initial and module configuration is deployed via Ansible you are using tried and tested abstracted configuration modules rather than having to write your own per-device type templates (like I did with my lab builder). Much like with containerlab the majority of the error messages you come across are written in plain english making troubleshooting easy.
In theory due to the modular design it could be extended to all sorts of different device types, but in reality there are a lot of technologies that you wont be able to lab in netlab (ISE, F5s, Palos, windows, etc). One of the great things with CML and EVE-NG is how easy it is to extend (breakout) a network out of the lab, netlab is on par with this as it uses linux bridges which can be extended in same manner as the mgmt network (add vNIC into linux bridge). I haven’t properly tested this yet but in theory you should be able to connect up netlab labs to EVE-NG or CML labs fairly easily.
If all this wasn’t enough there a multitude of other modules to deploy different features (BGP, OSPF, LAG, VRF, etc) in a similar manner as well as VRF, VLAN, node and link groupings to further minimise the topology file (group objects that share the same attributes). The table below shows how the deployment topology file differs in size for the different lab deployment methods I have been playing with.
| Lab provider | Topology file size (number of lines) |
|---|---|
| EVE-NG topology import (Topology Builder) | 207 |
| CML topology import (cmlutils) | 548 |
| EVE-NG/CML custom tool (evengsdk and virl2-client) | 83 |
| containerlab | 79 (8 less if use DHCP for mgmt IPs) |
| netlab | 64 |
Netlab configuration modules
Besides applying the initial configration netlab can also be used to apply custom config snippets (using jinja templates) as well a whole host of feature configuration modules (netlab show modules):
- Routing protocols: OSPF, IS-IS, EIGRP, BGP, RIPv2/ng
- Additional control-plane protocols or BGP address families: BFD, EVPN, MPLS/VPN, FHRP
- Layer-2 control plane: STP, LAG
- Data plane: VLAN, VRF, VXLAN, MPLS, SR-MPLS, SRv6
- Network services: DHCP, DHCPv6
- IPv6 support: IPv6 addresses, OSPFv3, IS-IS MT, EIGRP IPv6 AF, BGP IPv6 AF, SR-MPLS
As you would imagine the more things that you implement the more complicated it gets. For example BGP has a multitude of options and nerd knobs, it is impossible to allow for all of them and to not end up with a level of complexity in the topology file. On top of that you have prefix manipulation (routing policies) which has its own generic routing module and BGP routing policies plugin. The topology file tries to follow the same minimalistic approach, but when working with lots of different modules it is a lot to take in so the learning curve becomes quite steep.
Going forward I am not sure whether it would be best to work on isolated labs for differing feature config modules rather than mixing and matching them. For example, you could keep an OSPF and BGP lab topology quite concise if they are separate labs as a lot of the settings can be done globally and you could make better use of node and link groups.
Topology
Like an idiot I went all in and tried adding a whole host of different configuration modules (vlan, vrf, bgp, ospf, routing, bgp.policy plugin) and custom templates (for things without a config module) to my existing topology. This is what I was trying to achieve:
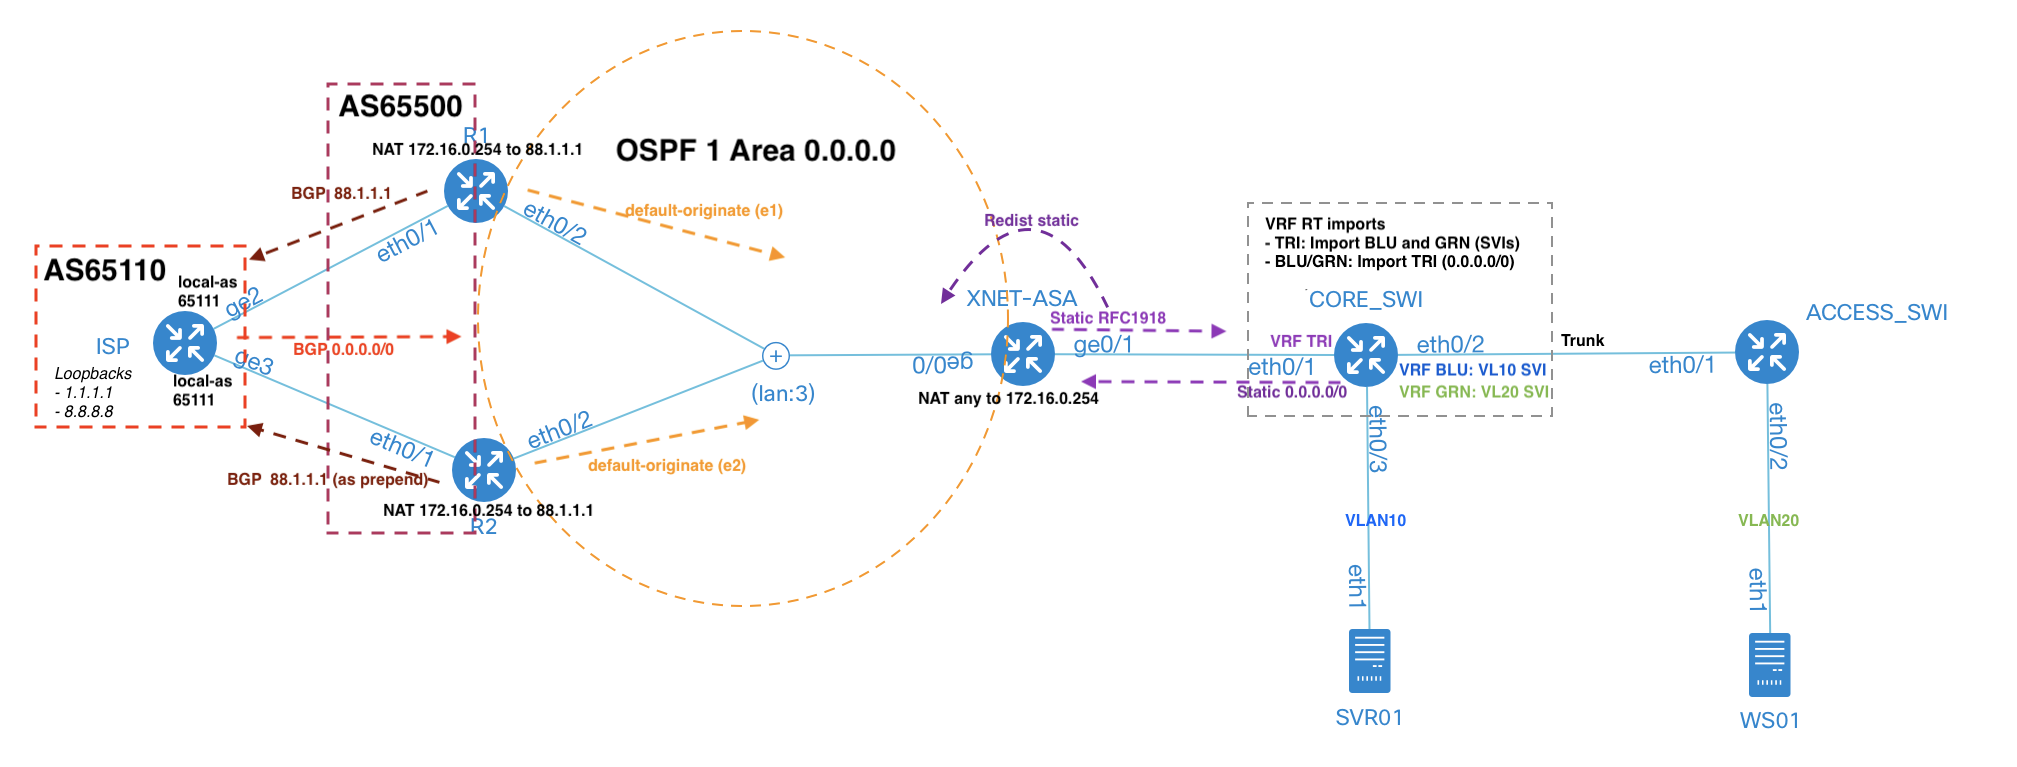
It took me a while to get this all up and running, you have to accept you can’t have control of everything (loopback addresses, RDs, BGP RIDs) if you want to keep the topology file to a minimum. A few notes about the features used:
- VLANs and VRFs are similar in that they are defined globally or per-node and then assigned on a link or interface basis
- OSPF and BGP automatically form peerings with all devices that have the module enabled, it uses the concept of ‘external’ and ‘internal’ interfaces to decide when both EGP and IGP protocol are on the same device
- Disabling of a routing protocol is done at link or interface level
- A lot of the time netlab tries to give the option to define settings globally to limit repetition (it does the heavy lifting in background). The majority of settings can be set at node or interface/link level
For any features not covered by the modules you can apply custom config snippets using your own jinja templates. The .j2 template file is created in the lab directory and then referenced (no need for .j2 extension) under a node with config [ template_name ]. You can use existing host_vars (host_vars/NODE_NAME/topology.yml) and existing or custom group_vars (set with vars under a group) in the template. It would be nice if you could also create custom host_vars, but I don’t think it is possible.
The below template and group_vars are an example of how to deploy OSPF and NAT on an ASA.
groups
  asa:
    members: [ XNET-ASA ]
    vars:
      ospf:
        router_id: 3.3.3.3
        process: 1
        area: 0.0.0.0
router ospf {{ ospf.process }}
 router-id {{ ospf.router_id }}
 network {{ interfaces[0]["ipv4"] | ipaddr('address') }} {{ interfaces[0]["ipv4"] | ipaddr('netmask') }} area {{ ospf.area }}
 redistribute static subnets
I also needed custom templates for CSR NATs and BGP advertisement as you cant advertise a non-locally attached network in BGP without adding a null route (bgp.originate). Guess this is one of the handoffs you have to accept to keep it the topology file as minimal as it is, it is not really that hard to overcome with custom templates. This is the full netlab_topo.yml topology file that I deployed to achieve this, the templates can be found in github (asa_ospf.j2, coreswi_bgp.j2, edge_nat.j2).
|
|
On top of the reports discussed in the netlab section you can also generate reports for BGP and OSPF (doesn’t work for VRF OSPF processes).
netlab report bgp.html bgp_report.html: bgp_report.html shows BGP ASNs (and advertised prefixes) and neighborsnetlab report ospf-areas.html ospf-areas_report.html: ospf-areas_report.html shows OSPF areas, nodes and interfaces
I found some of the hierarchical elements didnt work as documented, I need to dig into code at somepoint to workout why (open bugs if needed):
- Node bgp.as value as the node RD value: Always uses vrf.as rather than bgp.as, even tried with the exact same topology from documentation
- Common node router ID used for OSPF and BGP: When specified netlab up fails with the error
nodes: Invalid node attribute 'router_id' found in nodes.r1
I have also had to stop using AS path prepend (hashed out plugin: [ bgp.policy ]) because if the plugin is enabled and there are clab linux containers (device: linux) netlab up fails with the following message:
┌──────────────────────────────────────────────────────────────────────────────────┐
│ STARTING clab nodes                                                              │
└──────────────────────────────────────────────────────────────────────────────────┘
Traceback (most recent call last):
  File "/usr/local/bin/netlab", line 14, in <module>
    netsim.cli.lab_commands(__file__)
  File "/usr/local/lib/python3.12/dist-packages/netsim/cli/__init__.py", line 356, in lab_commands
    mod.run(sys.argv[arg_start:])   # type: ignore
    ^^^^^^^^^^^^^^^^^^^^^^^^^^^^^
  File "/usr/local/lib/python3.12/dist-packages/netsim/cli/up.py", line 368, in run
    run_up(cli_args)
  File "/usr/local/lib/python3.12/dist-packages/netsim/cli/up.py", line 331, in run_up
    start_provider_lab(topology,p_provider)
  File "/usr/local/lib/python3.12/dist-packages/netsim/cli/up.py", line 198, in start_provider_lab
    p_module.call('pre_start_lab',p_topology)
  File "/usr/local/lib/python3.12/dist-packages/netsim/utils/callback.py", line 42, in call
    return method(*args, **kwargs)
          ^^^^^^^^^^^^^^^^^^^^^^^
  File "/usr/local/lib/python3.12/dist-packages/netsim/providers/clab.py", line 204, in pre_start_lab
    load_kmods(topology)
  File "/usr/local/lib/python3.12/dist-packages/netsim/providers/clab.py", line 149, in load_kmods
    for m in (['initial']+ndata.get('module',[])):          # Now iterate over all the netlab modules the node uses
              ~~~~~~~~~~~^~~~~~~~~~~~~~~~~~~~~~~
  File "box/box.py", line 317, in box.box.Box.__radd__
box.exceptions.BoxTypeError: Box can only merge two boxes or a box and a dictionary.
Summary
As you can see from the blog it is pretty impressive how netlab can deploy and configure all of the required features with a topology file of only 107 lines (with comments removed). Just like with the lab deployment, the modules are really well thoughtout in terms of keeping the file to a minimum. A perfect example of this is the BGP configuration, by moving it out of the nodes and adding nodes as list members it saves having to repeat the ASN under every node. It also makes sense to have the routing neighbours auto-form if the feature is enabled on a node, it is less likely you will not want a peer to form so these are the exceptions that you explicitly set (bgp: False under a link or interface).
With all that said I did struggle at times as I seemed to be endlessly going round in circles looking through documentation to find the syntax needed. There is some similarities in how modules are configured, but the more features and options there are the steeper the learning curve becomes. I have had this same problem with projects of my own, I use them that much that at the time they seems simple and well documented. It is only when I revisit months or years later I realise I am back to square one trying to figure out how it all works (or maybe is just as I get older the grey matter is not what it once was). This all makes me wonder whether when you get to a certain level of complexity you would be better off using an orchestration tool as those are skills you would require in real world environments rather than lab building.
Will I use netlab going forward? To build labs definitely 100%, to do the configurations, probably only a general base config or to quickly tryout different protocols. If building a more complex lab I think my time would better off spent learning an orchestrion tool as then those features could be deployed for real in a none lab environment.